Logo

2004 Johnson 150 (Bombardier) Sat for likely 3 years

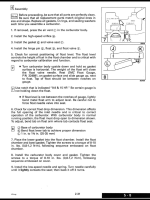
Bought the service manual (the seloc manual also has some info the service manual doesn’t) looks like it is a fuel screw so unscrewing richens the mixture and screwing in leans it out.

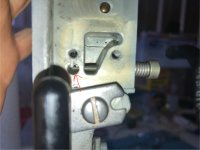
I’m rebuilding the carbs currently and the manual gives a spec for the carb I’m unfamiliar with. It says carb float drop should be between 17mm-23mm. I get that it’s measuring with the carb right side up and the float drooping but what are the reference points? Do you measure with the bowl gasket on and from that surface to the point in the picture below?

IMG_1057.jpeg

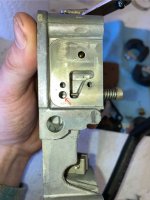
I’m pretty sure you measure from the bowl gasket surface but do you measure with or without the actual gasket installed? Like in this next photo below. The gasket is about 1.5mm thick. Also is that the right point on the float to measure to?

IMG_1062.jpeg

Not sure if it really matters all that much as the float needle wants to bind in its seat before the float is at full droop so maybe it’s not really that necessary. I have to pull the float down to get the float to actually show its full droop. Maybe with some oil lubricating the surfaces though it wouldn’t bind as everything is dry as a bone right now.
 
Don’t get wound up or the thickness of the gasket…remember, the spec you quoted from the manual states- 17-23mm. There is enough in that spec to account for three gaskets.
 
Don’t get wound up or the thickness of the gasket…remember, the spec you quoted from the manual states- 17-23mm. There is enough in that spec to account for three gaskets.
I am mistaken it is 17mm-28mm I had it remembered wrong so even more to prove your point haha. I just want to make sure the points I am measuring are correct. That outer top ledge of the float seems to be the most logical but I could be wrong.
 
This is from the service manual of a small 2 cylinders motor. You shouldn’t have to “pull” on the float, even dry it should rotate freely with only its own weight. Perhaps polish the pin a wee bit if it’s cruddy
 

Attachments

  • IMG_0193.png
    IMG_0193.png
    531 KB · Views: 5
This is from the service manual of a small 2 cylinders motor. You shouldn’t have to “pull” on the float, even dry it should rotate freely with only its own weight. Perhaps polish the pin a wee bit if it’s cruddy
Ahh I think I’ve figured out why now. So I am using a full rebuild kit from Johnson meaning new needle, seat, bowl, etc. so that’s not the issue.

If I measure that distance from the gasket surface to the BOTTOM of the float’s outer edge (like your diagram suggests) it’s definitely beyond spec. So if I reduce the travel and bring it back into spec likely the float will bottom out it’s droop before the needle has a chance to bind.

The only thing is I’m going off this guy on YouTube who says to measure to the top of the floats outer edge (furthest outer edge he says) not the bottom. Here is a link (he talks about it at 9:35):

 
There Edelbrock carburetors on a Johnson outboard.
Haha sorry for being off base, my assumption was it was kind of a universal rule but with the variance in carburetor design that wouldn’t make sense.

Weird that my service manual does not specify which rule to follow though. No pictures either, just given the spec.
 
In all the years that I have worked on outboards I have not worried about or measured float drop.----Find the real issue with your motor.
 
Float drop is a way to keep the float off the bowl during storage. Otherwise the float might get stuck to the bowl if there is fuel left in the bowl during periods of non use. Like racer said it does not affect operation.
 
In all the years that I have worked on outboards I have not worried about or measured float drop.----Find the real issue with your motor.
Since I've decided to rebuild them all because of that one stuck float valve, I want to make sure I do it right. I know I'm being pedantic I do appreciate all of the insight.
 
Measuring the old floats they have a drop of about 32-33mm if measured to the bottom of the float and without a gasket like in the service manual screenshot from @Edchris177. I might try to bring the new floats closer to that top end 28mm spec.
 
Wanted to confirm something with you guys. Finally got around to getting ready to assemble everything. I had the throttle bodies off to finish replacing some gaskets and noticed the idle mixture adjustment needle valves were not bottoming out in their respective holes the same amount. Took them out and found it looks like they have corrosion on the tips limiting the amount they can seat within their respective holes.

I want to be sure I’m on the right track; all 6 should seat the exact same amount in their tapered holes right? Problem is with a factory setting of 4 turns from fully seated, well if they seat at a different amount of turns that spec is null and void.

The issue is they are around $80 a piece and after all the money we’ve spent already it seems silly having to spend basically $500 more just for these valves. Is there a way to polish them without removing extra material? Maybe use an ultrasonic cleaner?

The photos I attach shows two different valves and both are bottomed out as far as they can be turned in. You’ll see that one is nowhere near as seated versus the other.
 

Attachments

  • IMG_1513.jpeg
    IMG_1513.jpeg
    612.9 KB · Views: 8
  • IMG_1519.jpeg
    IMG_1519.jpeg
    731.3 KB · Views: 8
They are a metering jet and the 4 turns is a starting point not a factory setting. You have to adjust these under a load as each cylinder will react differently. My 225 is adjusted from 4 to 6 turns out depending on cylinder as the lower are leaner ones.
 
They are a metering jet and the 4 turns is a starting point not a factory setting. You have to adjust these under a load as each cylinder will react differently. My 225 is adjusted from 4 to 6 turns out depending on cylinder as the lower are leaner ones.
Right I know what they are for. The problem is they are seating in their respective holes at different depths. For example if I screw all of them until they bottom out, some of the bolts will be protruding out more than others from the face of the throttle body if you follow. I'm looking into getting them ultrasonic cleaned since I'm not sure I trust myself to sand the corrosion off without removing extra material.

Has anybody used emory cloth or sandpaper to clean them?
 
Seating wont make a difference as you are going to adjust them anyway. One screw might be at 3 turns and another at 5. To clean em just chuck em up in a drill and polish with 0000 steel wool and WD40. Use this a lot on my C&R pew pew's
 
Turns out the needles are fine. The lower two seated into a thicker wall that made it look as if they didn’t go in as far. I did some measurements and they are equivalent.

The top starboard needle unfortunately does seat further than the others likely from somebody seating it too hard. It goes in a good 2 full turns further than the rest.

Regardless I’m getting everything back together and the FSM states a 5-6 Nm torque for the mounting bolts of the carbs/throttlebody.

I’ll attach a photo but the two lower bolts for each carb go through the carbs body and into the throttle body only, not through it. I noticed after torquing everything it looks like the body is bending. I’m wondering if that is normal or if I should lighten the pressure on the lower two bolts for each carb. Top two bolts for each carb go through the carb body and throttle body and into the manifold. They also are torqued to 5-6 Nm, no problem there.

In actuality those lower two bolts are just securing the carb to the throttle body and helping seal that preformed o-ring. 5 Nm felt a little much for my taste but that’s what the manual said.
 

Attachments

  • IMG_1615.jpeg
    IMG_1615.jpeg
    576.8 KB · Views: 8
I torque all my customers 60° and 90° plastic motor carbs to 25 inch LBS and never had a problem and they dont bow up
 
I torque all my customers 60° and 90° plastic motor carbs to 25 inch LBS and never had a problem and they dont bow up
And it’s the same style carb mounting system like in my photo where of the 4 carb mounting bolts, the top two secure the carb and throttle body to the motor whereas the bottom two just secure the carb to the throttle body?
 
Remmeber,you’re only sealing against atmospheric pressure, it doesn’t take much to make those O rings seal. I’ve got 2 motors on the bench where previous owners thought more was better, & cracked the plastic top plate. $$
Torque specs on little screws can make for serious pain. If the screws/holes have dirt, corrosion, the threads are a bit buggered, or people grease the threads, a torque spec may be meaningless.
6Nm is about double what you need, if the bolts/threads are reasonably clean.
 
I'll split the difference. Since you've done 25 in-lbs (3 Nm) and the FSM says 5-6 Nm, I'll try 4 Nm and see if there is less bending in the carb body.

Maybe if anybody has access to their late 90s early 2000s V4/V6 Johnson motors, next time you have a chance could you take a side profile photo of the carbs and see if they are bending like in the photo above?
 
Remmeber,you’re only sealing against atmospheric pressure, it doesn’t take much to make those O rings seal. I’ve got 2 motors on the bench where previous owners thought more was better, & cracked the plastic top plate. $$
Torque specs on little screws can make for serious pain. If the screws/holes have dirt, corrosion, the threads are a bit buggered, or people grease the threads, a torque spec may be meaningless.
6Nm is about double what you need, if the bolts/threads are reasonably clean.

You are absolutely right, I should have paid more attention. I purposely didn't lube the screws for that reason but no telling if oil got into the screw holes. Do you recommend completely backing out the screws on a carb and retorquing from no torque or just slightly backing them down until their are good?
 
It’s a fools game to get hung up on a couple in/lbs, either way. Frankly, I’ve never used a torque wrench on small screws. Do it by feel.
Undo them, see if the bend disappears. Re-do them by feel, using a tiny bit of Blue Loctite, they won’t come out.
 
Finished dropping down the torque to about 4 Nm or just under. Worked on one carb at a time so that I did not disturb the mating of the throttlebody to the manifold.

Felt much better at that torque, and while I didn’t notice the bending of the carb get any better really, it’s nice knowing nothing will crack. They might have a slight bend in them without any torque.
 
Back in November we got a new 5 gallon tank and I filled it up with 89 Ethanol free gas; filled to the top and mixed with XD-30 oil. It was left out in the rain for a day or two but was then put in a shed and since then has remained there. Since it is the new style tank with no vent to atmosphere (the inflating type), water could not have gotten in correct? Also since it was filled to the top, there wasn't much air left inside the tank to create condensation and mix with the gas I would think.
 
Just want to double check before I start it soon; I’ve been putting the boat in gear and spinning the prop by hand to move the pistons manually with fogging oil. There’s no way that could alter timing etc because that’s controlled by the optical sensor right?

We do not have a lanyard system hooked up so I can’t ground the system by pulling that unfortunately and blipping the starter.
 
Back
Top