Logo

2004 Johnson 150 (Bombardier) Sat for likely 3 years

cham

Contributing Member
It’s my father’s boat and while I’ve been in Uni it’s been neglected for 2 maybe 3 years. Ran great when we last used it but a few things come to mind. It has the famous VRO/OMS system and we were worried about it back even when we used to use it. Any way to tell its working and not over-oiling the system or worse; not injecting any oil? Not sure I want to bank on the alarm system working.

We never used fuel stabilizer so my goal is to flush out as much of the old fuel as I can. Open the carb drain bolts and pump new fuel in from an external tank. I think I might premix the fuel as well just to make sure it’s getting oil; OMS is 19 years old at this point. Also planning on running it first on the external tank. Going to have to clean the boat’s internal tank once we confirm the engine is fine.

Should I be worrying about clogged carb jets? The high flow jet is accessible behind the drain bolt but I will have to disassemble the carbs to look at anything else. My father has an aversion against rebuilding anything carb related because for now he thinks it’s too much of a can of worms. Should I possibly add seafoam to the fuel as well to help clean out the jets?

I’ve already removed the spark plugs and fogged the cylinders and I’m letting it sit for 24 hrs; going to rotate the crank and spray some more (what’s the best way to rotate engine manually?). I plan to crank it without the spark plugs to eject any excess fogging oil; is there a worry of the spark plug holes drawing any foreign matter when manually cranking?

Should I change the fuel filter before I start it up or after? Obviously I’ll at least empty it of any old fuel.

Lastly I’d like to flush the cooling system out; can I removing the thermostats and bolt the housing backup just so I know water is flowing everywhere (with the engine off)? Worried about replacing the old thermostats before startup only to clog the new ones once things get dislodged in there.
 
I've attached a link to a diagram of your carburetor. It looks like both idle and main jets can be removed without taking the carbs off. I'd at least spray some carb cleaner through the jets before trying to crank the motor. There are videos on how to check the oil injection system. Add oil to fuel for test start and worry about that later. I've never had an oil injection system go bad, but I'm a Yamaha guy. With plugs out, you should have no problem at all turning the flywheel by hand. Yes, removing the thermostats and putting the covers back on is a good way to flush without starting the motor. If you plan on replacing the water pump inpeller, while the lower unit is off, you can connect a garden hose to the pickup tube that goes into the water pump housing and flush it that way. I would go to home depot and get a few different adapters and different sizes of tubing and hose clamps so you'll have the right size for your pick up tube. When you drain the fuel filter, I'd pay attention to what's in it to determine if I'd replace it or not. You're probably good just emptying it out and rince it off with good gas. If you can get to the drain plugs for the carbs, I'd remove then to drain the gas and then pump some gas into them with the drain plugs out to flush the bowls out a little. I can't think of anything else. Once you get it craned and running, I'd replace the water pump impeller, the lower unit oil and spark plugs. Obviously, if you have an excessive amount of smoke, it's probably an indication that your oil injection system is working and you are "double-oiling" the motor by using pre-mix fuel.
Good luck and let us know how it goes!

 
Not easy to turn the flywheel by hand on one of those motors.----Factory manual has procedure for checking the oil injection.----Also a test for " no oil " alarm.----Motor needs a new water pump impeller about every 5 years.
 
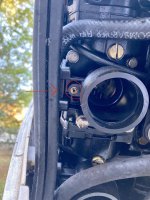
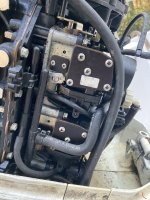
Thanks @Oldsaltydog for the insight that puts me a little at ease. Sounds like I at least was on the right track then. As far as the jets go; I might just spray some carb cleaner into the high flow “orifice” as the diagram aptly calls it without removing it and that will jet into the other fuel ways. I cannot seem to make out where the pilot/idle jet is and it sounds like you think it’s accessible from outside the carburetor. Which part # in the exploded diagram is it? I’ll attach a photo below of where I saw a video of someone spraying carb cleaner through; no idea what it is though.

As for the impeller I plan to rebuild the whole thing as we’ve not done it during our time of ownership but only once we confirm the engine is running. I’ll check for any fuel leaks while running as well since it sounds like these plastic carb bowls warp and leak. If they’re leaking that’ll be just enough to convince him it’s time to break them apart.

Your statement on double-oiling the system makes sense, I’ll keep my eyes open for it. As for converting the system in the future, in the mean time can I not just plug up the oil inlet hose going to the OMS/VRO and unplug the “No Oil” alarm wiring harness? I do see a full replacement conversion fuel pump for $200 when and if the OMS totally fails but until then this would be a free conversion.

@racerone is it possible I can put the gear lever up at the steering wheel in forward gear, and then spin the prop (with the spark plugs out)? I’ll check for the No Oil alarm test, I’ve scanned through the manual before but I’ll look a little closer this time. Cheers guys this is invaluable info!
 

Attachments

  • IMG_0445.jpeg
    IMG_0445.jpeg
    901.2 KB · Views: 10
Okay just figured it out. That circled brass part above is Item #10 “Orifice” which means jet I believe. That doesn’t make sense to me since it’s drawing in air? It also says “3 required per assembly”. Not sure if that’s for just one carb or for the 3 carb assembly for 1 bank.

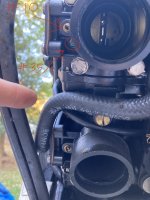
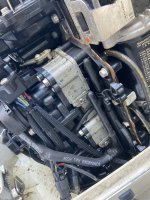
That Item #35 you referenced is shown in the picture below hidden a little bit behind Item #10. I’ll post some more photos that I already have of the carbs; let me know if you’d like better ones I can get later tonight.
 

Attachments

  • IMG_0444.jpeg
    IMG_0444.jpeg
    731.2 KB · Views: 4
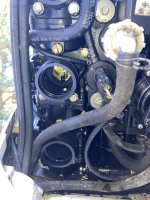
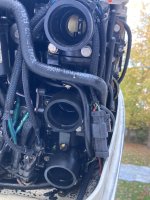
Here’s some extra carb photos.
 

Attachments

  • IMG_0442.jpeg
    IMG_0442.jpeg
    929.1 KB · Views: 4
  • IMG_0438.jpeg
    IMG_0438.jpeg
    754.9 KB · Views: 4
  • IMG_0440.jpeg
    IMG_0440.jpeg
    806.7 KB · Views: 4
  • IMG_0437.jpeg
    IMG_0437.jpeg
    866.1 KB · Views: 4
Okay sounds like its just one per carb than because its a V6. So item #10 is non-adjustable, it just has a slot for removal?
 
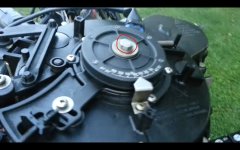
Haha sorry I was just trying to be thorough I assumed you did. Since its got the OIS system, am I able to crank the flywheel by that bolt under the first cover on the top of the engine? In the photo below that center bolt is what I'm talking about, I can't mess anything up timing wise if I crank clockwise right?
 

Attachments

  • IMG_0486.jpeg
    IMG_0486.jpeg
    268.8 KB · Views: 4
Starter works but I just wanted a more gentler approach in case the piston rings were frozen. Tried it last night with the boat in forward gear and worked a treat. The pistons were slightly stuck but just moving the prop ever so slightly back and forth freed them pretty easily.

Heard that it isn’t the best to put the boat in gear when the engine is off because the gears could potentially not mesh. Since the engine is free now, is there still a fear of shearing the bolt? I need to crank the engine over now to get all of the extra Seafoam Deep Creep out of the cylinders before starting.
 
Engine is free for sure now; can I do any harm by turning the engine over with the starter and the spark plugs removed? I’d like to maybe flush some of the excess fogging oil in the cylinders out through the spark plug holes; I might be over stressing things just don’t want any possibility of hydrolock.
 
Few updates,
Struggled with replacing the thermostats because of the caps being frozen but eventually got it done. Replaced all of the reservoir oil among some other things like the lower unit oil. Removed and cleaned the high flow jets of the carbs I could get to. We are going to start it with a portable 5 gallon tank with a 100:1 premix ratio on the off chance the OMS/VRO is not functioning properly.

We still have not started it yet but the problem is as far as I can tell there isn’t a tether. Is it okay to have the coils not connected to the spark plugs while you crank the engine a couple times? I want to shoot any excess fogging oil out through the spark plug holes, can’t be too safe because I don’t want to hydrolock anything.

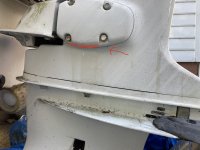
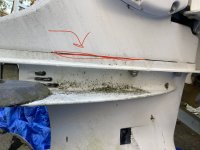
Secondly when using the flush attachment to get any crud out, we noticed water coming out between the lower unit and mid-section seam. It sounds like this might be normal but we also noticed water coming out of an upper plate. The red lines in the attached photos show where the water is leaking out of.
 

Attachments

  • IMG_0535.jpeg
    IMG_0535.jpeg
    587.8 KB · Views: 8
  • IMG_0532.jpeg
    IMG_0532.jpeg
    573.1 KB · Views: 8
Run with 50:1 in your first tank.-----Monitor oil consumption from oil tank.-----Or run test on automatic oiling system.
 
We decided today to fire it up without trying to remove the fogging oil; didn’t want to mess with grounding plugs and potential for spark to ignite fuel.. All I did was flush new fuel through the carb bowls, prime the VRO oiling system, and tightened some bolts on the vapor/water separator top gasket that was leaking fuel. Took a while but the she fired up with a huge billow of spoke from that fogging oil. Ran great but I did note some slight surging and backfiring. Maybe part of the surging was it warming up and then having the RPMs drop? Never died on us and we only ran it for about 5 minutes. I’m going to replace the water pump before we start it again just to make sure it’s getting enough cooling.

One thing to note, we’re using a portable 6 gallon fuel tank since the gas in the internal tank is bad. How tight should the primer bulb get? It kept getting almost completely tight and then after you’d leave it, it would lose its firmness if you can follow. Will it take a while with running the engine before all of the carb bowls fill and it gets tight? I couldn’t see any more fuel leaking anywhere when priming the system besides that top gasket on the vapor/fuel separator.
 
I had it wrong. I tightened the screws on the top cap of the fuel vapor separator that’s next to the primer solenoid. Not the vapor/water separator.
 
The bulb should get tight when you pump it up before you start it. Once the engine is running the bulb won't be as firm. If it loses firmness before you start the motor, it probably has a bad check valve in the bulb
 
Just bought the fuel tank today since we thought we might use it for a while before we get around to draining the internal tank. Any chance a brand new check valve could be defective?

How many pumps should it generally take to get it tight? And correct me if I’m wrong it should remain tight for even hours after I pump the bulb as long as I don’t start the motor right?
 
No there is no need for the manual pump ( bulb ) to stay hard !!-----It's only function is to fill the carburetors to save wear on the starter motor.----Or your shoulder and arms on a small motor with a recoil starter.----A much mis understood item it is !!
 
The QuickStart feature will make the motor seem to surge and backfire but when sensor reaches 98° it drops out causing engine to drop RPM and idle smoother.
 
The QuickStart feature will make the motor seem to surge and backfire but when sensor reaches 98° it drops out causing engine to drop RPM and idle smoother.
It seemed like it was doing just that after that 5 minutes of run time. Just in case, what would be the best way to clear the idle circuit jets since they are the tiniest? Low RPM slow speed in the water with Seafoam in the fuel?

Secondly I just realized that vapor separator unit/assembly is discontinued. They are common to warp apparently and mine doesn’t look too bad right now but in my previous post I mentioned it was leaking. Do they warp because of people snugging the fasteners when the gasket should be replaced instead? Because I did just that.
 
The jets you see on carb are intermediate as the idle mixture are adjustable metering screws. Try some Seafoam first but most idle problems are the calibration gaskets on throttle plate.
 
Went ahead and ordered the gasket; I'll back off that torque next time I'm around. Any problems with going ahead and decarbing the engine next time we have it out on the water to do some testing? Was going to do the classic Seafoam 15 minute soak-run technique. It will be the first time getting on the throttle and raising RPMs since awakening the engine after its 3 year slumber.

Should I instead wait until we get a baseline; I want to try and clean the piston rings off as soon as possible before any scouring happens but maybe I am thinking about this wrong. Should I instead start out by using something less aggressive like "Ring Clean" or "Ring Free" as just a fuel additive and not do a full de-carb?
 
Back
Top