Logo

2004 Johnson 150 (Bombardier) Sat for likely 3 years

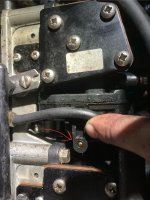
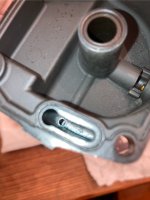
What is the purpose of this BB shot on each carb bowl? It isn’t to draw in air correct? I think I heard they fall out which obviously creates a leak. Any reason not to just JB Weld over them as a preventative measure?
 

Attachments

  • IMG_0628.jpeg
    IMG_0628.jpeg
    683.3 KB · Views: 4
What is the purpose of this BB shot on each carb bowl? It isn’t to draw in air correct? I think I heard they fall out which obviously creates a leak. Any reason not to just JB Weld over them as a preventative measure?
The short answer is yes, use some oil resistant JB weld and seal the BB to prevent leakage. These are well known leak points on these old float chambers. I replaced the float chambers on my carbs last year and before anything I sealed the BB's with JB Weld.

RacerOne is correct, it is part of the MFG process. The bowls are injection molded then passage ways are drilled during the finishing process. One of the passage ways is drilled from the top near the gasket surface and the other is drilled through the side where the BB is located. After drilling the BB is pressed in to seal the hole on the outside. I believe this passage is to deliver fuel for an idle/low speed circuit in the carb but I could be wrong on that.
 
Thanks for the insight on the BB; got that all sealed up! Last thing before we take her out on her first maiden voyage in over 3 years, the brand new portable fuel tank we bought leaks. Showed up the other day only to find a red fuel stain (XD-30 is red) sitting on the boat. Found out it was leaking at the quick-fit collar for the hose connection to the tank and at the tip of the hose where it connects to the motor.

Correct me if I'm wrong but the newer non-vented style tanks should in theory expand enough so fuel doesn't want to purge out of every orifice right? Is it possible we put too much fuel into the 6 gallon tank; it sounds like you want to leave some of an air gap within the tank. I think we put about 5-3/4 gallons of fuel in the 6 gallon tank. There has been some pretty decent temperature changes during the time it leaked. I definitely want to be sure air isn't leaking into the system as the primer bulb wasn't staying firm last time we tried starting the engine, so I'd like to rule the new tank out of that equation. The tank is a Walmart special, guess it's very possible its defective even being new.
 
Correct me if I'm wrong but the newer non-vented style tanks should in theory expand enough so fuel doesn't want to purge out of every orifice right? Is it possible we put too much fuel into the 6 gallon tank; it sounds like you want to leave some of an air gap within the tank. I definitely want to be sure air isn't leaking into the system as the primer bulb wasn't staying firm last time we tried starting the engine, so I'd like to rule the new tank out of that equation. The tank is a Walmart special, guess it's very possible its defective even being new.
The tanks are most certainly vented, but it should be a 1-way vent. They are designed to not let air escape, but as fuel is consumed the cap allows air IN to replace the fuel volume and avoid creating a vacuum. As temperature increases the plastic tanks can swell and will create internal pressure. If you're fittings are not well sealed that increased pressure can cause fuel to seep out.
 
Must be the hose then because it leaked where the quick fitting connects to the tank, not where fitting is screwed in. There's two o-rings where the quick-fitting attaches. It also leaked at the factory prong connection at the end of the hose, not where it inserts into the hose. I think next time we'll try a non-quick fitting hose. Also what teflon-tape or sealer is ideal for the threaded connections; we used the white stuff but it sounds like the yellow teflon tape is thicker. Is Permatex #2 or #3 suitable?
 
Are you sure you have a fuel hose with Evinrude/Johnson ends?
A buddies tinny leaked at both ends. Turns out they were Yamaha fittings, they look nearly the same, but Yammy is a touch bigger.
 
Must be the hose then because it leaked where the quick fitting connects to the tank, not where fitting is screwed in. There's two o-rings where the quick-fitting attaches. It also leaked at the factory prong connection at the end of the hose, not where it inserts into the hose. I think next time we'll try a non-quick fitting hose. Also what teflon-tape or sealer is ideal for the threaded connections; we used the white stuff but it sounds like the yellow teflon tape is thicker. Is Permatex #2 or #3 suitable?
If you have the correct quick connect fittings they shouldn't leak. Yes, the yellow teflon tape is what you should use for fuel applications.
 
Just took her on her first maiden voyage in over 3 years. Overall it went pretty well! Runs great above idle and gets up and going just how we remember. The only problem was it didn't want to idle which is weird because it idled pretty damn good on muffs in the driveway. We resorted to getting it in gear almost immediately after starting it other wise it would stall immediately and shut off. But once it got going and the rpms bumped up, it ran beautifully with no surging or bogging.

During our time out I threw some Marine Seafoam in the 6 gallon portable tank and ran it, shut the engine off for 15 minutes and ran it again repeating that process a couple times. Tried to run it as close to idle as possible at times too. That seemed to help. It seemed to hold idle a little better but still would stall. Spark plugs are still very old and was going to replace them after this Seafoaming.

So far I've replaced:
Thermostats
Water Pump
Vapor Separator gasket
Swapped OMS/VRO to Premix Fuel Pump

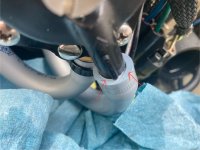
I got the fuel pump from Offshore Marine and we are having a slight issue with it. The way it came it uses two normal fuel pumps in series and the hose connecting the first pump to the second pump was leaking as it came from them. You'd see fuel oozing out of the hose when priming the fuel system. I removed the ziptie fastener for the nipple connection on the inlet of the 2nd pump and replaced it with a hose clamp. That improved it but it still looks like it might not be a perfect seal and I'm wondering if air is getting in through that seam. Below is a photo of where the fuel leaks from.

We also noticed the RPMs would not increase from idle until the gear lever was over halfway forward from the neutral position; could the shift throttle cable need adjustment? Could the old spark plugs be the culprit; the engine runs fine above idle? Should I go ahead and replace the plug wires. not sure how old they are? What about the coils?

I was thinking while running seafoam through it on muffs, I could choke the intake for each cylinder with a rag and try to create a stronger vacuum for the idle jets if that is what the issue is; good idea?
 
“The only problem was it didn't want to idle which is weird because it idled pretty damn good on muffs in the driveway”

On muffs there isn’t the back pressure. Once in the water you have nearly, (or maybe more), two feet of water pressure against the exhaust.
 
Huh; so far they seem to be okay. I’m wondering if I messed something up with the throttle when replacing the water pump and dropping the lower unit. I had the throttle in forward gear so I could get access to the brass bolt that holds on the shifter rod to the link.

But when I was assembling the lower unit back I had to return the throttle lever to neutral before I could slide the brass bracket back on; otherwise the tension was too much for me. Since I moved the throttle lever before putting the brass bracket on, did that mess with anything?
 
Ran the engine today in the driveway and it idled pretty well. I noticed giving the primer solenoid more prime made the engine start right up and it idled for a few minutes before the rpms started to settle/drop and then it eventually died. On the next startup I tried restricting the air intake on each throttle body to create vacuum and draw anything out of the idle circuit thats clogging flow. After that it idled for as long as I needed. It started to backfire though. I was also trying to burn off any excess Seafoam from the fuel.

After shutting off and draining the carb bowls just to see what comes out I noticed the top left (passenger) carb bowl had next to no fuel drain out. I then plugged up all the carb drains but left this one out. I tried flushing gas through the carb and drain but the system literally pressurized with the drain open! Am I missing something or is something clogging that bowl really bad?!
 
I came to the assumption that the upper passenger-side carb I mentioned in my last comment had the float needle stuck closed. Decided to take it off and what do you know I was right. Kind of interesting a couple wraps with a screw driver on the carb body didn't free the needle but with the bowl removed, some little persuasion with my finger on the float was enough to free the needle from its seat. Now I'm waiting for a rebuild kit since I have it apart.

All the other carbs seem to have working needle valves; they spit fuel when I've got the bowl drain removed; and there's pressure in the fuel system when it needs to be. Although I think one of them is not fully closing as when I pressurize the system and then tilt the motor, a little fuel comes out of the bottom driver-side carb throat only. That could be why I'm losing primer bulb firmness.

Now before we started it for the first time back in October, fuel was coming out of all 6 carb drains but I do remember less so on that upper passenger-side carb. I guess running the engine and giving it a heat cycle moved varnish around and when the engine cooled the needle froze in its seat. I'm hoping this doesn't happen to any of the other carbs after running so I guess I'll be checking that the carbs all drain fuel for a while now. I probably should check when the engine is cold just before starting up as that is when tolerances are tight and things are less likely to catch on fire lol.
 
You must make sure ALL CARBURETORS are clean.-----If you have a restricted / empty carburetor you will be starving 1 cylinder of gasoline.----And more important ,no oil going into that cylinder !
 
You must make sure ALL CARBURETORS are clean.-----If you have a restricted / empty carburetor you will be starving 1 cylinder of gasoline.----And more important ,no oil going into that cylinder !

After rebuilding this carb I won’t be too worried about carbs not getting fuel in the bowl. The rest seem great!

I’m mostly worried about the idle jets. If the engine idles consistently and doesn’t stall isn’t there nothing to worry about?
 
I’m mostly worried about the idle jets. If the engine idles consistently and doesn’t stall isn’t there nothing to worry about?
the motor will idle, & rev up on muffs or in a barrel with one cylinder not working.
If that cylinder is not working because it’s not getting fuel…it’s also not getting any lubrication.
if that is the case, & you continue to run it, you WILL ruin your motor.
 
I understand if a cylinder is not getting fuel it will burn up because it is also not getting oil. But I would think it would show signs or stall at idle like it did before I found out one of the float needles was stuck. That's why it stalled at idle, because it was getting very minimal fuel to that one cylinder.

If it idles smoothly without surging or cutting out, are you saying it still could be burning up?

I just found Johnson carb gasket parts on Crowley Marine for a fraction of the cost of Marine Engine parts. That might be enough reason for me to take the rest of the carbs off to clean the idle jets. I would only have to get the carb mounting o-ring and bowl gasket to get at the idle jets and float needle. $11 per carb total but more manhours than I've already spent for sure.
 
There is more to a carburetor than the idle jets.---Make sure carburetors ( high speed jets ) are clean or risk damaging your motor.------
 
I don’t have the experience on the bigger motors that people like racer, and Maaco, Mark Tim guy, and a bunch of others have, but I do know even on the little twin cylinder engines, One cylinder can be totally not working and they will start up and idle on muffs, or in a barrel. Only when you get out and try to power them up, you realize you have no power and one cylinder is dead.
 
There is more to a carburetor than the idle jets.---Make sure carburetors ( high speed jets ) are clean or risk damaging your motor.------
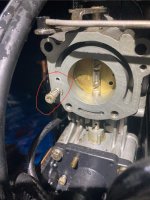
Right, I’ve been able to get at the high flow jets already without taking the carbs apart. In fact you can get cleaner into the idle circuit by spraying into that orifice I circled in post #4. I found this out after taking that one carb apart. Open the carb bowl drain bolt and when you see carb cleaner draining out you know it’s flushed through the idle jet. Actually both the high flow and idle circuit draw from the same opening within the bowl; they divert after.

I really think it’s just that one stuck needle causing issue but I’m starting to think I might as well pull them all off.
 
I don’t have the experience on the bigger motors that people like racer, and Maaco, Mark Tim guy, and a bunch of others have, but I do know even on the little twin cylinder engines, One cylinder can be totally not working and they will start up and idle on muffs, or in a barrel. Only when you get out and try to power them up, you realize you have no power and one cylinder is dead.
I hear ya, when we took it out the engine ran great above idle and seemed to have all the power we remembered; only idling was giving us problems.

I might get just enough gaskets to open the bowls up and get cleaner where it needs to be but not give them a full rebuild; pretty time consuming for all 6.
 
There is no instrumentation that lets you know that there is an issue with fuel starvation.-----And most 2 stroke engines are damaged by owners who reply with -----" I did not know that " ----after they empty the wallet on repairs or a new motor.------
 
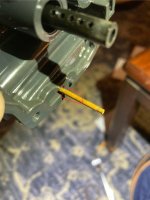
While I was cleaning the carb that I removed with a stuck float needle I noticed something. The image below shows the brass idle jet pickup tube and that is a hairline crack. I tried testing if fuel can actually get through the crack by spraying carb cleaner from the bottom up through it and the spray oozed out through the crack.

IMG_0846.jpg


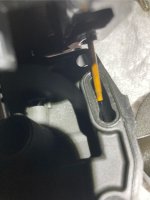
The images below show the chamber that the brass pickup tube/stem recess into. The pickup tube does not recess into that small circular hole you see at the bottom of the chamber in the second photo below. The base of the pickup tube rests above the flat portion with no hole and fuel comes up through that tiny hole/orifice. I say this because even though fuel does ooz out through the hairline crack; that lost fuel falls back down into the chamber to be sucked up eventually. Meaning, is it really the end of the world?

IMG_0847.jpg

IMG_0853.jpg


It should be noted I will be checking the rest of the carbs for this crack and I don't believe the brass idle pickup tube is replaceable, I would have to replace the entire carb. I'm thinking I could maybe remedy it by turning up the fueling of the idle mixture screw on the carbs with the hairline cracks (I'm assuming some of the others probably have it as well?
 
That is the emulsion tube for idle, crack can make it lean.
And as for the idle mixture screw (Johnson calls it the slow speed screw) rotating it counter-clockwise or unscrewing should richen the idle mixture because it meters fuel not air right?

Here is a photo:
IMG_0868.jpeg
 
Back
Top