

Logo

Mercruiser 4.3L Cranks, Has Sparks & Fuel, But Will Not Fire Up

Hi all, I managed to find some time this morning to take another look. The fuel pump says RECMAR, but I can't see any Part Number sticker or stamp on it anywhere. Is there a way to tell if it's a Low Pressure Pump or a High Pressure Pump simply by looking at it (@AllDodge)?

Engine Oil is draining as I type this and I can confirm it's got fuel in it - about 5+ litres has come out - excluding the Oil Filter, which is still on at the moment. This Mercruiser does have the oil drain tube attached to the engine, which would account for some of that too.
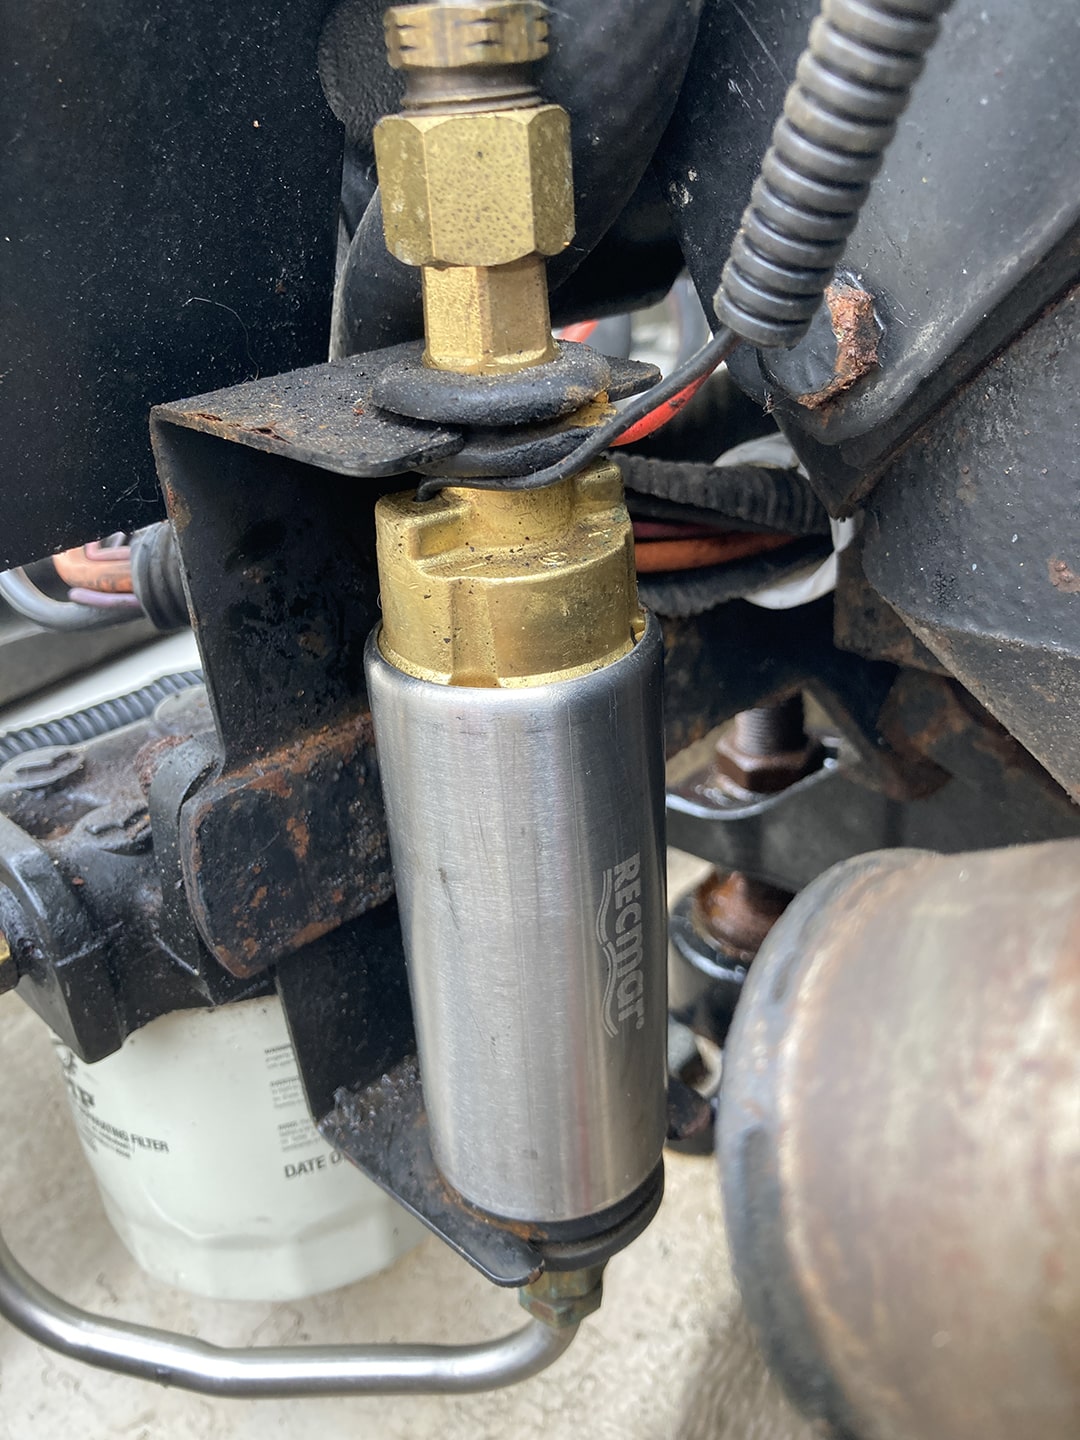
IMG_2673-min.JPG


I don't have the required tools to test it. But have some company today though...
IMG_2668-min.JPG


Thanks
 
I don't have the required tools to test it. But have some company today though..
There should be a part number on it, maybe on other side, but even if it turns out it's the correct part it still may be putting out to much pressure. Need it measured
 
There should be a part number on it, maybe on other side, but even if it turns out it's the correct part it still may be putting out to much pressure. Need it measured
I'm sure there's nothing else other than the brand name, I went round it with my phone, but i'll take it off. I'll see if I can find someone locally who can test it for me. Or is it a simple case of timing the amount of fuel put through it (Jerry can A - to - Jerry can B on a 12v supply)?

While watching a couple of more videos on Carbs, one guy recommended adding in an inline pressure regulator, which sounded a good idea in theory.

I'm pulling the carb off next.
 
Flow rate won't provide the info needed
Don't need a Reg if pressure is correct and the pump should not put out more pressure than the carb can take
 
Flow rate won't provide the info needed
Don't need a Reg if pressure is correct and the pump should not put out more pressure than the carb can take
Ah i see, thanks (y) I've got the carb and the pump off now - 100% no other info on the pump other than the brand. I'll take the carb apart tomorrow and see if there's anything obvious going on. There was no obvious dirt in the Water Separator, or the little carb filter (which I have looked at).

I couldn't see an obvious line-up mark for the electric choke - the carb has a clear arrow, but nothing clearly marked on the choke module, which was mentioned in the videos. Unless you can only see it once it's taken out a slightly :unsure:

IMG_2685-min.jpg


I might just end up ordering a new fuel pump along with the carb refurb kit, as I think it will be easier than finding someone to pressure check it.
 
Don't know about where your at but vacuum fuel pressure gauges are pretty cheap
https://www.harborfreight.com/fuel-pump-and-vacuum-tester-62637.html

You could reconnect the pump, and place gauge on output of pump. Wear safety glasses because don't want gas in your eyes. Turn pump ON and might have to bleed out air to get a good reading
Im in the UK, but should be able to find something similar, will keep that in mind. Do you know what max PSI the Mercruiser 4.3 should have or where I would find that out? Thanks
 
I think I may have found the prime suspect causing the flooding issue. The gasket seems to have a misshaped raised bow directly above the Float and from what I can see this stops the Float from fully rising in order to close the valve and stop the fuel entering.

I checked the float under hot water and no bubbles came out of it and there was no sound of fluid inside it either. The inside of the carb is pristine, and the sprung loaded pins are all moving freely. I've ordered the full refurb kit, plus a new float and will replace all parts anyway (should be here early next week).

But wondered your thoughts on what I have found so far - could this be it?

IMG_2693-min.JPG
 
Not sure the gasket is the issue, triple check the float height. This is normally done with the top upside down.
Float height 9/16 (14mm) measured with gasket in place
Float drop 1 3/32 (27mm) measured with gasket in place

Slide2.JPG
Slide3.JPG


1759491051468.png
 
Hi @AllDodge, thanks for the information, I'll can certainly have a go at that. The one error I have made is giving my engine year as 1996, that's the year of the Mercury 115 Outboard on our old family boat that I gave by mistake (a reflex typo). Only realised this yesterday. The Mercruiser should be 2004 ish, not sure if that changes the measurements?
 
Hi @AllDodge, as per the diagrams, i have a current Float Level of 14mm :oops: (top of gasket to dot) and Float Drop of 31mm :oops: (top of gasket to same dot). Mine has the spring loaded needle. Therefore that would make the Float Level 5mm over (9mm Specified) and Float Drop 7mm over (24mm specified). Factoring in the gasket is still the old one and my 40+ year old eyes lol.
 
Looks like spring loaded is different for newer model
Should be 9mm for spring, not compressing the spring during measurement

1759496109629.png
 
Looks like spring loaded is different for newer model
Should be 9mm for spring, not compressing the spring during measurement

View attachment 36280
Yes, sorry I was going by the PDF diagram data, which would make mine currently incorrect. But not far out if going by:

Float height 9/16 (14mm) measured with gasket in place
Float drop 1 3/32 (27mm) measured with gasket in place


As the issue is flooding, then I would presume the float has been setup wrong and needs to be adjusted to a float height of 9mm. Or am I miss understanding?
 
Yes, 9mm with spring

and spec sheet for carb in newer manual shows same as older. Only found the difference when looking at the rebuild section
 
Yes, 9mm with spring

and spec sheet for carb in newer manual shows same as older. Only found the difference when looking at the rebuild section
Apparently (according to this PDF https://www.carburetor-parts.com/assets/manuals/mercarb-manual.pdf - page 49) there is a service bulletin that say's the correct float settings should be the same as your original notes (not 9mm), which matches what the float was previously set to:

Float height 9/16 (14mm) measured with gasket in place
Float drop 1 3/32 (27mm) measured with gasket in place


Wondering if it's best that I just put the carb float back to these. Plus all other settings back to defaults when I re-build it? The choke unloader was over 10mm gap, when (according to the PDF) it should be 2mm. The choke setting should be 2 towards lean (according to the PDF and videos), mine doesn't have a scribed mark, but looking at the videos it should be directly opposite the bottom electrical connector. If that is the case, then the choke setting was previously set very heavy, e.g 10 to choke side.

Feel like carbs are an absolute mine field
 
I'm unable to provide an exact figure, but will say with the flooding I would set at 9 to 10mm and run it. Does some regular runs and no WOT runs just to see if things are working correctly. If all good try a few WOT runs (few minutes), slow down quickly and shut down. Pull a few plugs and see if they are white or cream color. If white might need to rich the mix, but if cream it should be ok
 
I'm just in the process of rebuilding the Mercarb, but there are some differences and wanted to check with you guys on whether they matter or not if possible.

1. The new float weighs 9 grams (the correct weight according to all documents), the old one is currently 10 grams (incorrect weight), plus that's with a few days drying out, so it may have been heavier. Not sure how much 1 gram's difference would make to the old one functioning incorrectly?

IMG_2723-min.jpg


2. The float is a slightly different shape and doesn't have the original "dot" markings, I've tried copying these as best I can by eye (in yellow). I have watched a video that says to "just make sure the float is level" (parallel with the gasket) and that the seem line is to be used for the height.

With the spring loaded needle fitted the 4.3l should have a float level of 14mm to the dot on the original float (9mm with non-spring needle). My measurements are 9mm from the lower dot to top of gasket, (but 14-15mm to the floats seem line) and the float is parallel to the gasket. Does that look correct for the new float's design? Or should I make the dot to top of gasket 14mm, as per the general instructions for a spring needle and ignore the bit seen about the float needing to be parallel?

IMG_2726-min.JPG


3. The new needle is slightly shorter (1mm approx) when assembled, which changes the geometry of the floats position once installed. I presume the difference doesn't matter and that I just need to adjust the float after installing the new needle?

IMG_2725-min.jpg


One on the left is the original, the one on the right is the new one. Thanks
 
So, I've got the refurbed Carb mounted, fuel pump re-fitted (and lines), new Water Separator, Oil Filter, new oil, fresh plugs (gapped to 0.045) and I even stuck on a new coil for good measure.

Now i'm stuck trying to prime the fuel feed. I have the fuel pump connected to a separate 12v switched feed, so that I can just switch it on and off as needed without cranking the engine and I thought the pump would be enough to prime the fuel system. I did put some fuel in the Water Separator to help, but didn't fill it up all the way. It's not connected to the carb yet, as wanted to see fuel come out the top before that stage.

Is there a procedure I have missed to prime the fuel line? Or anything I need to check?
 
How long did you manually run pump?

Did you check/set Float drop?
I ran it for about 2 minutes. I solved it a minute ago by connecting a jerry can and syphon tube and pump some into the Water Separator then the electric pump took over.

I set the float up as per the image above (9mm to the dot for level and 24 to the dot for the drop). The float is slightly different as it's aftermarket job and had no dots. If it still has issues, then I'll pull it off again and re-adjust to 14mm to dot for level and 27mm to dot for drop and try that. The old float was 10+ grams and from what I can tell they set the carb up poorly... It's now setup to default. Mix, Choke Unloader, etc. 🙏
 
There are two float adjustments.

Float Level and Float drop.

The vertical tang on the float is what is adjusted to set float drop.

Float level is adjusted by bending both sides of the metal horizontal parts.

Float level, 99% of the time is set so that float (usually a line on float) or visually perfectly level with inverted lid as you had in picture. In your case due to slight differences in parts you had to adjust.

Water seperating filter holds a lot of gas so if not mostly full it takes a long time to displace all the air!
 
I have the fuel pump connected to a separate 12v switched feed, so that I can just switch it on and off as needed without cranking the engine and I thought the pump would be enough to prime the fuel system. I did put some fuel in the Water Separator to help, but didn't fill it up all the way. It's not connected to the carb yet, as wanted to see fuel come out the top before that stage.
Electric fuel pumps don't suck very well, would suggest putting more in the filter

Next are you sure the 12V wiring is connected correctly. If connected in reverse it won't hurt the pump but it will also run in reverse
 
Back
Top