

Logo

Hydrolocked in the parkinglot

So because I have the drive apart I though of changing the seals on the upper part of the drive, so I got the tool and removed the gears. The thing I discovered is that the 2 bearings in the drive gear assembly don't spin freely at all. I have to hold the gear or put it back in the yoke and spin by hand and rag and when I stop twisting the bearings stop spinning. I have a feeling the shim after the drive gear is tightened on the bearing. This gear assembly does not come apart as soon as the nut is removed, I believe it is pressed in. So I need help with the next steps.
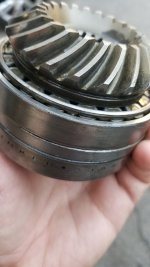
20210224_160938.jpg
Below is a video placed on Dropbox showing the spinning process.

https://www.dropbox.com/s/lrfa66pe5h7y8c6/Drivegear bearing assembly.mp4?dl=0

The boat is a 97 model with the Alpha one Gen 2 so which assembly is this the 80ft/lbs torque, or the 6-10 in/lbs one. There seem to be 2 or more different ones with different ways to adjust preload.
 
Last edited:
I am not sure this is something for you to do.

The 80 ft lbs is a "static" setting Used on Gen I ( when disassembled there is a small spacer between inner race of the two bearings)

the 6-10 inch lbs is a "rolling" torque setting (there is NO spacer between inner race of two bearings)

If you have never done either I am not sure this is something you may want to do.

Do you have an accurate and calibrated 0-30 or 0-15 in lb dial torque wrench?

They typically have a 1/4 inch socket fitting and will require a 3/8 adapter for the socket needed


If I am not mistaken ALL Gen II's require rolling torque to set bearing preload

You also need a MERCRUISER manual # 14 for this.

Getting instructions over the internet is not the appropriate method to perform major service on an upper gear housing

Also I am not going to copy service manual 25 pages to this post.

In the end, I would suggest getting your parts, Carrier seal assembly, bearing pack. Bring to a authorized or experienced location and let them do this.

It will most likely cost the same to acquire all the tools and your time vs them doing this in an hour............
 
[h=1]I have access to CDI Torque 301LDIN 1/4- Inch Drive 0-30in/Lb [/h]Also have access to CDI151LDIN 1/4 inch dial torque wrench 0 to 15.
service manual _14 alpha i gen ii outdrives 1991 to present.pdf (ta-group.at) Not sure what pages I need.
I actually pressed the Drive gear out a bit and it spins freely and nicely. So the thing was probably to tight and it prevented the bearings from spinning freely. So if I actually press it out a bit more more I can just do the rolling torque on these no need to buy new ones.
This video shows the way
5 Drive gear preload - YouTube
Let me know and thanks for being here.
 
Section 3A Pages 1-25

Your model is (Prior To 0L100009) This is determined by the double bearing pack you have. Newer models have a slightly different bearing pack design


Page 3A-15 Use image on left with hose clamp This is to keep bearings AND spacer in line, otherwise you will not get assembly back into gear housing!!!!!!

Page 3A-17 Item D Carrier seal. (this is better and easier if purchased as an complete assembly (carrier and seal) although just the seal can be purchased separately but you have to remove old seal and press new one into carrier making sure seal lips are facing the correct way!!!)

According to manual you need to get all bearings off gear shaft and start over. I would remove outer most bearing and spacer ring, get inner bearing away from gear a small amount to start vs removing both all the way. The point is to get gear side bearing from any inner race load from being pressed against gear.

Clean all parts then coat everything with a light coating of new fresh gear oil

(NOTE: keep threads clean and I would suggest using red loctite on threads and nut when reassembling)
There is not a lot of pressure on the nut. Using red loctite will make sure the nut will not loosen over time, but the threads MUST be oil free before applying the loctite!!) Use Brake cleaner on threads and nut threads

Re-press inner bearing to gear. Then press outer bearing on (with spacer ring in between the bearings) until a very light friction occurs on the spacer ring then STOP.

Follow page 3A-20 then skip to page 3A-24 & 25

Once you have the upper bearing assembly set up in a vice as shown you need the torque wrench and a regular socket wrench both with the same size socket.


1. Install hose clamp slightly crooked so it kind of covers both bearings and spacer ring to keep spacer ring centered.
2. Spacer ring should be free to move at this stage. Use standard socket wrench to tighten nut until spacer does not move. (do this in very small steps) and once spacer feels like it will not move remove socket wrench and now use torque wrench.
3. While holding the hose clamp spin the torque wrench CLOCK WISE several turns to "work" the bearings and seat them and then slowly spin torque wrench clockwise and take a reading. It should be ZERO at this point.
4. If ZERO or under 5 in lbs Use socket wrench again and tighten nut a little more (baby steps here !!!!!)
5. Continue this process until you achieve the specification for USED bearings, of NO more that 5 inch lbs of rolling torque.

If you go past this you will need to disassemble back to your starting point and try again.
 
Last edited:
So this manual is for my type of alpha drive. I have another one I printed a few years ago and it is large but I don't think it includes the drives part this detailed. it is a Mercruiser Service Manual, Mercruiser Tilt Trim, Mercruiser Alpha One and Mercruiser Wiring Diagrams. But the upper and lower drives are not as detailed. This number 14 is great.
Thanks for the detailed Info on the procedure. Do you think I need to replace the bearings if they were this tightly set? As soon as I pushed the gear out they got freed. But don't know if that caused some issues. They are $31 each same exact as original. Am thinking on just replacing them. Wonder if this had anything to do with engaging the forward and reverse at times that made a gear noise and would not engage unless the lever was pushed up further which in turn would cause a not so smooth engaging of the gears. And other times it would engage smoothly. I think the cable was also a culprit.
 
Last edited:
It's really late but in the morning I will make another small clip of the bearings after I pushed the gear shaft out a bit.
 
You can always pack up the drive and parts and send to Timguy...
He is retired and offering FREE repairs....
 
So this manual is for my type of alpha drive. I have another one I printed a few years ago and it is large but I don't think it includes the drives part this detailed. it is a Mercruiser Service Manual, Mercruiser Tilt Trim, Mercruiser Alpha One and Mercruiser Wiring Diagrams. But the upper and lower drives are not as detailed. This number 14 is great.
Thanks for the detailed Info on the procedure. Do you think I need to replace the bearings if they were this tightly set? As soon as I pushed the gear out they got freed. But don't know if that caused some issues. They are $31 each same exact as original. Am thinking on just replacing them. Wonder if this had anything to do with engaging the forward and reverse at times that made a gear noise and would not engage unless the lever was pushed up further which in turn would cause a not so smooth engaging of the gears. And other times it would engage smoothly. I think the cable was also a culprit.

Not sure where you get your prices for the bearings

I understand bearings are bearings and Merc over prices them such as the gimbal bearing, but you best be 1000% sure they are the same.

This site lists them here.

http://www.marineengine.com/parts/m...79999-usa/drive-shaft-housing-and-drive-gears

The prices are well over $100.00

Sierra is $150

Mecruiser parts are $365
 
Is there an all around good bearing puller for these type of jobs and the other bearings in the drive.
I bought this cheap one and could only use the to silver arms for it since the other stuff is too short to grab the bearings.

Amazon.com: Prokomon Bearing Puller Set | 5-Ton-Capacity Bearing Separator | Wheel Hub Axle Puller | Pinion Bearing Removal Tool Kit | Bearing Splitter: Automotive


I did get them out though. The top bearing is intact but the one close to the gear broke apart. While I am replacing both it's no big deal but what about if the preload goes too tight and needs to be redone. What do you use?
 
As much as I could show you how to do all this, I cant from here.


Try you tube.........

The tools you have may or may not work..........I know mine do.......Cant help you with what you purchased

I would say you are not using the splitter properly

Do you have a press? Manual or hydraulic?

I have never broken a bearing when disassembling this........

The interference fit on the gear shank is only ~ .0005"
 
As much as I could show you how to do all this, I cant from here.


Try you tube.........

The tools you have may or may not work..........I know mine do.......Cant help you with what you purchased

I would say you are not using the splitter properly

Do you have a press? Manual or hydraulic?

I have never broken a bearing when disassembling this........

The interference fit on the gear shank is only ~ .0005"
So I guess you are using a press to remove the bearings as well as to put them back. I only had the set I showed in the link. It did the job but it is not the proper setup to remove it without damaging something.
I guess an industrial press can accommodate the gear and push it out holding the bearings. Don't have it. So now I just have to put it back.
 
Are these tall or wide enough to fit the gear shaft. Didn't measure it but the presses are 4"or so. Is it enough for most bearing needs on that drive?
I found a set of the eBay brand new $70 plus tax free shipping QuickSilver 31-35988A12 OEM Roller Bearing Assembly on eBay brand new offered$70 plus tax free shipping and won QuickSilver 31-35988A12 OEM Roller Bearing Assembly | eBay

Funny thing is I offered $50 for the sierra setup and won that also. But will cancel it since the Quicksilver is better.
NIB Bearing Kit Sierra 18-1160 Replaces Mercruiser 31-35988a2, 31-35988a12 | eBay

 
Last edited:
Yeah but what's the use of buying another that need work. I can just do the work on mine. Just changing the seals and 2 bearings on the upper. The drive is perfect with low hours but some aging so new seals are probably a good idea. But in case gears go those would be great.
 
Yeah but what's the use of buying another that need work.
You really shouldn't visit my barn. It defines the spirit of this quote. I have like at least two of everything and none of it works....gosh the British Seagull collection alone...
 
[FONT=&quot]I just did the preload with the dial and got it around 6 to 7(these are new bearings) when I turn it with the dial. If I move faster it goes to 8 but only if I do it all around 360 full circle. The lady in the above video only spins it a little.
Let me know if it has to be tighter than that. It says 6-10 in the manual. Also do I need to grease the bearings before installing, or can I just put some of the gear oil on them and install the shaft? Thanks in advance.[/FONT]


Section 3A Pages 1-25

Your model is (Prior To 0L100009) This is determined by the double bearing pack you have. Newer models have a slightly different bearing pack design


Page 3A-15 Use image on left with hose clamp This is to keep bearings AND spacer in line, otherwise you will not get assembly back into gear housing!!!!!!

Page 3A-17 Item D Carrier seal. (this is better and easier if purchased as an complete assembly (carrier and seal) although just the seal can be purchased separately but you have to remove old seal and press new one into carrier making sure seal lips are facing the correct way!!!)

According to manual you need to get all bearings off gear shaft and start over. I would remove outer most bearing and spacer ring, get inner bearing away from gear a small amount to start vs removing both all the way. The point is to get gear side bearing from any inner race load from being pressed against gear.

Clean all parts then coat everything with a light coating of new fresh gear oil

(NOTE: keep threads clean and I would suggest using red loctite on threads and nut when reassembling)
There is not a lot of pressure on the nut. Using red loctite will make sure the nut will not loosen over time, but the threads MUST be oil free before applying the loctite!!) Use Brake cleaner on threads and nut threads

Re-press inner bearing to gear. Then press outer bearing on (with spacer ring in between the bearings) until a very light friction occurs on the spacer ring then STOP.

Follow page 3A-20 then skip to page 3A-24 & 25

Once you have the upper bearing assembly set up in a vice as shown you need the torque wrench and a regular socket wrench both with the same size socket.


1. Install hose clamp slightly crooked so it kind of covers both bearings and spacer ring to keep spacer ring centered.
2. Spacer ring should be free to move at this stage. Use standard socket wrench to tighten nut until spacer does not move. (do this in very small steps) and once spacer feels like it will not move remove socket wrench and now use torque wrench.
3. While holding the hose clamp spin the torque wrench CLOCK WISE several turns to "work" the bearings and seat them and then slowly spin torque wrench clockwise and take a reading. It should be ZERO at this point.
4. If ZERO or under 5 in lbs Use socket wrench again and tighten nut a little more (baby steps here !!!!!)
5. Continue this process until you achieve the specification for USED bearings, of NO more that 5 inch lbs of rolling torque.

If you go past this you will need to disassemble back to your starting point and try again.
 
I just did the preload with the dial and got it around 6 to 7(these are new bearings) when I turn it with the dial. If I move faster it goes to 8 but only if I do it all around 360 full circle. The lady in the above video only spins it a little.
Let me know if it has to be tighter than that. It says 6-10 in the manual. Also do I need to grease the bearings before installing, or can I just put some of the gear oil on them and install the shaft? Thanks in advance.


""Clean all parts then coat everything with a light coating of new fresh gear oil"" as I said in the quote you posted.
This is also clearly stated in the Merc Manual.
With new and clean bearings, Coat with gear iol, assemble and spin a few times (slowly) while under some compression to allow bearings to seat. This does not take very much or more that a couple revolutions. Once done then check rolling torque and adjust per procedure

Never set torque on a roller bearing DRY
 
Last edited:
""Clean all parts then coat everything with a light coating of new fresh gear oil"" as I said in the quote you posted.
This is also clearly stated in the Merc Manual.
With new and clean bearings, Coat with gear oil, assemble and spin a few times (slowly) while under some compression to allow bearings to seat. This does not take very much or more that a couple revolutions. Once done then check rolling torque and adjust per procedure

Never set torque on a roller bearing DRY
Is the 6-7 Lb.-in sufficiently tight?
And another thing I forgot to put the red Loctite. what are my options?
Should I buy a new washer, undo the nut and redo at or a bit above that? It is supposed to be at 8Lb.-in right? Mine was at 6 to 7Lb.-in.
You are right I need to lube it and then recheck, but first I need to know about the red Loctite. Wouldn't adding the old nut on top of the new nut with red Loctite keep the new nut from opening? Just a cheesy way probably stupid
 
Last edited:
I read and re-read the manual 14 and I don't see anywhere that red loctite has to be used but I do see why it should be. I am still waiting for an answer on what I should do next to add the Loctite.

Is the 6-7 Lb.-in sufficiently tight?
And another thing I forgot to put the red Loctite. what are my options?
Should I buy a new washer, undo the nut and redo at or a bit above that? It is supposed to be at 8Lb.-in right? Mine was at 6 to 7Lb.-in.
You are right I need to lube it and then recheck, but first I need to know about the red Loctite. Wouldn't adding the old nut on top of the new nut with red Loctite keep the new nut from opening? Just a cheesy way probably stupid
 
""Clean all parts then coat everything with a light coating of new fresh gear oil"" as I said in the quote you posted.
This is also clearly stated in the Merc Manual.
With new and clean bearings, Coat with gear iol, assemble and spin a few times (slowly) while under some compression to allow bearings to seat. This does not take very much or more that a couple revolutions. Once done then check rolling torque and adjust per procedure

Never set torque on a roller bearing DRY

Any word on my questions?
 
Any word on my questions?
I bought a new washer waiting for it and will use the red loctite. Since I am at 6-7 on the dial gauge I assume I can undo the nut and then just get it to 8Lb-in as per book with the new washer. I hope I don't have to remove bearings since I didn't use it yet.
 
I bought a new washer waiting for it and will use the red loctite. Since I am at 6-7 on the dial gauge I assume I can undo the nut and then just get it to 8Lb-in as per book with the new washer. I hope I don't have to remove bearings since I didn't use it yet.

Just tighten it a little more to get to 8 in lbs. I think you only have to separate the bearing if you go over 8 in lbs. If you are worried about the lock tight back it off a turn put some loctitie on the threads then tighten to 8 in lbs
 
I have to say this thread is getting elementary and interest is waning...........

If memory serves me correct, that is not just a standard washer it's a beefy one. You would have really F it up to have to replace it.......

What would require replacement is the nut, as after several re-uses the Nylar will no longer work as designed.
 
Hey K-ghost thanks for the input over the course of my repairs you've been invaluable as a second and third opinion, sorry if I overstepped my questioning and became redundant. Your help was truly much appreciated. As are all that respond. This is after all the point for this forums, right? To ask for help and be a newbie.
Back to the washer the reason I asked was that it says it's a one time use washer. I re-ordered it anyways so no biggie it's cheap. The nut is also new and the old one has never before been removed but I replaced it anyways. I am really close to getting this done here folks so bear with me.
 
I just read thru the manual,

I not sure where you read that the washer should be replaced.

There is no mention for the carrier assembly washer to be replaced.
 
Back
Top