Logo

1994 BF2 BAES carb

Sailorwse

New member
I have an old BF2 BAES model that has a blocked main jet in the carb. Does anyone know hot to remove the carb or at least the fuel bowl?

I pulled and cleaned the tank and made sure that the fuel filter that is in the tank end of the fuel line was not plugged because that has caused me problems in the past. I also pulled the bowl nut / drain needle valve. The ports in the needle valve drain were plugged which I cleaned. I can now open the fuel valve and get fuel to come out the drain so fuel is making it to the carburetor.

Now I can get it to start and run but only on full choke. If I open the choke at all, it dies no mater what rpm I am running at.

That sounds to me like the primary jet is plugged. Easy right? Not so much. On this old Honda, the bowl and all of the carb is blocked by the lower housing and I cannot see how to remove it. It looks like the engine might need to be completely removed from the housing to gain access.

Here is a photo of the serial number plate. the number is BAES 1222809
196094-7526f2c330b17ff883da88256785a933.jpg

Here is a photo of the carb covered by the housing.
196095-847a639323ab98f422dd24374abb242c.jpg

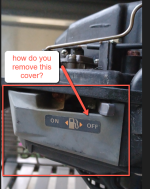
looking from the side. It looks like if the light gray cover below the fuel cutoff was removed, you could get to the carb mounting bolts. The problem is that I cannot see anything that is attaching it to the engine.
196096-a3649688f35b11e061724831df8a908d.jpg

Here is a view looking up at the bottom. I have removed the black guard but the hole above is too small to remove the bowl with the light gray cover above.
196097-650fa40fa6258965d900a555fa9853a0.jpg
 
Hi Sailorwse

Man! That's tight!
I don't know, I've never worked on one of those so no advice that's going to be the magic bullet here.

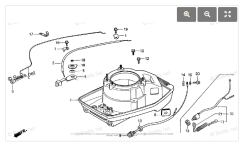
Just wondering if there's any chance that you can get the exhaust pipe protector (item 7 in link below) off or loose enough at least to get in there to work some? Maybe unbolt the pipe so it all comes off together?


The acorn nuts (items 15) secure the carb to the air guide (item 1)?? ....Question marks because I don't know....just asking.

But if that's the case, unless you can get clearance to slide the carb off of those two long bolts I don't see how you can get to the screws (item 21 in link below) to disconnect from the cylinder head.


Definitely a contortionist's puzzle.

Although, it might be easier to pull the head, carb and air guide together than anything else.

Good luck
 
I can get #7 off but the bowl does not fit through the metal frame of the outboard that #7 is covering.

It looks like I will need to remove this gray cover in order to remove the carb. Do you have the part drawing that shows how it is attached?

on-off cover.png
 
I have been fiddling with it and the black bottom half of the engine cover (the part with the grab handles) is plastic rather than metal as I first thought. An exploded parts drawing of that would also be helpful. every nut that I can see in there is completely covered either by the gray or black parts and I see no way to remove either.
 
Any possibility of you slipping a small inspection mirror in the slot for that fuel lever and seeing if you can get a clue that way?

Sadly, the shot of the cylinder barrel is from the port side and I believe that lever and the gray cover is on the stbd. side

In the link below, the part number 14 looks like a counterpart cover to that gray cover on the port side but it is held with easily accessible bolts.


The only view of the stbd side is the decal page below where label 11 is the decal with the gas pump on it.


Sorry this isn't very helpful.
 
I think I may have figured it out. I think the gray thing is the Air guide which is only viewed from the back side. Its two bolts are not accessible with the fan cover #7 in place. I have removed the recoil and have the bolts out of the fan cover, but it cannot come off with the spark plug installed. Anyone know what size wrench is required for this plug? It is the last thing I want to strip out.

SPARK PLUG BMR 4A​

 
Yeah, I think it's probably got something to do with boats.net has a tendency to "jumble up" the parts pages they copy from Honda.
The factory parts manuals are pretty "linear" and much easier to follow once you know how the "system" is put together.
At least it's gratifying that it confuses others sometimes as much as it does me ;>)
Still, I'm grateful for these pages since I use them alot to help people (and myself) figure things out when no one has the manuals.
It's just that it falls short of being crystal clear at times.

Did you get that spark plug out and remove the air guide or is it still hanging you up?
 
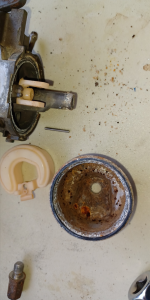
I finally got the carb off. The pile of debris in the upper right corner is what was in the bowl.
Can't figure out why it wouldn't run. ;) :ROFLMAO::ROFLMAO::ROFLMAO:

stuff.png
 
Oh my! Looks nice ~n~ crunchy!
That is what watered down pump gas can do fer ya!!

The way that little dude sips fuel I might consider burning VP canned instead. Pricey but keeps pretty much forever.

Glad you got it apart. Now make sure that emulsion tube is whistle clean and isn't cracked.

I'm guessing that you're also going to want to visit the idle circuit with a can of spray too. Put the straw in every hole you can find. Especially the tiny ones at the top of the throat above the throttle plate.

What do you push with that little dude?
 
I was hoping to find a smoking gun, ie, a completely blocked jet but I could see through all of the holes in both the Main nozzle and main jet. I ran a wire through each hole anyway and blew everything out with brake cleaner. Hopefully it was one of the many chunks that had been pulled up to the main nozzle then fell out when I was disassembling. Now I just need to get everything back together.
 
Oh my! Looks nice ~n~ crunchy!
That is what watered down pump gas can do fer ya!!

The way that little dude sips fuel I might consider burning VP canned instead. Pricey but keeps pretty much forever.

Glad you got it apart. Now make sure that emulsion tube is whistle clean and isn't cracked.

I'm guessing that you're also going to want to visit the idle circuit with a can of spray too. Put the straw in every hole you can find. Especially the tiny ones at the top of the throat above the throttle plate.

What do you push with that little dude?
I use it on the 10' Zodiac tender for my sailboat. It is never used at much more than 1/2 throttle because no matter how hard I push it, there is no way it will ever get onto a plane.
 
I'd slow the roll on slapping that back in. Like I said, make sure passages are all clear and will pass fluid or you might just be pulling it back off again.

I would DEFINITELY look under that upper cover and take the idle screw and jet set screw out after seeing that mess in the bowl.

This one might be the most deserving sonic cleaner candidate I've ever seen!

Barring that a good flush and a new gasket set would be highly advisable IMO.

Be careful where and how you poke around with wire too because it doesn't take much to damage the wrong drilling.

Good luck.
 
We have Varoom! It started on the second pull.
Thanks @jgmo your diagrams were a great help. Now I can go on my two-week cruise. Heading to the boat tomorrow morning.


Star of Papillon 3.jpg
 
Thanks. FYI, my wife made that spinnaker for my birthday about 12-years ago and it looks like I should get a very nice 28 to 30 mile deep-reach out of it today.
 
SO JEALOUS! :>)

Absolutely BEAUTIFUL spinnaker! I love the star pattern.

Must be nice to have a "lofty" wife.

Is that a Catalina or did I just step in it?:~o
 
1988 Catalina C30 tall rig / bow sprit. I bought her for my wife on Mother Day 25-years ago. That is my story and I am sticking with it.
In truth Papillon is both our mid-life-crisis. It is not possible to "share" a mid-life-crisis and you each must have your own.

Mine is from the end of the pointy bit of the anchor and the longest dock line inward to the companionway doors where hers begins.

She has pledges to help me to enjoy mine to the fullest provided I do not screw hers up.
 
That is a FAIR AND EQUITABLE agreement and, I too, would honor that.

I have always admired the C 30 for her lines. It must be a real treat motoring up in the dinghy , approaching that beautifully sculpted stern and thinking, "that's MY boat"!

I dated my wife on my little San Juan 23 trailer sailer and we both decided to get married, work hard and retire to a bigger boat someday.


Here's the boat my wife and I were married on in San Diego.
We took our vows just aft of the foremast In front of about 100 of our closest friends.

 
I was able to go on my cruise and the Honda ran every time, but I need to get a carb kit for it. If I left the fuel shutoff valve on, it would constantly drip out the back of the engine. I could not tell if it was coming from the drain needle valve or the overflow, but a full carb kit would fix either. Where is a good place to look for parts for this old 2hp?
 
what about buying a complete replacement carb. I did a search and found a bunch of listings for BF2 carbs for about $50. Not sure how to tell which one I need.
 
If it is the drain, you should probably be able to McGiver it. Either put in a plug of some sort or repair Needle
It could be, because it's opened and closed alot and can be easily overtightened, that the needle tip is "necked down". If so, you might be able to true it up using a fine file or emery cloth good enough for it to seal.

Or....
Cut the end off square and put a small piece of fuel hose in the fitting so that it acts.as a plug against the seat when the valve is cinched down.

Lots of ways to sail that cat.

Buenos suerte.
 
what about buying a complete replacement carb. I did a search and found a bunch of listings for BF2 carbs for about $50. Not sure how to tell which one I need.
That's the rub....
It comes down to take a guess, spend the $50 and try it. You might get lucky.

I don't think that works most of the time though.

These internet hawkers will promise you anything to make a sale and sending one back just isn't worth my time.

I would rather find a used one. Preferably attached to a complete parts motor.

They're out there. Especially where there's lots of marinas.
Finding them is the catch.
 
Actually, I see there are two of the three carbs still available. Item 9. Did you look at that?
I'd take a chance on one of those working before rolling the dice on some eBay brand knockoff.
$68 and, if you have the right engine serial # you're DEFINITELY in biz-ness!
 
I am admittedly do not speak fluent parts list. Given that my S/N is BAES 1222809 which is greater than 1000647 then they list two carbs.
16100-ZVO-A04 and 16100-ZVO-A04 are both listed. Do I need to know which one I need or will either one work?

Since everything to the right of #21 remains attached to the engine the only other part might be #14 but they are not available. Any suggestions for how to insure that it is properly sealed given that it must be reused?

 
The page in the link below includes your serial number and the one and only carb listed is available.


If I understand your last question correctly, I believe item 14 is simply a large piece of 1/16" (or so) thick gasket material. It is likely also acting as a vital piece of the cooling air ducting. But fabricating a new one isn't difficult. Especially if you have the old one for a template.

I see no reason to disturb the other items (11, 12, 13, 15, 21) unless you already have or believe they are leaking.
In that case, you will want to take particular care not to damage 11 and 15 because they are unavailable.
Item 13 is available and you would need to simply fabricate item 12 from paper gasket material.
 
Back
Top