Logo

How does THIS particular helmet pin come out?

Do you have a grease zert on top of the flywheel housing behind the engine where the PDS bearing is? Once you pull the PDS shaft you can inspect the forward seal and shaft. Mine had pits in the sealing surface and installed a speedi sleeve. Your almost ready to put it back together. The forward seal allows you to grease the PDS bearing without pulling it apart. The rear seal allows relief when yuo pump grease in the cavity in front of the bearing.
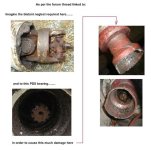
Yeah there’s a grease zerk back there. I found all the parts I need locally with the exception of the shims and helmet pin, but I didn’t actively look for those. I figure I’ll be doing good to get the bearing and crosses done today. Still waiting on carb parts as you know. Also need to replace plywood cabin top and bed by railing stanchens. Lots of little other things too.

I’ll bet money that my shaft is pitted too, and will have to look into the speedi sleeve you mention.
 
What can use in place of all these special greese part numbers? Like for the o-rings on top of intermediate drive, and the mating surfaces? How about pds bearing and crosses grease? I’ve got a greese gun full of synthetic greese that I use for work. Usually just use that on my OB’s
 
A good marine lithium grease is recommended i believe the PDS bearing is a industry standard just get the measurements Ricardo has the part numbers on the top of his head. You may be able to match up o-rings at your local hardware store use nitrile material.
 
I’ve got all the parts already. Got the seal and both rings out. Can’t seem to get the bearing to pull out. Looks fine too, no sign of water intrusion. How am I gonna get this out?
 
.........................
I’m confused....

Why would I even mess with the shims if all I do is replace the bellows and u-joints and reassemble? Wouldn’t I just install everything the way I removed it?
Yes, but only if the last person in there re-assembled things correctly.
I for one have never trusted this, and more often than not I have found that the shimming was NOT correct.

Also, why has everything I’ve read say to replace the pds while you’re in there if you don’t know the boats history, and that it’s easy to do? It sounds like a pretty large undertaking to replace that bearing the way you describe?
Let me put it this way after working on the AQ series for years and years;
...most of these bearings DO NOT get serviced.
...rarely are they replaced when they should have been.
...a PDS bearing failure can cause catastrophic and very expensive damage (see image below).


I’d like this thing sitting in my slip by the first week of April, and I’ll be out of town for ten days between now and then. What are my options?
A..... do things in a short-cut fashion and get the boat back in the water quickly.
B..... take your time and do things correctly and completely, and ensure that you won't be pulling the boat back out soon.

Let me see if I understand the gist of this..

I can pull the aft pds seal
Yes, you may ruin it, but yes it must come out.

remove snap rings
Yes, remove the two large snap rings.
For years its been my recommendation to modify the tips of a long needle nose pliers.


somehow miraculously get the bearing to come out
NO..... the bearing comes out with the PDS.

install new bearing(correctly filling with grease)
Yes.

install snap rings
No... re-insert PDS first, then install snap rings.
Be sure to put some grease on the pilot nose and the B/W splines.


install seal(observing orientation)
Correct..... this seal installs in a non-conventional direction.

replace u-joints(crosses)
Please see my caution regarding removing the four Bearing Box clamping collar cap screws.

replace bellows

install new o-ring seals
After checking shim value requirement.

fit trans on top of case (don’t know the names)
Upper unit = transmission
Center unit = Intermediate housing
Bottom unit = Lower Gear unit.


check gap
See my previous post again.

figure out what shims I need in order to be at the proper gap
The adjustment to the shim pack value is made so that when the gap is ultimately ZERO, there is an effective .003" squeeze on the shim pack.

install said shims
bolt it all back together
fill with oil
30W Engine Oil.... NOT heavy gear oil.

Is this about right?
Where do I get random shims?
Volvo Penta dealer.

Do backyard “mechanics” just throw these things back together without checking all this stuff? They make it sound like a 20 min job that requires very little in new parts
I can't say..... I do not know any backyard mechanics, let alone any that do Volvo Penta AQ series work.

I’m trying to cut through all the internet noise..
Do I want a sealed or open pds bearing?
Your F/C offers a grease port, and that is why I called out a 6206 bearing, of which is an Open bearing.
If you do not want to lube it in the future, then buy a 6206-2RS sealed bearing.


I can find all the parts I need locally but am having problems finding it at marine stores. According to the epc I need bearing p/n 11013
Don't confuse Volvo Penta bearing p/n numbers with Industry Standard numbers.
V/P simply puts their own p/n on Industry Standard bearings.
With a few exceptions only, ALL Volvo Penta bearings are Industry Standard.

Thanks Ricardo! This brief explanation is MUCH clearer than the instructions in the OEM manual(s)...

What can use in place of all these special greese part numbers? Like for the o-rings on top of intermediate drive, and the mating surfaces? How about pds bearing and crosses grease? I’ve got a greese gun full of synthetic greese that I use for work. Usually just use that on my OB’s
I have always used a high pressure bearing grease for Crosses and PDS bearings.
For the two mating surfaces and O-rings, Quick Silver "Perfect Seal" is excellent.

.......... You may be able to match up o-rings at your local hardware store use nitrile material.
Unfortunately, there are only two O-rings that can be found at a hardware store.
Best to buy OEM or Sierra exact replacements.

I’ve got all the parts already. Got the seal and both rings out. Can’t seem to get the bearing to pull out. Looks fine too, no sign of water intrusion. How am I gonna get this out?
You will somehow grab onto the splined area of the PDS and pull rearward.
Sometimes brass shim stock wrapped around the splines and then clamped onto with a Giant Vise Grip will do the trick.
Otherwise, you will need a collet style puller tool.

I have tackled almost every possible stubborn scenario that the AQ series has to present... from a rust stuck PDS into the drive coupler splines........ to a female yoke that is rusted to the AFT PDS splines....... and to seeing where owners have rounded out the clamping collar cap screw hex-head sockets.
I know first hand (from seeing what these owners have done), that the only way that works well is to do it correctly from the beginning.


This is what can occur to a flywheel cover that has suffered from a PDS bearing failure.
 

Attachments

  • PDS bearing caused FC snout damage.jpg
    PDS bearing caused FC snout damage.jpg
    77.1 KB · Views: 66
Last edited:
Maybe driil a hole and tap it and use a slide hammer?

The PDS is machined and is then hardened. It would be very difficult to drill, let alone tap threads into it.

Use the brass shim stock to protect the splines, and grab onto it with a giant vise grip.
Tap it in..... and pull it out.
Repeat as needed.


.
 
Last edited:
Ok, here we are..


This is as far as I got today. I lost one of the large clips too, but a place called Tacoma Screw(not a whore house) will have a replacement, and it’s pretty close by. I’ll polish that pds up the best I can. I’ll clean it all up the best I can with brake cleaner.

Next I’ll tackle the crosses. Do I need to remove the cross/yoke assembly from the transmission to replace the crosses? Looks like I’ll have to, but don’t really want to disturb that transmission and all it’s shims.

Theres plenty of corrosion on most of this stuff... should I knock it off, perhaps a lite sanding, then prime? I know I’ll be putting outdrive bottom paint on it. But places like the bellow flanges need cleaned up pretty bad.
 
Sho some pics as you put it back together. Are you gonna glass over the repairs to your cabin?
No I’ve picked at the cabin roof enough that there’s a hole, so I need to cut it off. It’s a half inch thick and I’ll need to find ply that will make the curve. Probably using multiple layers of ply. Then I’ll glass it. Super easy structure to fix... it was made by a pretty talented wood worker, hopefully I don’t butcher it too bad. Plywood and fiberglass is pretty forgiving though.
 
The PDS is machined and is then hardened. It would be very difficult to drill, let alone tap threads into it.

Use the brass shim stock to protect the splines, and grab onto it with a giant vise grip.
Tap it in..... and pull it out.
Repeat as needed.


.

I clamped the the end with vice grips, then clamped the end of the vicegrips with a smaller needle nose pair of vice grips at a 90 degree angle. Then I tapped on the smaller pair aft with my little 3 lb sledge. It came out ok... not damage to the splines. I hit it with a little bit of heat too, careful to not melt the fwd seal. It looks good to me.
 
Please trust my advice....... replace the bearing while you have the PDS out!
A good bearing supplier should have it in stock!


.

I HAVE A NEW ONE AND I’LL REPLACE IT... lol
I have all the parts I need. I didn’t know that the marine dealer down the road stocked Volvo parts, they have everything. I paid $26 for a new Volvo pds bearing. Also got a Volvo water neck and gasket. The rest are Sierra.
 
Get some 1/4 inch marine grade plywood. I used to live at tac screw when I worked for marine works take a number. Are you in the seattle area i used to live in Ballard.
 
Measure the shaft where the front seal rides and search timken for the proper speedi sleeve. I just used a old damper pully to press the sleeve on just push it up flush with the lip you can leave the break away flange on it. I just put a heavy bead of loctite on it just prior to pressing the sleeve on.
 
Reguarding the FWD PDS seal surface and the seal;

You will most likely spend more time attempting to find a “speedy sleeve“ than you will replacing this seal and cleaning the shaft surface up.
You can easily build yourself a tool that will hook onto this seal, allowing you to pull it out AFT.
This seal will be different from the 35x62x7mm rear seal.
The size will be embossed into the seal body.
Purchase and install a new seal!

Keep in mind that the rear PDS seal must be able to breach excessive grease or grease pressure. This is the reason for this seal being installed in the “non-conventional“ orientation.


Now...... have you done a forum search, and have you found one of the threads whereby I have gone into detail regarding the use of heat prior to removing the 4 cap screws?
This removal is necessary in order to remove the bearing box from the main transmission case.
Once the bearing box is out, the new “bearing crosses” (u-joints) and the new seal surface washer and main drive gear seal can be installed.

The installation of a new seal seal surface washer requires that you perform a fresh rolling torque value check.


.
 
Last edited:
A cordless 1/4 inch drive impact driver works well for stubborn bolts just get a socket adaptor. The rolling torque is the same as when your setting up a rear differential pinion shaft. If not correct it will howl like a basset hound. I did mine with some wire and a spring type fish scale.
 
kim, are you suggesting that the OP use an impact driver and socket adapter for removing the four clamping collar cap screws?

Yes a cordless zip screw gun 1/4 hex drive.


ashedd, please note:

The four bearing box clamping collar fasteners are grade #8,
carbon steel, 3/8" NC, hex socket head cap screws.
The female 3/8" NC threads (within the transmission case) are thread inserts.
The hex sockets are 5/16", not 1/4".

For the 200, 250, 270, 280, 285, first gen 275 and 290 transmissions (pre-A transmissions), these are considered to be wet area bolt bores and potentially wet area male/female threads.
This means that from the delicate socket head sealing washer to the thread insert areas, these are subject to water intrusion.
Water causes corrosion, aluminum oxide and rust in all of these areas.
This means that these four cap screws may be very stubborn to remove due to corrosion, rust etc..... especially after years of not being serviced.

If any of the four hex head sockets become rounded out...... you will not be able to remove them.
If that is the case, you will most likely end up taking the transmission in for some expensive milling machine work as to avoid damage to the delicate aluminum shoulders.
(I have posted a photo of a transmission that was being machined for this very reason)

If you want to safely remove these four cap screws, heat is your friend!
If you apply Propane or Mapp gas heat (no Oxy/Acet) to the exterior of the aluminum bolt bores, and to the main gear case in these areas, you will create some expansion.
This expansion helps with the corrosion and will reduce the likelihood of stripping or rounding out the hex sockets.

I have done this many times, so please do not discount what I am suggesting to you.


(when the A transmission came out (275A, 290A, etc and later), these areas were no longer wet areas allowing for much easier removal)

Bottom line.... be very careful when attempting to remove these four cap screws!
Penetrating oils etc. are of no use for this. It would take weeks or even months for any penetrating oils to even begin reaching these areas.


Now..... you have shown us that your drive shaft bellows had leaked and that water caused rust within this area.
What you are not yet seeing is the rust that has occurred to the special carbon steel seal surface washer!
Rust scale becomes abrasive.
This abrasiveness slowly but surely cuts away at the seal lip causing it to no longer hold the gear oil back.

Once you get into this area and have the male yoke removed from the main drive gear, you will have access to the seal surface washer.
You can try to polish the OD of the seal surface washer.
You can remove up to .005" from it's OD, yet the new seal will still work.
Avoid swirl marks when polishing.... or you will have trouble.


If by chance you end up replacing this seal surface washer, note that none of these parts will be of the exact same shim platform depth.
(the shims within this washer control the rolling torque value)
If you replace this part, and if the same shims were to go back in...... the main drive gear double bearing box rolling torque will now be different and out of spec.
This means that you must take a fresh rolling torque reading, and adjust the shim value accordingly.


I am making these suggestions so that you do not make a costly mistake, and so that you can get it right the first time and not need to do it again.


.
 
Last edited:
.......................
It is not imperative that the FWD seal completely seal against grease.
Polish this area the best that you can.

What is imperative is that the AFT seal does not seal better than the FWD seal.
Be sure to Pre-Fill the grease cavity prior to installing the AFT seal!
When introducing new grease in the future, the grease will come in forward of the bearing.
It will then be blocked by the FWD seal causing it to go through the bearing.
Any excess that comes out of the ball-cage will seep past the AFT seal and will then puke out into the bellows area.

Always lubricate the PDS bearing with the engine idling.
With the cavity having been Pre-Filled, three to four pumps is enough for each service.


Apply a water proof grease to the Borg Warner splines and to the pilot nose area as seen below.


Be sure to clean the area underneath where the new water neck fitting sits.
The gasket "bead" rotates against the top of the pivot tube, so be sure to grease this area.


Next I’ll tackle the crosses. Do I need to remove the cross/yoke assembly from the transmission to replace the crosses?
You will have good access to the area once the male yoke has been removed from the main drive gear.
The bearing crosses install just as with a car/truck drive line.
Once installed, be sure to tap the yokes correctly as to relax the trunion bearing caps.


Looks like I’ll have to, but don’t really want to disturb that transmission and all it’s shims.
Unless you get into this area, you will not be able to replace the main drive gear seal.

There's plenty of corrosion on most of this stuff...
This is exactly why I went into detail regarding removing the four BB clamping collar cap screws.

.
 
Last edited:
Are there shims inside the sealing washer where the main gear and the yoke come together? The thickness of the shim stack is what gives you bearing preload (rolling torque value).
 
You were very lucky to have gotten the 4 cap screws out so easily. Good for you!

As Kim said, be sure that the small circular shims remain (these control the rolling torque value).

Between the seal surface washer and the male yoke there will be a thin O-ring. Be sure to replace it.

There will also be two larger O-rings that install one on each side of the bearing box "stop collar".

Also replace the 4 cap screw sealing washers. These prevent water from entering the universal drive shaft area.

Liberally apply Perfect Seal to each side of the stop collar O-rings, all four cap screw threads and at the area where the two aluminum components mate.

As for the brass split ring keeper...... check the vertical shaft up/down play. Look up the MAX tolerance for clearance.
If excessive, I would suggest replacing it while you are in this far.
 

Attachments

  • transmission  ashedd.jpg
    transmission ashedd.jpg
    72.3 KB · Views: 57
  • 280 split ring keeper and brg OD .jpg
    280 split ring keeper and brg OD .jpg
    89.7 KB · Views: 58
  • 280 steel bearing box.jpg
    280 steel bearing box.jpg
    16.4 KB · Views: 43
Yea it has only been a couple days since you pulled the gearbox and your close to putting it back together. If the split ring keeper is brass just do the upgrade i will look for the nuts i have in case you need one for the proper end play on the verticle shaft. That was easy have two in hand you can have if needed.
 
I’m not sure what parts you’re talking about...... can you reference the epc and give the coresponding number?

Is the steel bearing box number 45?
 
The bearing box just pulls right out of the clamping collar with the four bolt holes. Before you put it back together check the rolling torque. Put the yoke back on before installing the seal ando ring then torque the bolt to spec. Put the yoke in a bice then wrap a string around the bearing box with a spring scale pull on the string it must have between .2 and 1 ft lbs pressure to turn the bearings. I will check the reference numbers.
 
Back
Top