Logo

How does THIS particular helmet pin come out?

ashedd

Regular Contributor
I’ve read tons of posts about removing this pin, but none mention the pin with two bolts and NO other holes. I’ve tapped and pulled on it with needle nose vice grips about as much as I’m comfortable.

 
The newer style has four bolt holes two are threaded to push the bushing out. Not sure how to pull that one soak it good with power steering fluid and try and get it to wiggle with the rihht size punch. Be sure and replace it with part nimber 853048 for future service. Why? are you going to pull the upper gearbox?
 
Yeah I’m pulling the gear box to replace bellows without removing the drive. Also to Inspect the bearings and u-joint. It’s a new to me Boat. But it looks like I need a new shift cable too
 
Your helmet been pre-dates the style with the two additional Jack-Screw threads.
Do not thread longer cap screws into these two existing holes!

Place two grade #8 3/8” rods into the holes.
Gently force them in all directions. The helmet pin will eventually come loose.


.
 
I had to pull the two side pins to get mine apart. I used a large C clamp with two sockets to push the pins out. The power steering fluid is a good liquid wrench for stainless/aluminum corrosion. Once you pull the gearbox payclose attention to the shims under the lower bearing they can get damaged real easy. Also replace the water neck and gasket under the bellows and always replace the O rings. If you replace the crosses (u joints) you should replace the PDS bearing as well. There are two large snap rings then you can pull the primary drive shaft. I know the$ signs keep racking up but you know what BOAT stands for? Break out anouther thousand$
 
Heat, hammer, vice grips and the little effer came out


I forgot about the “drain the oil part”.... but it’s clean and brown, so that’s good I guess. Dunno what’s settled at the bottom


Is this the sneaky shim I’ve read about? It was the only thing not attached besides the o-rings


Nice healthy amount of rust


Right now the drive is stuck in the locked position, haven’t tried to move it up with the tilt motor yet. Once I get it to move I’ll pull the bellows off. Guess I’ll need u-joints, gotta remember how to do that. They’re nice and free, but look like hell
 
There are C clips on the inside of the caps just tap the clops pff with a punch and the caps will push out. The sealing surface on the yoke needs to be cleaned up and at the very least replace the seal in the PDS tube. You definately need a new bellows for the u joints. Was there any water in the bottom of the lower gearbox?
 
Haven’t gone back out to drain it. Gonna be interesting once I tilt it up to access the drain plug and have all the oil spill on the grass. Guess I could technically put the top back on then tilt and drain, but that seems like a lot of trouble lol

I can do a search, but those are standard u-joints right? Just find the size online then go to the auto parts store?
 
That is the splined coupler for the verticle shafts connecting the two gearboxes. A drip pan would be nice to see how much water comes out if any. Did you find the shims yet be careful one may be stuck to the bearing in the upper gearbox?
 
They are down in the oil. Another thing to check is the end play on the verticle shaft. Push in hard on the lower bearing and push and pull on the shaft. The split ring keeper is another common wear item that needs to be checked. Do you have a service manualif not spend the dime and get to know the drive.
 
Boot


Maybe a shim


Definitely a shim


I’m guessing to get to the PDS I’ll have to take those bolts out? But aren’t we at the back of the engine at this point?


I have a drive manual in iBooks
 
Just pull the seal and remove the two large inside snap rings. I ground the tips ofa large set of needlenose pliers to compress the snap rings then you can pull the shaft and bearing out do not messwith the bolts.
 
Drained a little oil out. Little bit of black followed by the honey brown oil. No water.

So I should get in that red tunnel piece and yank the seal out?
 
You can check the lower bearing has the proper shim with a pair of calipers. Press in on the bearing an measure the height ov the bearing to the mating surface. The put the shim in the intermediate housing and measure to the top of the mating surface you want about .004” preload on the bearing.
 
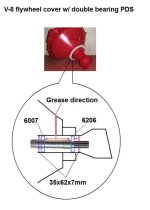
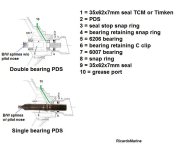
First and second images below show a cut-view of a flywheel cover showing the PDS location.
The first one is a V engine double bearing PDS.
Second one shows both the V engine and the 4 cylinder engine single bearing PDS such as what you have.

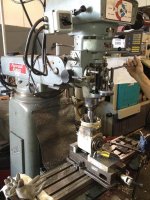
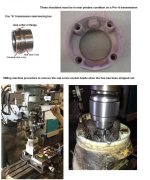
The last images show what you'll end up doing IF you attempt to remove the transmission's Bearing Box without first doing an extensive search on the forum and learning the Dos and Don'ts of the correct cap screw removal.

The transmission shown is on a Milling Machine while having the rounded out hex head cap screws carefully milled out as to not damage the delicate aluminum clamping collar shoulders.
This would be a very costly mistake should the wrong procedure be used.
 

Attachments

  • PDS double bearing grease porting.jpg
    PDS double bearing grease porting.jpg
    38.3 KB · Views: 58
  • PDS both styles single and double bearing 4 .jpg
    PDS both styles single and double bearing 4 .jpg
    60.2 KB · Views: 67
  • Milling machine 1.jpg
    Milling machine 1.jpg
    88.6 KB · Views: 69
  • Milling machine 3.jpg
    Milling machine 3.jpg
    77.7 KB · Views: 65
Last edited:
...........................
Boot

This is an AQ series drive shaft bellows.


Maybe a shim


Definitely a shim
Yes, that is one of what we commonly see as multiple shims.


I’m guessing to get to the PDS I’ll have to take those bolts out?
DO NOT remove those bolts.

But aren’t we at the back of the engine at this point?
See my images in my previous post.


This is the water neck fitting above.
Be sure that you replace it and the special beaded gasket underneath it.


I have a drive manual in iBooks
OEM..... not Seloc or Clymers!
 
You can check the lower bearing has the proper shim with a pair of calipers. Press in on the bearing an measure the height ov the bearing to the mating surface. The put the shim in the intermediate housing and measure to the top of the mating surface you want about .004” preload on the bearing.

For a bit more accuracy and ease;

Over-shim between the Intermediate housing "bore" and the the bottom of the lower "driven gear" bearing retainer.
Yes.... you will need a few more random value shims in order to do this.

Without the two O-rings in place, gently snug the transmission into position.
Now take multiple precision feeler gauge readings around the perimeter (measure the gap between the two components).
Use the measurement that came up most often.

Remove the transmission.

Carefully measure the "over-shim" pack value.

Reduce the over-shim pack value by a number that will still be .003" to .004" strong when the two components will attempt to close the gap.
(I prefer .003")
In other words..... the shim pack must be squeezed by .003" when the transmission has been finally tightened into place.

The goal:
The two components (transmission and Intermediate housing) come together closing the gap, yet offering a shim pack squeeze of .003" when fully tightened into position.
This tension prevents the bearing retainer and outer bearing race from rotating while under load.
The exact same procedure is used for correctly shimming the transmission's top cover.

 
Last edited:
Look on ebay for part number 897313 and click on after market upgrade it shows pics of what can happen if you have the brass retainer. It has a shift life anything over .020 inches end play on the verticle shaft must be corrected.
 
I’m confused....

Why would I even mess with the shims if all I do is replace the bellows and u-joints and reassemble? Wouldn’t I just install everything the way I removed it?

Also, why has everything I’ve read say to replace the pds while you’re in there if you don’t know the boats history, and that it’s easy to do? It sounds like a pretty large undertaking to replace that bearing the way you describe?

I’d like this thing sitting in my slip by the first week of April, and I’ll be out of town for ten days between now and then. What are my options?
 
Let me see if I understand the gist of this..

I can pull the aft pds seal
remove snap rings
somehow miraculously get the bearing to come out
install new bearing(correctly filling with grease)
install snap rings
install seal(observing orientation)
replace u-joints(crosses)
replace bellows
install new o-ring seals
fit trans on top of case(don’t know the names)
check gap
figure out what shims I need in order to be at the proper gap
install said shims
bolt it all back together
fill with oil

Is this about right?
Where do I get random shims?

Do backyard “mechanics” just throw these things back together without checking all this stuff? They make it sound like a 20 min job that requires very little in new parts
 
Do you want trouble-free operation..... or would you rather hold off on preventative maintenance until parts replacement becomes absolutely necessary?

PDS bearings rarely get replaced. You’re single bearing PBS is removable from AFT without the need to remove the engine. This bearing will cost you no more than $14. Now is the time to replace it!

Your main drive gear seal is no doubt compromised due to the rust. Now is the time to replace that! However, this is not for average Joe, unless Joe does some thorough research. (I have posted to this very topic many times on this forum)

The AQ series drives are very good. However, deferred or non-maintenance will take it’s tole on any stern drive!


If we do not take the time nor spend the money to do preventative maintenance now...... when we will find the time or enough money to correct an even greater repair later????


Your call!
 
Last edited:
I’m trying to cut through all the internet noise..
Do I want a sealed or open pds bearing? I can find all the parts I need locally but am having problems finding it at marine stores. According to the epc I need bearing p/n 11013
 
Last edited:
Do you have a grease zert on top of the flywheel housing behind the engine where the PDS bearing is? Once you pull the PDS shaft you can inspect the forward seal and shaft. Mine had pits in the sealing surface and installed a speedi sleeve. Your almost ready to put it back together. The forward seal allows you to grease the PDS bearing without pulling it apart. The rear seal allows relief when yuo pump grease in the cavity in front of the bearing.
 
Back
Top