Logo

Replacing Spark Plugs Mercruiser 4.3L - Coolant Hoses In The way! Help!

jasondainter

Regular Contributor
Hi All.

I am trying to do (what you would think is) a basic job, changing spark plugs on my Mercruiser 4.3L MPI from 2006.

Ive seen in a few videos, the best way and *only* realistic way I can see is to remove the chunky hose on the way on both sides or access would be impossible.

I have a closed cooling system in my mercruiser and when opening a little I could see pink liquid (antifreeze) leaking a little.

I saw a few people in forums suggested that a bit of leak is normal so I went for it and took the left hose off, my goodness. The thing poured out just over 6 litres of antifreeze onto the engine floor. Not optimal! These are quite pricey here in Sweden so going to cost me a bit to top up 6 litres (probably approx 100 USD!)

I managed to vac it all up but have a few questions going forwards so I can finish the job.

1. How on earth do I remove the right hose without the same thing happening. I read there is 19L of coolant in that system so want to avoid the same thing again and blowing another 100 USD. Is there some kind of cap that can be placed into the hose to block it off?, is that the reccomended way to go about it?

2. Am I missing anything? As far as I can sell its 100% essential to take off those hoses.

3. I presume when topping up I fill up the main tank right to the neck (I believe thats what the manual says) then the reserve "top up" tank to the right level, then run the engine on muffs to "bleed", then I'm good?

Help is greatly appreciated!
 
It's the age old problem of how to get to something on a motor when something else is in the way.

Find a place that a container can be placed to drain coolant. Doesn't have to drain all of it but enough to remove the hose. Don't know your serial number Pulling the hose you just did should drain both exhaust manifolds
 
Thanks but a container isnt going to cut it, 6 *litres* of coolant poured out when I pulled it off quite quickly and actually theres very little space for a container to handle that amount of liquid

Plus if I drain out all the coolant to a container, from my closed cooling system, I guess in theory I could add it back again but seems like a risk of contaminating it when doing that.

A mechanic who has worked on this boat told me he doesnt remove those hoses, but I really fail to see how that is possible (
show an example of the hose in question)

Good to know it likely drained both though, I have a 3D printed plug that I printed last night to fit into the hose in case theres more coming out, thats the best thing I can think of when doing this job again in a year or two.

Unless anyone has any other ideas how to handle this?
 
Nothing wrong with draining coolant into the bilge and out the drain plug if bilge is fairly clean. Even a bit of dirt isn't a problem, just strain it thru a some cloth before reuse. If unable to remove drain plug, drain into bilge and suck it up using a shop vac

As for not enough area to place a container. Make something like a rain gutter (smaller) to drain it into a container else where. Get a piece of 7 or 8 CM hose and pull plug and the hose will drain into another container close by. Same issue things have to be moved to gain access.


1drain.jpg
 
Thanks, I was actually wondering about straining it. I managed to hoover up all 6 litres of it from the bottom of the engine bay and collect it, but the bottom of the bay was very dirty. I asked chat GPT on its take and it was very adamant that I should not re-use it due to contaminants potentially ruining seals etc and doing harm. But good idea with the cloth maybe it would be OK enough.

I forked out the cash for some new quicksilver coolant anyhow now already so I'll probably put that in to be safe this time.

Good idea with the gutter also! But thinking perhpas a plug would be more effective then no spillage at all to worry about? How about the plug route?

I 3d printed this last night so if it fits (which I can customize) then that should work?

Screenshot 2025-10-20 at 14.22.55.png
 
Yes coolant manufactures say do not reuse because they have no idea what is in the bilge.

When the hose is draining from the thermostat housing and all the coolant in the heat exchanger. By plugging the hose it will lower the amount coming out but note the hose on top of the exhaust manifold will drain back into from that hose and out.

Clarifying note from my previous comment: Draining one side will drain from both sides, but there will still be some on the other side, but should not be much
 
Thanks again.

Im not sure I am following this part "By plugging the hose it will lower the amount coming out but note the hose on top of the exhaust manifold will drain back into from that hose and out."

I think you're saying by plugging the hose immediately after taking it off it'll end up coming out of somewhere else? Not sure how that can be could you kindly explain to a noob such as myself!

Understood about the other side potentially not being an issue now, but I'm thinking more about next time I come to change them again.
 
I think you're saying by plugging the hose immediately after taking it off it'll end up coming out of somewhere else? Not sure how that can be could you kindly explain to a noob such as myself!
The pic below is not yours but hope it will help clarify
The exhaust manifold has a hose on top and bottom. Ignore hose on very top attached to elbow.

If bottom is plugged, coolant will still flow from top hose down thru manifold and out the bottom fitting. This comes from the heat exchanger and anything else higher like the other manifold on other side

GM 350 closed cooling.png
 
Ok and to add to this remember that when you refill the cooling system you have to run the engine with the cap off of the heat exchanger to allow trapped air to escape, trapped air can cause overheating when the engine warms up. I like to use what’s called a radiator funnel this will allow the air to escape without making a mess. Closed cooling is a great addition to an inboard engine for several reasons but it creates some extra work due to the hoses, etc. The ones in the way feed the AF into the bottom of the exhaust manifold so it’s inevitable that they will be in the same area as the spark plugs. Keep in mind that if you boat in salt water this saved you from having to replace the exhaust manifolds every 7 years…so a lot of money saved that way….it’s also typical of Merc, even their raw water cooled engines have a maddening array of hoses and connections with that easy drain system. My old OMC has like 5 hoses total! Older Volvos are the same.
 
Also forgot to mention they make tools to clamp off hoses, I would just use a C clamp, clamp off the hose before disconnecting it to keep the AF in the hose.
You will spill some but not 6 qts!
But remember to bleed the air out of the heat exchanger...
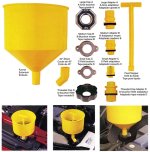
here's what I am talking about....a special funnel that has various attachments so you can fit it to the neck of a radiator or heat exchanger....
very useful!
 

Attachments

  • Lisle funnel.jpg
    Lisle funnel.jpg
    209 KB · Views: 33
  • Lisle rad funnel.jpg
    Lisle rad funnel.jpg
    87.9 KB · Views: 38
Super helpful guys! Thank you!

AllDodge, so would one way around this to basically be when I pull off the (rather thick) hose, to plug the hose itself AND the "male" part that goes into said hose. Surely plugging them both would stop the leak entirel?

My 3D printed part at 26mm width fit pretty nicely into the plug so I could do something similar with the "bit that you pull it out from"

Does that make sense or am I missing something?

I found my engine serial now finally, 0W336458.

I took the other side out now plugged the hose part to be safe and no major leaks from the "other" end it goes into so I can actually start the work now!

First thing I notice is the existing plugs are gapped to 0.03 inches which seems totally wrong for the motor, it literally has "0.06"" printed on the engine cover and checked 4/5 times in other places and seems to be wrong so I'll be fixing that when the new ones go on.

0.06 is quite a huge gap (from my little knowledge of these!), its so bit it point upwards a bit have I done it correctly or is there a technique to making it fit more parallel rather than angled up?
 
Super helpful guys! Thank you!

AllDodge, so would one way around this to basically be when I pull off the (rather thick) hose, to plug the hose itself AND the "male" part that goes into said hose. Surely plugging them both would stop the leak entirel?
OK here you are trying to keep the exhaust manifold and the hose connected to it from draining. Here's what I'd do:
use a c-clamp and your plug in the hose you're disconnecting to stop that from draining, for the manifold you would have to buy a length of the same size hose, put one of your plugs in it and quickly slide it over the fitting with the blue wingnut fitting on it. Clamp off the main hose, slide it off but have other hose ready to slide on to the manifold fitting. That's the only way I can think of doing it. You're still going to spill some but it won't be that much.
My 3D printed part at 26mm width fit pretty nicely into the plug so I could do something similar with the "bit that you pull it out from"

Does that make sense or am I missing something?

I found my engine serial now finally, 0W336458.

I took the other side out now plugged the hose part to be safe and no major leaks from the "other" end it goes into so I can actually start the work now!

First thing I notice is the existing plugs are gapped to 0.03 inches which seems totally wrong for the motor, it literally has "0.06"" printed on the engine cover and checked 4/5 times in other places and seems to be wrong so I'll be fixing that when the new ones go on.

0.06 is quite a huge gap (from my little knowledge of these!), its so bit it point upwards a bit have I done it correctly or is there a technique to making it fit more parallel rather than angled up?
 
after watching the vid, because the Merc manifolds are fed from the bottom, I can see that even on a raw water cooled engine, you'd have to remove that hose but it doesn't matter as much because it's just water not AF. On the OMC and Volvo manifolds, they are fed from the front so the access is fine. I can have the plugs out and new ones in maybe in 15 min.
4.3 with new exhaust system.png
 
Plug gap should be .060
Original Plugs were AC 41-932 and have been replaced by AC 41-933 all of which are Iridium and high dollar. Some have used MR43LTS and replace more often

Yes you could cap off or pinch off the hoses but will still loose fluid out of the manifolds
 
Thanks I bought the same same plugs as the last mechanic fitted (maybe was a bad idea given he gapped them incorrectly) which were NGK BPR6EFS. According to my friend chat GPT they are a suitable replacement but they are standard nickel electrode not long-life (platinum/iridium) so given they might not last as long I'm temped to delay things and get AC 41-933's so I can wait at least a couple of years before redoing this! I'm in Sweden so the ice/snow is fast approaching so I'm a bit against the clock but maybe can get some delivered fast.

I've heard gapping these iridium ones is a bit more tricky because this round disc gapping tools ruin the tips, so would probably have to pick up feeler gauge then using using long nosed pliers like in this video, does thhat sound about right?

Out of interest though does the "angle" of the spark plug adjustment on my BPR6EFS ones look OK on my photo above? I'm worried its angled too far diagonally up is that normal for this big a gap or should I have tried to work it more so its more "flat" with the gap and nipple bit underneath? Maybe using the pliers is a way to make that more "flat"?

RE the leakage, I hear you on the extra tube and plug but I think that's unnecessary if you have a 3D printer, since I can print another plug for the manifold hole when the hose is disconnected. Using TPU material is a bit flexible plastic and perfect plug material so should plug the hole nicely.
 
Do not even try to regap iridium plugs, the coating will Crack and it will never last

Using NGK BPR6EFS is ok, and a tad off center is not an issue
 
OK thanks, but how would you ever gap them then if you got AC 41-933 ones? My understanding is they wont come gapped to 0.06"? So how do people normally do that?
 
Thanks I bought the same same plugs as the last mechanic fitted (maybe was a bad idea given he gapped them incorrectly) which were NGK BPR6EFS. According to my friend chat GPT they are a suitable replacement but they are standard nickel electrode not long-life (platinum/iridium) so given they might not last as long I'm temped to delay things and get AC 41-933's so I can wait at least a couple of years before redoing this! I'm in Sweden so the ice/snow is fast approaching so I'm a bit against the clock but maybe can get some delivered fast.

I've heard gapping these iridium ones is a bit more tricky because this round disc gapping tools ruin the tips, so would probably have to pick up feeler gauge then using using long nosed pliers like in this video, does thhat sound about right?

Out of interest though does the "angle" of the spark plug adjustment on my BPR6EFS ones look OK on my photo above? I'm worried its angled too far diagonally up is that normal for this big a gap or should I have tried to work it more so its more "flat" with the gap and nipple bit underneath? Maybe using the pliers is a way to make that more "flat"?

RE the leakage, I hear you on the extra tube and plug but I think that's unnecessary if you have a 3D printer, since I can print another plug for the manifold hole when the hose is disconnected. Using TPU material is a bit flexible plastic and perfect plug material so should plug the hole nicely.
Same as a car engine…do NOT even attempt to gap an iridium plug. It might even say so on the packaging.
 
A few people here saying 41-932 was replaced with the 41-993 I'm thinking they would be a suitable replacement which are pre gapped at 0.06". I might pick up a set for another year or so when I next change them.
 
On the plugs, I'd go for platinum tipped before parting with the extra $$s for the iridium tipped ones...

On the gap, having the ground electrode 'parallel' to the face of the tip is best. most conventional plugs are not built for a 0.060" gap so some tilt is not unexpected. Personally, I would set the gap ~ 0.045" and not worry about it. The gap will only grow with use...
 
Plugs come pre-gapped, don't try to change it
Found a 2006 Bulletin which says to use 993 for 4.3 motors after 2006. Parts look up at Mercury still show 932

The iridium and platinum plugs are designed to last forever in a boat, maybe 1M miles in a car. As before you could use the regular LTS plugs and be fine, but up to you
 

Attachments

  • Bul 2006-03 spark plugs.pdf
    77.3 KB · Views: 27
On the plugs, I'd go for platinum tipped before parting with the extra $$s for the iridium tipped ones...

On the gap, having the ground electrode 'parallel' to the face of the tip is best. most conventional plugs are not built for a 0.060" gap so some tilt is not unexpected. Personally, I would set the gap ~ 0.045" and not worry about it. The gap will only grow with use...
Thanks I was considering this and since it ran ok in my uneducated opinion at 0.03" i might be better off not pushing these plugs past what they're intended for.

Why 0.045 out of interest?
 
I see Aluminum brackets on the lower part of the engine cover- have you thought about removing it to make access easier?

I worked on boats at three dealerships- IMO, ALL boat designers should be forced to service boats for at least one year, so they can learn that "What's the problem? It fits" doesn't mean "It's possible to service that freakin' boat".

Can you post a photo of the spark plugs AND the coolant hoses?

If you can use a universal joint and extension with spark plug socket to remove the plugs, you may not need to remove the hoses. Insert a short piece of hose into the socket, to grab the ceramic insulator. I loosened the plugs and used a 6' piece of hose (I think the I.D. is 5/16") and once they were loose, I slid it onto the ceramic and removed/installed them.

Good luck.
 
I see Aluminum brackets on the lower part of the engine cover- have you thought about removing it to make access easier?

I worked on boats at three dealerships- IMO, ALL boat designers should be forced to service boats for at least one year, so they can learn that "What's the problem? It fits" doesn't mean "It's possible to service that freakin' boat".

Can you post a photo of the spark plugs AND the coolant hoses?

If you can use a universal joint and extension with spark plug socket to remove the plugs, you may not need to remove the hoses. Insert a short piece of hose into the socket, to grab the ceramic insulator. I loosened the plugs and used a 6' piece of hose (I think the I.D. is 5/16") and once they were loose, I slid it onto the ceramic and removed/installed them.

Good luck.
Haha yes I second this proposal! Never thought life would be so hard changing a spark plug!

It might be possible the way you say, the problem is to get into my engine bay I have to hang pretty much upside down in there to even get close to the plugs, and the fat closed heating system is right in front of at least 1 of the plugs so I have a hard time seeing another way in as you would need to unscrew the thing, and ideally torque it back to 15nm or whatever suitable.

But I'll take some pics / maybe a video when I'm back in the boat stabbing at this again (probably this evening!)

Good news is my new coolant now arrived 8 litres of the stuff so it should replace the bucket load I lost on the floor!

I think the 3D printed plugs (which I told my wife were butt plugs, which she was unamused by) I made will work pretty well though since I custom made them with soft plastic (TPU) to fit they're pretty snug and you could probably add a crocodile clip on them also to stop any drips. I'll print those all ready for next year whilst I have access to the hose this time round to stop another pink Tsunami!
 
Haha yes I second this proposal! Never thought life would be so hard changing a spark plug!

It might be possible the way you say, the problem is to get into my engine bay I have to hang pretty much upside down in there to even get close to the plugs, and the fat closed heating system is right in front of at least 1 of the plugs so I have a hard time seeing another way in as you would need to unscrew the thing, and ideally torque it back to 15nm or whatever suitable.

But I'll take some pics / maybe a video when I'm back in the boat stabbing at this again (probably this evening!)

Good news is my new coolant now arrived 8 litres of the stuff so it should replace the bucket load I lost on the floor!

I think the 3D printed plugs (which I told my wife were butt plugs, which she was unamused by) I made will work pretty well though since I custom made them with soft plastic (TPU) to fit they're pretty snug and you could probably add a crocodile clip on them also to stop any drips. I'll print those all ready for next year whilst I have access to the hose this time round to stop another pink Tsunami!
Sorry, I saw Louc's photo and didn't look at the screen name.

However, you might want to indicate the make/model of your boat- as I posted, some manufacturers don't think that making boats easy to service matters.

You can buy rubber caps for fittings and hose pinch off clamps at auto parts stores- I'm not a fan of using metal Vice Grips on rubber hoses, but some of these have surfaces that won't damage the rubber.

1761058026657.png
 
Thanks I was considering this and since it ran ok in my uneducated opinion at 0.03" i might be better off not pushing these plugs past what they're intended for.

Why 0.045 out of interest?
Empirical...that was the gap you could open the regular plugs up to and still have a decent looking gap...may need tweakiing if they have modified the standard plugs..
 
Back
Top