Logo

Johnson 70EL79R - Idle Adjustment?

randomguy

New member
Hey everyone:

My first post. We recently bought a pontoon that's in good shape and a perfect starter for my family. It's got a 70HP '79 Johnson outboard on it. It starts pretty well, and it runs really great from everywhere just above idle all the way up to full throttle.

However, it generally won't hold idle very well and it frequently wants to die when you put it into gear. I'm pretty mechanically inclined, but this is my first outboard. I'd like to try to increase the idle speed and see how she behaves, but I'm in need of a little guidance.

I got a manual online that states that it covers this model and year, but it tells me that I need to adjust the idle screws by removing rubber caps in the air silencer cover, and those caps aren't there. I've removed the cover and it's a solid cover.

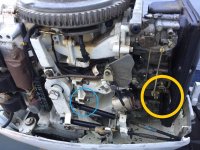
Then I noticed a sticker on the cover that tells me that the idle adjustment needs to be done with the throttle cable trunnion (see attached image).
Engine Idle Adjust Note.jpgEngine Side.jpg

So my question is this. The throttle cable is the one on the bottom in the pic, or furthest from the flywheel. When the throttle control lever is moved forward, the cable pulls, so the arm moves towards the bow. Is idle RPM adjustment as simple as turning the black thumb wheel in the "tighten" direction? Do they refer to that as a trunnion? If that's how it's done, why would I want to make the adjustment with the cable disconnected? Wouldn't I want to have the engine running and the cable connected so I could listen as I'm doing this? Am I missing something?

Thanks in advance!
 
See the bolt with the 7/8 " head-----Next to it is a bracket with 2 screws.----The lower one is turned in to increase idle speed.----Best to do a compression test too.--------Write down the numbers for future reference.
 
I kinda wondered about that screw. So it's just a simple mechanical stop, huh? Should I actually disconnect the cable before adjusting? I doubt that it's going to need a ton of tweaking....


Thanks!
 
Hey everyone:

Thanks to racerone's post, I went out and adjusted my idle up a bit. She purrs now at idle in neutral. However, when I go to the detent positions (Forward Idle or Rev Idle), she still chokes and seems like she's starving for fuel. I got some advice to do a fuel pump first since they're cheap and easy to install.

So I ordered one and installed it last night. There was maybe a minimal improvement, but it certainly was not drastic. The situation is pretty much still as I described it. Fuel is new, higher octane ethanol free with some seafoam in it. Fuel pump is new. Neutral idle is great, and any speed above idle is great. However, forward or reverse idle starves her and sometimes she dies right away when you come out of neutral, either direction.

Is there a way to adjust the RPM at the forward/reverse idle detent positions?

What should I try next? Carb rebuild? Something else?

Thanks again for everyone's posts!
 
I'd have to get down and watch again while the stick moves, but if I recall correctly, when the stick is moved to detent, the rotating collar has moved and is no longer pressed up against the stop screw that racerone referred to in his post.

It wasn't obvious to me how the RPM level gets adjusted when the stick is in gear at the detent position, but maybe I missed it. How does this get done?

Thanks
 
When the lever is in neutral and the throttle mechanism is not pulled tight against the idle screw. You need to adjust the cable on the motor. You are only concerned about the lower screw at idle. The upper screw is only the WOT stop for the carbs. Your idle should be about 1000-1200 rpm on muffs. Your final adjustment for idle needs to be done idling, in gear and the motor up to operating temp.
 
Last edited:
Idle rpm on a flushette
20" shaft = 1000 rpm
25" shaft = 1200 rpm
The idle will drop to normal when in the water if all else is as it should be.

Setting idle.....
Back idle stop screw away from its seat temporarily.
Set idle via the adjustable trunion on the throttle cable.
When idle is set, screw in the idle stop screw against its seat.
***
Now, as throttle is applied, then returned to neutral/idle, the rpm may be higher... readjust the cable trunion adjustment knob so that the idle stop screw bottoms out properly against its stop.
 
OK, I made some adjustments tonight. The idle screw isn't too far from being all the way out, maybe about three threads.

Anyway, it now idles about 1200 in neutral and runs nice and smooth. When I go into forward detent, it drops to around 800 and is still pretty rough and sputtery and will sometimes die. I gave up for now mostly because I ran out of daylight. Should I keep increasing until I get it smoothed out in gear, or am I already at the ceiling of where I should be?

Thanks again everyone for your posts!
 

Attachments

  • Johnson.jpg
    Johnson.jpg
    87.2 KB · Views: 29,221
You need to do a link and sync. As you raise the idle you are moving the cam towards the carbs and they are starting to open. You do not want the carbs opening at all you want to set the idle with the timing.
 
The throttle roller should be approximately 3'8" in diameter.

Back the throttle roller away from the metal cam sp that it is not touching.

Adjust the linkages between the carburetors so that the throttle butterflies open and close at the same time. You do not want one butterfly slightly open while the other is closed. (link)

Now, adjust the throttle roller so that the butterflies open when the scribe mark on the cam is dead center with the throttle roller... not before or after. (sync)
 
Since this is an older motor, you have to compensate for carb linkage wear. When you synchronize the throttle butterflies, first prop slightly open the cam follower for carbs. Look inside the carb that is directly on the roller. Then adjust the other carbs to that same opening. Lube linkages. If there is more than about .020 to .025 play from "master" carb roller movement to the action applied to any other carb, then it will be important to correct the play. This has to be done accurately and carefully. The top carb is often the culprit behind top cylinders scoring because of lean operation. Often on fixed jetting,the upper carb is jetted slightly richer. Had OMC engineers used the upper carb as the "master", then they likely would have saved millions of motors from early death. The lower carbs rarely produce the scoring. To add to that, the upper cylinder generally runs a bit hotter as the water flow becomes interrupted with debris and/or a weak water flow. I do have a Yamaha 25 here with a scored lower cylinder, however. I am just generalizing but many other techs may share my thoughts.
 
Last edited:
Wow, thank you guys very much for the detailed how to's. I really appreciate it. I'm pretty mechanically oriented, but this is my first time working on carbs and stuff, so I really only know the very basics.

Anyway the next couple weeks are crazy busy for me and I've got two jet skis to take out and clean up before I start tinkering with this. I'll check all this stuff out and post back again later. Thanks again!
 
Just had a Sea Doo here, they are challenging to work on. Almost 1000 cc the guy let it sink. Then filled it with oil and it sat for 4 weeks. What a mess. Ended up hooking up an auto fuel pump after turning it upside down for 2 hours to drain. Got it going but the thing is going to need a massive cleaning. The original fuel pump is 450 bucks. Do you think the engineers would have the foresight to put a drain plug on the crankcase? Huh?
 
OK, I made some adjustments tonight. The idle screw isn't too far from being all the way out, maybe about three threads.

Anyway, it now idles about 1200 in neutral and runs nice and smooth. When I go into forward detent, it drops to around 800 and is still pretty rough and sputtery and will sometimes die. I gave up for now mostly because I ran out of daylight. Should I keep increasing until I get it smoothed out in gear, or am I already at the ceiling of where I should be?

Thanks again everyone for your posts!
Where does that spring attatch with the yellow circle it's broken mine is the same
 
There is a spring there that may look broken to you.----It keeps choke plates OPEN when at full throttle.----Do not adjust / change it if you are not sure of it !
 
Back
Top