

Logo

Installing new saddle tanks on my 22' cruiser would like less stern weight

I have but just a little. the new correct vent came but it sticks out kindof far of course it came w/ no instructions.looks like I need to ream the hole I hate doing any holes though hull.mite let it stick out.
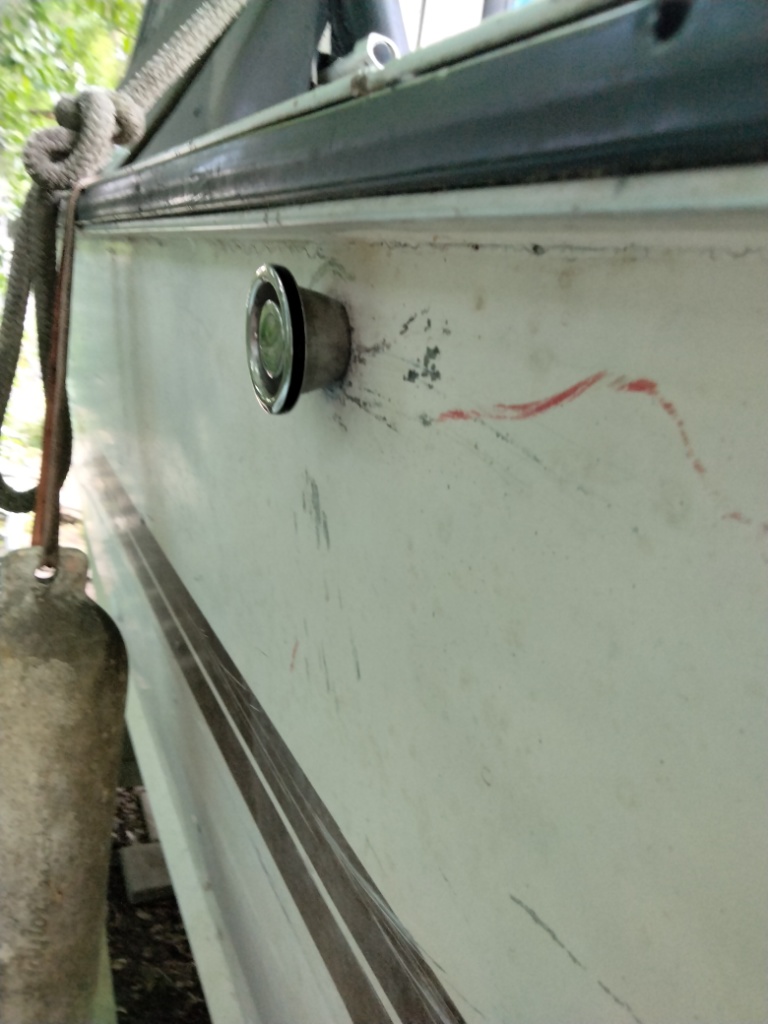
correct 360 degree vent.jpg


been having a bit of a struggle w/ the tanks waterproofing the plateform. received some defective epoxy another pita removing uncured epoxy ten times the amount of work taking that smeely crape off not to mention the mess of epoxyed saw dust everywhere rant over.

been concentrating on transom rebuild. splashwell just finishing up on the rigging tubes has been a major pita but I'm taking it easy when I start rushing thats when short cuts happen.

if I had a 26" setback pod I'd've (not sure thats a real word) ditched the splashwell for full transom. anyway pod, knee brace an I/beam brace is done I may hang the ETEC later today.

I now have a family of I think are feral cats that moved in under the Hummer been for about a week, an are making themselves at home normally a feral avoids people. they can claw the crape out of you.

don't get started on the dam mosquitoes from hell the new zapper didn't help only thing that helps is the big fan but then I have to move it all the time.
 
on the vent, may or may not need a bigger hole thru the hull...pull the clamp and the hose and pull it out.

remove the bell shaped 'cup' and leave the gasket on the vent. Inspect vent to see if the hose's tube is expanded where it goes into the "button" of the vent. if it doesn't, reinstall the vent into the hull, and the put on the cup & nut...tighten nut and reinstall hose and clamp...
 
hey Mark are saying to remove the bell cup then insert the button of vent the trumpet thing an have gasket agaist hull then slide the cup on inside of hull then nut an tighten? thanks and BTW the new ETEC is hung on the new transom. plan to do some rigging soon. thanks
 
I think you got it...i marked up your picture to resolve any ambiguities...
 

Attachments

  • hull vent annotated.pdf
    89.9 KB · Views: 48
ok so the bell goe's inside the hull obviously the gasket on outside? will report back you know I had to look up that big word the last word. thanks
right now priority is finish rigging. I still have two of 6 gallon portables (I'll still carry as reserves depending on lenght of cruise) an a the 19 gallon below deck I use above deck.not sure why we arne't suposed to use 6 gallon tanks why big v6 engines, maybe bc they run out quick an the should never be deprived of fuel? the saddle tanks will free up some real estate.
 
I think so...

It's means things that are not clear ( confusing).

It's t he potential for leaks and explosions...
 
You know I’ve been waiting a couple weeks for this epoxy to dry I think I received a spoiled batch. Anyway got tried of waiting an slapped the dam wet platform in, didn’t even bother epoxying the freeboard (upright protectors).


Top of platform
platform an freeboard protector mounted top.jpg


underneth platform home made surport I'm planning to either use blue lock tight or just double up on nuts bc for right now this is the only point tank is secured to platform, still to secure the rear image
underneth platform surport.jpg

wireing sender an grounds of tank white is sender level, green is tanks body ground blk is senders ground
I've also spliced on the fuel caps ground all three combined will run these grounds up to negative busbar behind helm. sender will go to my half of the toggle switch middle of toggle will go to gauge, remember there will be two tanks. was thinking about using a wire nut to secure the three grounds then liquid tape
then good 3m electrical tape.

need top surpurt inbetween tank an gunnel only the bottom of tank is secured to platform I'm considering spary expanding foam on top? or mite fab a wooden holder secured to the brown gunnel.(which isn't designed to be structural but for just holding the plywood tank cover.


need top surpurt inbetween tank an gunnel.jpg

need top surpurt inbetween tank an gunnel2.jpg

rubber filler tube needs extending2 inchs
rubber filler tube needs extending2 inchs.jpg

underneath I have ordered a 15” rubber tube


considering ordering new fuel cap filer tube mine are a bit corroded I have sanded down but still isn’t clean metal.


I believe the vents hole requires enlarging don’t realy like the way it sticks out like water can easly enter the tank though the vent.


Thanks for advise.
 
underneath I have ordered a 15” rubber tube

rubber filler tube needs extending2 inchs underneth.jpg


considering ordering new fuel cap filer tube mine are a bit corroded I have sanded down but still isn’t clean metal.

sanded corrosion off filler tube.jpg

I'd like to reuse the orginal filler cap it has a longer an nicer tube however it never had a ground strape wonder why, anyway it's real corroded lower right in image.
orginale longer filler tube lower right no ground.jpg


I believe the vents hole requires enlarging don’t realy like the way it sticks out like water can easly enter the tank though the vent.

correct 360 degree vent.jpg


Thanks for advise.
 
Do yourself a favor and never use a wirenut for boat electrical work....
I usaley don't use the wire nut, usaley just twist the connections together, probably should solder but don't,liquid tape, heat shrink then the 3m electrical tape.and of course tuck up away from any splashing.
what do you think about securing the top of tank? thanks Makomark
 
I offered thoughts on the vent a while back.

If you go with spray foam, make sure to get the closed cell variety...
 
you can add a bonding wire to any metallic fill port as long as you have access below the deck it is mounted on.

I will see if I can do the visual for you later - here's the verbage...just replace one of the screws with a thru bolt, about 1.5-2" longer than the screws used. add a washer and a nut to the thru bolt and secure that assembly. on the thru bolt's extended threads, add a nut and a washer, the bond wire's ring terminal, another washer and then the final nut. tighten the 'extra nuts' to secure the bonding wire to the fill port.
 
Plan to use a though hull bolt at new fuel cap to attach ground wire (unless you know a better way to remove the corrosion inside old filler tube?)


outside of vent flatup agaisnt hulls freeboard, won't rain still enter the vent like the rub rail can only block so much, here it looks much lower from rubrail than mine.
vent tube flat agaisnt freeboard.jpg

I'm gonna widen my vents hole by combining the large whole saw bit ontop of the small allready used bit will save alot of filing time for widened hole.

proper vent tube orintation I think I have just enough room to tilt tube upward an backward.
it looks like this expert (I say expert bc I watch alot of his videos) 5200ed the inside an outside of vent.
proper vent tube orintation.jpg

heay Makomark you are spot on again w/ excellent advise. thanks again after watching this a a few other videos not using the foam all it doe's is trap water an cause corrosion,
I know you suggested strapes if I use strapes the top will have to attach though freeboard
bottom can secure at platform.
I wished this tank had flanges like the orginal tank sure would simplify the securing part.

you know I was gonna JB weld some flanges but changed my mind.

 
Last edited:
the fuel pickup is aimed straight back, it would make routing the fuel tube easier if it was cocked a tad.
this other expert suggests to never use the teflon tape I've always used in favor of blue lock tight?

or it mite be best to just leave it aimed straight back an just fight it some more. if you only knew how hard this job has been so far.

 
if the pickup hose has a wiggle, it won't hurt anything.

Blue locktite works but locktite PST (past) works better - the teflon tape is usually applied too thick and the shreds have been know to flow downstream, into the fuel system, and clog things up...
 
the pickup tube is stationary think I'll leave it an just fight the routing which is kindof jammed all the way to transon.real tight back there.
I'm now considering having a flange welded on each end of each tank. the metal is kindof thin apprehensive bc he mite burn a hole in tanks skin thats why I wanted to JB. heck 5200 mite be strong enough to hold a mount flange. thanks will report back w/ more progress.
mite just continue w/ my 19gallon.

notice the fan inside vessel it's on high trying to blow the mosketoes away they aren't regular mosketoes they are carnivorous devils.not just one or two but dozens.
Ive tryed a mosketo zapper only worked on 1% tryed candle worst results, the fan generates some good wind but still fly though it.
my next plan is the mosketo netting you wear on face/sleeves/legs then they get me on the exposed hands.
heck I'm wearing thick sweat pants tucked into boots & shirt getting bitten even though the sweats. another reason it's going so slow.
 
update on tank:
Will revit strape to inside gunnels top. Bend up strape screw into bottom of platform
inbetween tank an freeboard 3marine plywood 2"stripes height of tank.inbetween strape an tank bicycle inner tube rubber.after the strapes fill tube then the 4way vale an water separating filter an the cover more on that stuff later.
1Bend up strape screw into platform rivot top.jpg


Best image I have of where strapes will be.

aft end of port tank.jpg


Heres new fuel line in rig tube.
fuel line though rig tube.jpg
 
I've got the tanks plateform as good as I can w/ the waterproofing epoxy. heak the original plywood platform was just painted an it lasted 45years this plywood appeared meduiem quality.

new platform is secured to the braces an the mount holes are drilled.

I'm getting close to mounting tank an hose clamping the fill an vent tube. plan to use a single hose clamp on each end of the vent tube. plan to use 2 opposing hose clamps on the tank. an I use 2 opposing clamps on the filler tube.
same the fuel pickup hoses also be double clamped at both ends tank and just single at the 3 way switch.

will be relocating new water separater fliter mounting w/ z bracket to back on transom
thanks
 
Last edited:
I think that will be compliance with the CFR sections that apply.

On the fill hoses, at the double clamps, the recommendation is to leave a full band's width of hose exposed at the end, and the requirement is for the clamp to have a band at least 1/2" wide...

And don't forget, the CFR requires the metal fittings within the fuel system to be "statically grounded"... to me, this means bonded together and tied into the hull's bonding system...
 
I think that will be compliance with the CFR sections that apply.

On the fill hoses, at the double clamps, the recommendation is to leave a full band's width of hose exposed at the end, and the requirement is for the clamp to have a band at least 1/2" wide...

And don't forget, the CFR requires the metal fittings within the fuel system to be "statically grounded"... to me, this means bonded together and tied into the hull's bonding system...
yes using the hose clamps that came w/ the new 1 1/2" fill tube these clamps are standard width looks like 1/2" are you sayng to leave the hose unclamped 1/2" from the very top?then use the double clamps one just above the other?

A little exposed rubber before clamp
a little exposed rubber before clamps.jpg

Height of my gunnal is to low. Only way I can have the vent loop is lower the vent. Which would mean to drill hole lower then patch orginal vent hole. then the rub rail wouldn't deflect downward rain water. but I'd have the loop.Blue line is the gunnal.
Height of my gunnal.jpg

There's no way the original vent had this upward loop it was just horizontal at best.image of opposite side but same on both sides.
vents 90 degree tube.jpg


I even cut to shorten the 90* tube on vent still just not enough room for upward loop.

I could maybe put a S loop
S loop.jpg

360 degree vent shortened.jpg

the vent tube is contacting the gunnals flange I'm forced to bend grind force over about 3/4" seams like the gunnal is made to tilt inward going forward.
I've pryed w/ a wrecking bar used crescent on flange in attempt to bend it's tight an ackward working on a dam near 4' freeboard but I'm determined to get it in securely.


the good is not much but I managed to fit the pickups output tube attached to PU used a fuel injector type clamp which is a stronger hose clamp.
fuel injector type clamps.jpg


also conceived a plan to secure the top of tank more on that later this dam vent is killing me.
thanks
 
Last edited:
don't put a "S" into the vent hose...it will trap any water that enters the vent...maybe you can shape the vent hose into something like "?"...if not, straight down will function, just not be ideal.
 
my AFT tanks don't have the bead or flare just a smooth tube. can't really understand the orientation or clamps in the black an white illustration. it appears to have clamps on each side of bead/flare.

the new fill cap doe's have a bit of a bead.

I think I've been trying to fit the star tank on port side. see the vent is contacting the inside of gunnel.
the tanks vent just barly clears the gunnel I've been trying an bending the gunnels flange to fit.
clearance for vent tube.jpg

just now today I noticed the 2nd tank has the vent on opposite side of fill tube.I can't believe I didn't notice this before if you only knew how much I've been stressing out trying to fit this dam tank an I was fitting the wrong tank.
outside both tanks.jpg


I'm still gonna have to lower the hulls vent though hull about 1" should give enough cleanance for the upward vent tubes loop.
I have decided to ditch the bell alltogether an use just the inside nub just like the orginal. this.
Fill neck gunnal rub rail hull vent.jpg

the new vent has these screened holes surrounding the complete vent so I thinking just block off the lower an side holes an only have the 2 top holes as vents.

would it be acceptable to attach the ground /bonding wire for the new fill cap at the inside where fill caps lid is chained to the fill cap then run wire up inside the hose?see the fill caps though hull mount holes seams to have a chrome finish this mite just be a polished aluminum was concerned the chrome could resist the ground current?
Groundwire attached here run inside of rubber hose.jpg

now I know which tank to install I mite get it mounted today.

thanks Makomark
 
Last edited:
the clamps should go on the 'inside' of the bead...if there's no bead, then there's no discussion to be had.

If the hull generates a lot of spray that could make the vent (outside the hull, below the rubrail) wet, I would put a cup over the vent to keep the water away from the screens...

Don't run the bonding wire between the hose and the fitting - that's a receipe for disaster...worst case, substitute a threaded bolt for one of the screws holding the fill fitting to the deck and attach the wire to that screw with a couple of washers and another nut (nylon locknuts work great there).

that bonding wire is to dissipate any static buildup so the connection can have a little resistance...
 
what confuses me about the vent is the attachment nut is way smaller than the hole the bell needs to sit flat agaisnt the hull.like should this bell be on the inside of hull?

this man has his vent stick way out that mite be why he's replacing it bc he hit a dock w/ vent an the cheap plastic snapped.
vent sticking out from hull.jpg

thanks Makomark
 
Last edited:
if you are referring to the 'bell' supplied with the new vent fitting, YES - i think it should go INSIDE of the hull.

So unthread the nut, remove it and the bell. or0ng stays on fitting...install fitting thru the hull, slide bell and nut onto vent fitting, from inside the hull, and then tighten nut.
 
yes I thinking that bell is inside an just have the nub sticking outside hull.initialy I thought the bell was to prevent splashes of water from entering the vent. also notice how much lower the image above is than mine this lower position to allow the upward loop.
 
I think I've figured it out half of the bell is on outside other half of bell is on inside. I'm assumming the gasket is on outside?
 
Back
Top