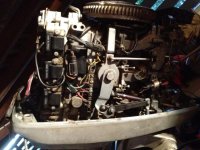
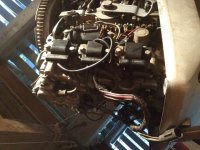
Evinrude early 80's 3cyl. Not sure what model/ year as the engine plate is unreadable. Is not starting, w/ no fire. Engine was running and idling but bogging under load. Bright blue spark, 100/110 psi compression all cyl. Plugs preset at 1mm, have tried at 0.7 w/no change. I am bemused as this motor was starting and running perfectly except the load problem until a couple of days ago. Thanks in advance!
Bottom line.... Your original problem was that the engine would start and idle normally BUT would bog down when throttle was applied. This is usually cause by one of two problems (or both)... fouled carburetors or a sticking timer base under the flywheel.
Stop looking for a short cut and remove, dismantle, clean, and rebuild the carburetors.
Check the timer based for sticking... spin the prop and put the engine into forward gear, then have someone slowly apply thrrottle while you observe the timer base. It should move smoothly from its retard position all the way up to the full spark advance position without hesitation.
If you've had the flywheel off and did not torque the flywheel nut properly when reinstalling, the key may be sheared which throws the engine out of time. Remove the flywheel and double check the flywheel key. If sheared, replace the key ONLY with the factory replacement (307480), installed with the outer edge vertically witht he engine (straight up and down), not aligned with the crankshaft taper. Torque the flywheel nut to 105 foot pounds.
Checking the spark with an inductive devive or the spark plugs is a waste of time. The spark must be checked on that model by having a 7/16" gap for the spark to jump, and the spark must be a strong blue lightning like flame... a real SNAP! What type spark do you have? No tester? Build the following.
(
Spark Tester - Home Made)
(J. Reeves)
You can use a medium size philips screwdriver inserted into the spark plug boot spring connector, then hold the screwdriver shank approximately 7/16" away from the block to check the spark or build the following:
A spark tester can be made with a piece of 1x4 or 1x6, drive a few finishing nails through it, then bend the pointed ends at a right angle. You can then adjust the gap by simply twisting the nail(s). Solder a spark plug wire to one which you can connect to the spark plug boots, and a ground wire of some kind to the other to connect to the powerhead somewhere. Use small alligator clips on the other end of the wires to connect to ground and to the spark plug connector that exists inside of the rubber plug boot.
Using the above, one could easily build a spark tester whereas they could connect 2, 4, 6, or 8 cylinders all at one time. The ground nail being straight up, the others being bent, aimed at the ground nail. A typical 4 cylinder tester follows:
..........X1..........X2
.................X..(grd)
..........X3..........X4
The recommended spark plug are Champion QL77JC4 plugs, gapped at either the original recommended gap of .040" or the later revisioned (1990s) gap of .030". One gap or the other may provide improved performance at either idle or full throttle. Try both gaps and decide.
The two (2) batteries you're using... hopefully you have them wired in parallel (12v) and not in series (24v).
NOTE: The stator under the flywheel is a two fold component.
1 - There are a series of small coils that generate AC voltage (alternator) which is supplied to a rectifier which converts the AC voltage to DC voltage to charge the battery. There is no regulator. You can check the rectifier as per the test below.
2 - There are three (3) larger coils, spaced evenly that generate approximately 300v AC to the powerpack capacitor in order to energize the ignition. Should any of those larger coils start to melt down, a voltage drop will exist which results in weak, erratic ignition (spark), and eventually no ignition. Check the stator to make sure that a sticky looking substance is not dripping down from the stator upon the timer base and/or powerhead.
(
Small Rectifier Test)
(J. Reeves)
Remove the rectifier wires from the terminal block. Using a ohm meter, connect the black lead of the ohm meter to the rectifier base (ground), then one by one, connect the red lead of the ohm meter to the yellow, yellow/gray, then the red wire (some rectifiers may also have a fourth yellow/blue wire. If so connect to that also). Now, reverse the ohm meter leads and check those same wires again. You should get a reading in one direction, and none at all in the other direction.
Now, connect the black lead of the ohm meter to the red wire. One by one, connect the red lead of the ohm meter to the yellow, yellow/gray, and if present, the yellow/blue wire. Then reverse the leads, checking the wires again. Once more, you should get a reading in one direction and none in the other.
Note that the reading obtained from the red rectifier wire will be lower then what is obtained from the other wires.
Any deviation from the "Reading", "No Reading" as above indicates a faulty rectifier. Note that a rectifier will not tolerate reverse polarity. Simply touching the battery with the cables in the reverse order or hooking up a battery charger backwards will blow the diodes in the rectifier assy immediately.
There may be a core plug on the powerhead (Looks like a small freeze out plug) that may have the model and serial number on it. If so, what are those numbers?
Let us know what you find.


 il mixture wrong. I have rectified both.