Logo

BF50 blows 10A fuse if Kill switch active

rwhite1961

New member
I came in from a day of boating, parked the boat in the back yard and proceeded to do the fresh water flush but the motor would not turn over.

  • Found the 10A fuse blown.
  • Replaced it, it immediately blew again.
  • Unplugged the ignition switch from the harness.
  • Unplugged the kill switch from the harness and the ign switch.
  • Replaced fuse - OK. power tilt working.
  • Plugged in the kill switch to the harness with the plastic key on (the one that keeps the button pushed) - fuse still OK
  • Removed the plastic key - fuse blew immediately.
Any ideas? I have a bad feeling about this one.

I have the service manual and I suppose the next step is to ohm out the ICM, but I'll need to borrow a decent meter first.

thanks in advance for any guidance.

Richard
 
The kill switch is wired in parallel with the key switch. The key switch applies a ground to the black red lead when it is turned off. The kill switch does the same thing with the clip is pulled off.

You said it was a 10 amp fuse. Most of the 50 HP that I have see have a 15 amp fuse on the motor. A 10 amp fuse is located in the wiring harness between the key switch panel and the gauges.

Which fuse are you referring to? The 10 amp in the gauge wiring harness should not affect the cranking.

You did not say if the key switch was connected on the last part of your test...I assume it was still disconnected.

In any case, I would check the connectors going to the key switch for corrosion. That is the first most common place for the black/red lead to be near a black yellow lead (switched 12v) or a white black lead (constant 12v).

If the key switch is still connected, there could be a problem inside the key switch (more corrosion or something broken)

If you think it is the ecu, you can disconnect the connector going to it with the black and black/red lead. These should be the only wires in the connector depending on the year of your motor. That should quickly take it out of the picture.

One other place to check would be the 14 pin (big round connector) at the front of your engine. That is another place where the Black/Red and White/Black come close to one another. That is another good place for corrosion to occur.

That should get you started before you get the ohmmeter.

One hint on tracking down a short like this. Instead of replacing the fuse with another fuse...connect a 12v test light where the fuse would be installed. DO NOT TRY TO CRANK THE MOTOR WITH THE TEST LIGHT - IT WON'T CRANK. Connect your safetly landyard with the clip pulled out and the light will light. As you disconnect wires that are causing the short, the light will go out. This will save a lot of fuses.

Good luck!

Mike
Mike
 
Hi Mike,

Great information, thanks. I'll try your suggestions in the next couple of evenings. To answer your questions, it is definitely the 10A fuse. The 15A fuse is the first one I checked and it is OK. And yes, the key switch was disconnected on the last test. Only the kill switch was connected, and pulling the lanyard blows the 10A fuse.

I inspected the harness and visually it looks okay. I do not have the Honda remote control, the boat is a MacGregor 26M and the dealer installed some third party controls. The bunched up harness and clipped leads are a bit ugly. So I'm hoping it's a short in the harness. I will report back when I have some results.

thanks again,
Richard
 
If the dealer installed some keyswitch assembly other than Honda, then who knows where the trouble will is? It sounds like a wiring missmash.

I guess the only advice that is still true (other than the colors going to the engine and ecu) is to use the test light in place of the 10amp fuse for trouble shooting.

Mike
 
Hi Mike,
I located the short, somewhat. I disconnected all connectors in the control console, and then disconnected the big round connector at the engine. So now there are no more connectors or devices between the terminal ends. Found a ~300 ohm short between the BL/R and the Wh/BL.

Now, finding the bad spot in the cable will not be easy, as there is no indication of any damage to guide me. I'll probably just assume the bad spot is near the engine, since that's where the most mechanical motion and potential salt water exposure occurs. Open cable a few feet away, chop the BL/R wire and check both ends. If I'm lucky that's where it will be. Then cut out the bad section and splice the wires.

Thanks for the guidance,
Richard
 
Look for any spot which may have a rip or open in the insulation.

Depending on how the cable is run you really have at least three options.

1. Trace it all out.

2. Replace the cable and be done with it. If there is one issue (that may be caused by some corrosion or abuse, there are probably more.

3. If you are spending a lot of time tracing...open up the cable near the engine (perferrably in a place on the cable that you can return out of the elements) and find the two leads in question. Cut them and make sure there is no resistance between them at the engine end. Then just connect two new wires to them and run them up to the other end of the cable and wire them in. Disconnect the old wires at the helm end, of course. Seal up the cable where you opened it up, with liquid tape or some equivalent.

Mike
 
As I clicked "send" on the last reply, I thought...how much current is the 300 ohm short drawing? It is only 40 ma. Not enough to pop a 10a fuse. It may be possible that the resistance decreases as the current starts flowing through it and the current increases to more than 10 amps, but it may not be your only issue.

Mike
 
Hi Mike,
Definitely there was more to it. There were shorts to other wires as well. One foot away from the engine is a three wire cable with connector, I assume for trim controls which are not needed on this motor sailer. Looked like a likely trouble spot so decided to start there and opened it up. It looks like whoever prepped this cable ~4.5 years ago made a clumsy round cut with a sharp knife straight into the cable to open the sheath, slicing into the outermost wires including the white/black, black/red, and others. Afterwards he covered it up nicely with the sleeve. :mad: 
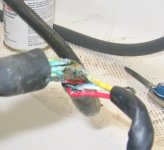
It's a corroded mess now. See attached. There is hard short evidence between the white/black to the gray wire. I separated all wires and made temp repairs with electrical tape and crimp connectors. Rechecked all pins and no more shorts. Engine started and ran smoothly.

I suppose the permanent repair would be to replace the cable. Or, to somehow obtain 14 replacement pins for the big round connector, the ones with the integral black seals, and then I could rebuild that end after cutting off the problem section.

I am glad to finally solve this mystery, and thankful it didn't happen on the last trip in the busy intracoastal with four of my wife's relatives on board!

thanks,
Richard
 

Attachments

  • damagedWiring.jpg
    damagedWiring.jpg
    64.4 KB · Views: 289
Glad you found it...it looks pretty messy.

It you do have enough cable to extend into the engine, the pins are available. You will need the pins and the rubber insulators.

I do not have the numbers here at home, but if you are interested, I will check our connector box at work. It is pretty easy to do. That will save buying a new cable and will be a proper repair.

Mike
 
Hi Mike,
That would be great if you can find a way for me to order those pins/seals. I asked my closest Honda Marine dealer and he said he could only order the entire harness.

Richard
 
Your dealer should have a whole kit of these pins, as well as various connectors.

The part number for the pins is 07JAZ-001080A. You will need 14. I think you have to buy a whole pack of 25. They are about 50 cents each

The part number for the rubber seal is 07JAZ-001100A. You will need 14 of these also. They also come 25 to a bag. The cost about 31 cents each.

When you take out the old pins, observe how they are crimped and how the rubber seal is crimped on also.

My recommendation is to change one pin at a time to avoid placement mistakes. Always double check your work by putting it up to the connector that it plugs into. The wire colors should match up.

If you can not find these through your dealer or boats.net let me know and we can work something out.

Mike
 
Hi Mike,

I just ordered those through my auto dealer. $27 total for 20pins and 20 seals. Dealer was more expensive on parts but not shipping fees. Boat.net had the pins but not the seals. hondapartsdeals.com had both for very cheap but the shipping charges were $28.

Thanks again for all your help.

Richard
 
Back
Top