Logo

Alpha one shifting question

gstprecision

New member
Hey guys, I am new here and new to boats as well. I just bought a 1989 boat with a 2,5l and an alpha one stern.

The lake I go to is extremely shallow at the boat launch so I have to keep the stern trimmed up when manoeuvring out of there. I have issue engaging the reverse when trimmed up it just grind. At normal trim (full down) no issues in reverse.

I adjusted my cables as per service manual and no change. Is this a normal issue? Cable seems routed properly and not binding.

Thanks
GST
 
I took the cable off again today and when I rotate the prop clockwise there is no engagement, it always rotate with a clicking sound even at the full down position.

I don'think this is normal

Thanks
GST
 
If you remove the cable from its attachment and pull the black plastic sleeve toward you(R) ,it should lock the prop in a clockwise motion
pushing it inward all the way (F) ,it locks the prop in a counterclockwise motion
 
This is exactly what I did. I am starting thinking there is something wrong in the mechanism. When I am turning clockwise and my son pulling (putting in reverse) on the cable it will not lock, just slipping and a clicking/grinding feel.

I think I will have to take the lower unit apart....

Thanks
GST
 
Ayuh,.... Yer not supposed to run 'em, with the drive Full Up,....

I'm not surprised the shiftin' is compromised at Full Up,....

How far ya gotta trim down for it to shift properly,..??
Full Up is quite abit more bend in the cable,...
If yer's is worn, maybe that's when yer seein' it,....
 
If you trim your outdrive up and you loose the ability to shift it typically means the short shift cable is bad and needs to be replaced. Too much slop in cable, it has stretched or worn out the inside isulation.


Here is the adjustment proceedure for the short shift cabel. (this is for a new installation but can be used to make sure yours is set correctly.

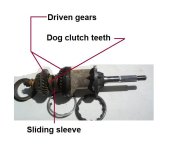
One key issue in the proceedure is the distance between the trunion/barrel and the cable end mounting hole distance.

**********************************************************************************************************

Trim out drive up 2 inches from all the way down.
Take keys out of ignition!!!!!!!!!!!
Have a second person stand at the prop.
You, remove the short shift cable from the shift bracket.
After the cable has been removed, push the plastic cable end all the way in and hold in place while prop is being spun C’Clockwise..
Have second person rotate prop counter clock wise until the prop is fully engaged and wont turn anymore. Maintain light effort on shift cable plastic end pushing it to keep forward engaged.

Measure the distance from the center of the brass trunion to the center of the round mounting hole in the plastic end. Adjust trunion/barrel to make that distance 6 inches. no more no less! In cases where the shift cable is old but still works well you can adjust this dimension to 5 15/16”. NO MORE.

Put shift control handle in forward FULL throttle position.
Remove the control shift cable from shift bracket at this time.

Install short shift cable back onto bracket at this time.

Take the shift control cable and adjust the trunion so it fits perfectly back into the shift bracket.
Before installing it turn the brass trunion 4 complete turns away from the plastic end and reinstall into shift bracket.

Now put shift control handle in the neutral position.
Have second person spin prop, it should spin freely.
Put shift control into the forward detent position at ~ 10:00 position. NO FUTHER.
Have the second person rotate the prop counter clockwise. You should have solid engagement with no ability to continue to turn the prop.

Now shift back into neutral. Prop should spin freely with no clacking or clunking.

Now shift to reverse to the 2:00 o’clock position detent NO FURTHER!!

Have the second person spin the prop clockwise.

If you have positive engagement with no clunking or jumping out of engagement, you are done.

If it does not fully engage into reverse than look at the shift bracket where the short shift cable mounts and there is a slot. Loosen the 7/16 hex that is touching the bracket and move the stud so you are pulling the short cable.

Try this and retest in water under load.

Anyway there are tests that would tell you if the cable is bad but to difficult to type out here but in general if you remove the shift control cable from the shift bracket, shift the control handle to full forward/wide open throttle and make a mark on the cable end, now go full reverse and repeat. Measure distance between marks, (2 7/8" to 3 1/8") any more and replace the control cable.

Short cable measurement test, remove short cable from shift bracket, push all the way in and spin prop by hand until full forward is made. Make a mark on shift cable end where the plastic stops over the metal.
Now with someone holding the prop from spinning pull the cable end out with two fingers, as soon as resistance is felt mark the inner cable where the plastic cable end ends. Now measure between the marks,
The measurement should beif I remember correctly 1/2 " to 9/16". anymore and the cable or linkage is bad.
 
As per Kghost..... the objective for Nuetral shift lever position (as well as for the shift interrupt mechanism), is to position the sliding sleeve equal distance from either driven gear. (see image)
The lower shift cable must be in good condition, and the adjustment must be very close to dead on.
However, there will be a small range in which the Nuetral sliding sleeve position will be OK.


I put this image together for another member some time back. You can see the sliding sleeve position. When the sleeve is equal distance between either driven gear, nuetral is achieved. If the cable changes in length as the drive is raised, the sleeve's position may change un-favorably.... not allowing for Full Rev engagement.
A new lower cable may do the trick........ if not, perhaps make a small change in the adjustment favoring Reverse engagement!
 

Attachments

  • Merc prop shaft and sliding sleeve.jpg
    Merc prop shaft and sliding sleeve.jpg
    60.2 KB · Views: 844
Last edited:
Here is another image of the two driven gears and the sliding sleeve.

Each driven gear has Dog Clutch teeth (within the Hypoid gear section) that mirror the sliding sleeve Dog Clutch teeth.
The sliding sleeve is splined to the prop shaft.

As the sleeve engages either driven gear, the prop shaft becomes powered in that direction.
 

Attachments

  • Merc prop shaft and sliding sleeve 2.jpg
    Merc prop shaft and sliding sleeve 2.jpg
    29.2 KB · Views: 276
Last edited:
Allright, I did the rigging as per kghost instruction. It works fine at full down trim and a little bit up after that reverse won't engage properly just skipping with little force required.

At full down it is locked no problem.

GST
 
Try adjusting the mounting stud I mention with the 7/16 hex under the short cable (where the slot is). Move it a bit further outward in the slot. If you go to far you will loose foward so be careful.

Also a common issue is (have you or anyone else removed the outdrive and forgot to put it in forward gear?)

If this has occurred some or several times and the drive was forced off, the shift linkage is probably tweeked. There is a vertical shift rod in the gimbal housing (see it with outdrive removed) at the bottom of this shaft is a upside down U shaped end. This U shape end gets bent out if drive is not removed or installed correctly. The U shape piece MUST be very tight to the bronze shift arm comming out of the lower unit.

The next issue would be with the bronze shift arm may be worn or bent but can determine that from here.......

If this is not the issue then it is either the shift cable or the shift spool...........

Other than that Not much can be done from here.........
 
I will play with the stud a bit maybe that will help.

The previous owner told me he took the outdrive off last year to replace the exhaust bellow. He confirmed he had the throttle in full FWD position the whole time.

Should I consider taking it apart this winter to replace the cable and check the gears?

Thanks
GST
 
There are no gears to check..........

It is not a question of if he removed it it is a question of how often and who else and whether they did it correctly. Odds are they did not each and every time........ This is a 1989.......that drive should have been takien off annually to be serviced!!!!!!!!!!!!

You should take it off yourself if you are concerned about the shifting issue. Look and see what the parts are......if you do take some pics and ask some questions.........
 
Thanks Kghost. I will definately take it off after the season, probably in the spring when I am done building my house. I am sure I will have many questions along the way.

Cheers and thank you again.
GST
 
Back
Top