

Logo

2012 Suzuki DF9.9A carburetor acting up - pilot screw?

whitegreg56

Regular Contributor
So, the sailing club purchased a sailboat that came with this motor.
It was running poorly since day one.
Being as we don't have a lot of experience with Suzuki outboards,
we took it to the local dealer. They did the standard maintenance...oil change, oil filter, fuel filter,
spark plugs, water pump. And recommended a new carburetor to the tune of $483.

When we got it back, we found that it stalls when the throttle is opened slightly.
The dealer took off the cap on the pilot screw of the new carburetor. The pilot screw has an effect on the stalling.
Things would be better for a couple of outings but then revert to the stalling, again.

The dealer said this is a fact-of-life with this engine and there is nothing that can done.
Is there anything I can try? Could dirty fuel be plugging the pilot screw? Would it be a good
idea to replace all the fuel lines (inside and outside)?
 
The carburetor is new so one would think you should be able to rule that out. Not sure why the dealer would have to mess with the pilot screw on a brand new carburetor. All that left is the rest of the fuel system. All I can suggest is inspect the entire fuel system looking for loose clamps, cracks in the line allowing air in, fuel pump failing. Drain the carburetor bowl and catch the fuel looking for little pieces of black plastic from deteriorating fuel lines. I’m not familiar with your engine so I’m not much help. The dealer should have checked all that I’ve mentioned plus more, after all they are the experts.
 
Well, I got a recommendation to check the valve clearances. Since the carb is new, it may not be a fuel problem.
Pumping the primer bulb has no effect. A compression test is probably in order, too.
 
Well, it looks like the engine is never coming up to temperature. After 15 minutes of idling, the thermostat cover is only slightly warm. If the engine is always cold, that may be why we can't seem to get the pilot screw adjusted correctly. The dealer claims they installed a new thermostat. We shall see. The boat is in a slip...getting the engine off is not trivial. Might try to do the repair from the dock...with the boat "stern first" in the slip. Stay tuned....
 
Classic example of new technology that repair shops can't handle.----And no morals when they submit those invoices.
 
Well, we replaced the thermostat with a brand new one...it wasn't that difficult at the floating dock with the boat stern first in the slip.
That definitely made a change...the engine doesn't stall when the throttle is opened from idle.
The thermostat cover is a lot hotter than it was before.

There is another problem (we'd be foolish to think that there is only ONE problem).
It will not stay running at idle unless the enrichener knob is pulled out slightly.
We noticed some oil in the plastic air-intake box. And, noted that the oil on the dipstick is OVERFILLED.
This looks like a smoking gun. Could this be causing our problems? Easy enough to find out!
 
Well, we replaced the thermostat with a brand new one...it wasn't that difficult at the floating dock with the boat stern first in the slip.
That definitely made a change...the engine doesn't stall when the throttle is opened from idle.
The thermostat cover is a lot hotter than it was before.

There is another problem (we'd be foolish to think that there is only ONE problem).
It will not stay running at idle unless the enrichener knob is pulled out slightly.
We noticed some oil in the plastic air-intake box. And, noted that the oil on the dipstick is OVERFILLED.
This looks like a smoking gun. Could this be causing our problems? Easy enough to find out!
So, I purchased an oil-extractor with a 1/4 inch O.D. plastic tube on it. I ran the extractor tube down the dipstick tube.
Eventually, it came to a stop...hitting something. At that point, I began the vacuum. Sucks nothing but AIR. Sigh.
It is not easy to drain the engine oil while the engine is on the boat and the boat in the water.
I don't want an oil spill. It wouldn't be the Exxon Valdez. Anyone got any ideas??
 
Place the lower unit inside a pail with the handle tied off to something, maybe somewhere on the top of the engine? You could then change oil and either let all the oil drain into the pail or try to catch the bulk of the oil in a separate container.
 
So, I pushed harder on the oil-extractor tube and it did go down into the oil sump.
Took out less than a cup of oil...dipstick reads correctly now.

I rebuilt the enrichener assembly...knob/wire/spring/valve/etc.
Engine still stalls out at idle. If the knob is pulled out slightly it will continue to run.
Saw on a Facebook group (Suzuki Outboard Advice) that it might be the Idle Air Bleed.
Where is that? It that the same as the Pilot Screw? Pilot screw seems to have no effect.
Any help much appreciated!
 
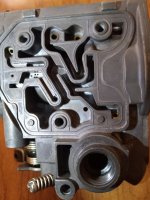
Here's the top of the old carburetor....
 

Attachments

  • Resized_20241118_142158.jpeg
    Resized_20241118_142158.jpeg
    608.3 KB · Views: 85
Normally it’s a bit of crud in the pilot jet which needs a good clean with some fine wire and carb cleaner, people then fart about and try to adjust the fuel/air mix or idle instead of ripping the carb apart and having a full tear down/ultrasonic clean and manual clean of the jets.
 
The carburetor is brand new. Are we talking about the idle jet or the pilot screw here?
The pilot screw is easy enough to unscrew and clean. I believe the whole carburetor has to come out to clear the idle jet.

If we are getting plugged up so soon, I wonder about having to do this every month going forward.
I am beginning to have my doubts about the fuel filter which is just a fine metal screen.
And, 4-stroke engines in general. Do they all have these tiny jets that get plugged?
Perhaps some other engine is in order here!
 
It sounds like your dealer has run rings round you to be honest, make sure all your fuel is as low ethanol as possible, clean and fresh, you should have an inline fuel filter which sits on the left rear side just before the fuel pump (I normally swap there for a see through one). Once the carb is properly cleaned and set up, if you keep your fuel clean and run the carb dry, you will never need to go into there again. Get a service manual, disassemble, clean and rebuild the carb with the fuel/air screw at OEM setting make her the thermostat works properly and your throttle is rigged properly and you should be good to go.
 
No... it doesn't. There is a plate on top of what's shown in the photo above (#11).
It is possible that the over-filled oil worked its way into the carb via the breather hose.
I am considering trying some SeaFoam before pulling the whole carb out.
 
No... it doesn't. There is a plate on top of what's shown in the photo above (#11).
It is possible that the over-filled oil worked its way into the carb via the breather hose.
I am considering trying some SeaFoam before pulling the whole carb out.
No worries but I would strip the carb before trying sea foam
 
So, the weather is warmer and I'm picking up where I left off.
I removed the carburetor and found a bit of brown/red corrosion at the brass insert at the lower right in the photo of post #11 (above).
Not sure why that is there...it wasn't in the photo of the old carburetor. I can post a photo of the new carburetor, if necessary.

It is apparent that the dealer did NOT put in new gaskets between the carburetor and the intake manifold when they reassembled.
The factory service manual specifically states that those gaskets should NOT be reused as it could cause air leakage and a lean mixture.
That could result in "severe engine damage".

So, I checked the compression. Top 35 psi. Bottom 40 psi. Manual states with decompression system 43~128 psi.
These are "guidelines not absolute service limits". I don't understand why the range is so large.
Should I put some oil in the spark plug hole and try again?

As long as I've got it apart, I'll make sure the throttle stopper rod is the correct length.
Other than that, I'm not sure what to do next. Maybe the valve clearances should be checked???
Got to get this fixed in the next few weeks!
 
To check the gaskets, start the engine and spray WD40 or a similar flammable aerosol near the gasket, if revs increase then your gaskets are not sealing.

Suzuki recommends checking tappet clearances at 200 hours. Unless Suzuki has changed their design a special tool is required to hold the tappet to replace shims depending on clearance.

A brand new carburetor should eliminate a carburetor issue.

Have you checked fuel hose routing, looking for kinks or other abnormalities?

Can you borrow another fuel tank and fuel line to try?

Good luck
 
I will try that trick with spraying the gasket area when I get the new gaskets and reassemble.
The carb mounting bolts were way too loose. Suggests we were leaking air and running lean.
Although the spark plugs were heavily carbon fouled. That suggests too RICH.

I replaced all the fuel lines and the tank to engine line/bulb last year...no change.

I have the special service valve adjustment driver. The cylinder head cover removal looks easy enough.

Stay tuned!
 
The weather was warm today....so, I adjusted the valve tappet clearances to 0.007"
on both cylinders. That made a difference. The engine doesn't stumble when
the throttle is opened from idle. And, there doesn't seem to be any backfiring at all.

It still stalls when the enrichener knob is pushed all the way in. I decided to check
the idle timing which should be 4 degrees BTDC at 1000 RPM. I put a mark on the
flywheel at 4 degrees BTDC and got out my timing light. The mark does NOT show up
under the arrow on the recoil starter cover. It looks like this engine had more than
one problem! It may not be the carburetor at all!

So, the next step is to check the pulser coil resistance and clearance from the flywheel.
Also, the resistance of the cylinder temperature sensor. The computer in the CDI unit
is probably okay because the engine runs fine at higher RPM where the spark advance
is just determined from a look-up table. The CDI units are pretty reliable, and they are
expensive so I am not going to throw that part at the engine.

There is also a "tachometer output" from the CDI unit. I am interested in seeing what that reads.

Stay tuned!
 
I went back today with the timing light and removed the recoil starter
to get a better look at the mark on the flywheel. Thank goodness the
engine can be "rope started". I waited for the sun to go down a bit and
make it easier to see the markings on the flywheel. At what I estimated
to be 1000 RPM (idle specification) the mark was a bit off and jumping
around a lot. At some higher speed, things were much more stable and
the advance was good (~20 degrees BTDC). I had cleaned up the pulser coil
and checked the gap. Also, used contact cleaner on the CDI connectors.
The pulser coil and temperature sensor resistances were within range.

Rather than throw parts at the engine, I ordered a "6-pin test cord" that will allow
me to monitor the signals on the CDI module. It should be here, tomorrow.
I plan on tightening all the ground screws in the ignition system as it should
only take a couple of minutes and who knows...it might be the problem.

I've noticed that the symptoms seem to be getting better.
I think we are hot on the trail of something here....

Stay tuned!
 
I noticed something strange, today. At idle, there is a lot of bubbling up from the area of the propeller.
If I set the idle lower, it stalls out.
The tank I am using has the water level about 3 inches above the anti-ventilation plate.
Normally, the idle exhaust should come out of the upper exhaust port.
There is some exhaust coming out there...but mostly thru the propeller.
I tried clearing the port with wire. Some stuff did come out but no big change.

I saw a YouTube video of a 2010 DF9.9A at idle that shows NOTHING bubbling up from the propeller.
Anyone know what's going on here? There is nothing in the service manual about idle exhaust.
Can it be cleaned out without disassembling the whole thing?
 
Well, I pretty much gave up on this engine. We are presently using a 1998 two-stroke 8 HP engine
that is running like a dream.

The dealer had returned the parts that they replaced...including the old carburetor.
I noticed that the main jet in the old carburetor was missing. I'm not clear on what
exactly you get with a new carb. The dealer may have moved the jet over from the
old carb to the new one. That might explain how with a brand-new carb, we still
have what seems to be a carburetion issue. It looks like there is more than one size
of jet. One of them is "no longer available".

This investigation will continue when the weather turns colder.
In the meantime, there is lots of sailing to be had!
 
Back
Top