Logo

1976 Ford 302 Tilt problems

Neal Franson

Regular Contributor
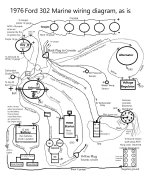
I was getting my boat ready to take out to complete my sea trials and the outdrive wouldn't tilt up. This has been an intermittent problem recently, so I thought it was a short grounding it out. Deciding to be a big boy and work it out myself, I did some diagnosis. Droid said to jump across the two big terminals bypassing the solenoid and I did and didn't get any reaction. The battery side of the solenoid is hooked straight to the battery through the assist solenoid batt terminal. I jumped straight from the batt terminal on the assist solenoid, which is straight from the battery, which is fully charged, at about 13.6 volts, and no reaction, not even a spark on the jump. Both solenoids click when activated by the switch, so I hooked up a meter to the motor side of the up tilt solenoid, (blue wire), and the black to an engine ground, and the meter read 13.6, and when I activated the up switch with the ignition on. So, the only thing left is the motor, which is nearly new, 2 years old with little use. Maybe the connections are grounding out at the motor, somehow. It is pretty low, I can't even see it, and it may have had some water from a leak I had in the transom boot connection. Either way, it is really buried and looks like I have to take off the outdrive again and the transom boot to get access, unless anyone has any better ideas. Attached is an as-is schematic, of my engine of my own creation, including the tilt mechanism.
 

Attachments

  • 302 Wiring schematic as-is.jpg
    302 Wiring schematic as-is.jpg
    491 KB · Views: 52
Neil,
Does it go down OK?
If unit is full down, unbolt the 3 bolts from the crescent shaped gear, lift drive & reinstall. Then test down. If down is OK, then motor is grounded OK thru the mounting bolts.
At that point, then one set of windings or brushes are bad in motor.
 
I haven't done the "down" test yet, but the solenoids both click just the same when activated from the switch, with no known response. I would think if I had down, I would get a clunk, like it is trying the engage, but bottoms-out, but just get the same click.
I explored what I can do from the inside, without taking off the outdrive, which I can only do by feel. I reached in back down the wires and found the connection with the motor cable, which is as I call it a paddle connection, male on the motor side and female on the solenoid side. It felt a bit frayed, and so I disconnected the connection, and had to cut the wire to get it out, so I cut and pulled out the wire and connection. I will have to order some wire to replace it. The up wire was bare for a couple of inches and didn't seem to be grounded on anything, but the connection looked pretty oxidated. I can probably rig up a test to the motor with some new connections and jump it to a battery connection and see if the tilt motor is functional. That's my plan - and order the wires.
 
I didn't get anything when I hooked up the motor up-wire (blue) to the battery, via a jump wire. Looks like I need a new tilt motor and have to take the outdrive off to get to it.:(
 
This is probably for Droid, unless someone else has some insights. I tried taking off my outdrive today, and you are supposed to start on a 30 degree angle tilt, but I am stuck fully down, and I took off the pivot caps and covers and it is wedged in there, so Droid said to take off the 3 bolts on the crescent-shaped tilt quadrant to pull the drive up, which I took out those bolts, but the middle bolt sheared off at the head, leaving the top part of the bolt holding everything somewhat in place, and the tilt quadrant will not come loose and the outdrive remains wedged in place. I have yanked on the drive pretty hard and have tried to separate the connection of the quadrant with a screwdriver and hammer, but there is not much room. Per Droid, if I can make this separation, the drive should lift up. I will probably have to sharpen-up a shorter flat screwdriver so that I can whack on that connection a bit.
 
I tried a few bolts and spikes ground down and got in there better, but no budge. I tried using a punch to try to knock the broken bolt in to push the tilt quadrant back, which may work, but I'm also afraid to knock it too hard and crack some of those old metal pieces that can't be replaced. I may need to get a longer punch to knock it out safely. Well, it is probably too hard to explain to get any help on, so I will just have to get through this, like all the broken bolts that I have had to deal with on this 50-year-old outdrive. It just takes the right set-up. The tilt quadrant is wedged against the quadrant gear, which I don't think will move with the tilt motor not working.
 
As for removing the drive; under normal circumstances, loosening the 3 bolts removes the gear. Lift the drive by hand & slide the gear out. Lower drive, loosen the 4 bolts securing the side caps (both sides), remove the trunnion caps & it's off. Yes, remove the shift wires too.
You have 2 issues...
1) The drive is full down and since the clutch pack is a worm & sector design it is tight against the stop & can't be rotated.
The back of your clutch housing should have a snap ring that holds the bushing in. Unfortunately, salt water has probably destroyed that too. You may have (hopefully do have) the service bulletin retainer installed. If that is removed, yanking the drive up should rotate the clutch pack & shoot the bushing & worm gear out.
2) Broken bolt. Penetrating oil & heat should allow you to drive the bolt & gear off the upper drive. BUT not until the gears are apart because you can't rotate the clutch pack. But maybe if you had an assistant to pull the drive upward simultaneously?
 
So, let me make sure I got this. This is a link to the diagram of my outdrive.
You want me to take apart the clutch housing of the tilt mechanism by taking off the cover (#39) and then taking out whatever retainers are holding the clutch mechanism in, and loosening the clutch plate assembly (#68), so then the quadrant gear (#72) can then be turned. And that enables me to then punch out the bolt holding the tilt quadrant to the upper drive. Or after the quadrant gear is able to move, I perhaps could just lift it up without necessarily having to pull the tilt quadrant.
 
No, snap ring 85 in the upper left of picture. Yank the drive up & gear 81, bushing 82 & o-ring will come out, freeing the clutch pack to rotate.
 
This is the service bulletin retainer in this picture as well as carnage where the gear should be. Parts will shoot out the back where the tab making contact with the bushing.
 

Attachments

  • 20240730_182349.jpg
    20240730_182349.jpg
    1,002.8 KB · Views: 44
So here is my tilt mechanism. Where the red dot is, there is a triangular plate with 3 bolts, and this looks like the area I have to go into to find the #85 snap ring. I take out the snap ring and lift up on the outdrive, and the other things should come out, and I can take off the outdrive.
tilt mechanism.jpg
 
Looks like a later production intermediate housing. That cover was a later design. Remove bolts & yank drive up. Same parts inside as earlier illustration. Just no snap ring.
I have lots of crescent gears & bolts laying around if you need one.
You shouldn't need that sealant mess around the transom seal.
 
Just as you predicted, I took off the three bolts and the triangular plate, I picked up the back of the outdrive and the mechanism pushed out and I was able to take off the outdrive, then took off the boot, and was able to take out the tilt motor. I also put that mechanism back in and had to twist the rod until it went back in far enough and put the plate back on without forcing anything. I assume that itis back in its original position.
The motor looked kind of rusty on the inside, and there was a wire that had a bare spot in the insulation, so I will order a new Arco tilt motor for $200 and hopefully get it later in the week. Thanks Droid!
 
Glad it came out as predicted. You had to twist it to align the pins in the shaft with the slot in the worm gear.
Now what about the gear & broken bolt?
 
I had some time to work on it today. I couldn't get the tilt quadrant to budge with that broken middle bolt on. It is holding pretty good and I didn't want to bang it up and break it, so I just put the two other bolts back on. I put together the new 10-gauge marine wiring from the solenoids, blue and green and soldered the connections to the wires. I scraped the old caulk off the transom and the boot, and put some rubber treatment on the boot, which is only two years old, cleaned up under the engine; and now am waiting for the new Arco tilt motor from marineemgine.com, which is on the way.
 
There is an oil fill on the top of the intermediate housing, and an oil fill in the side of the clutch area. I didn't see a drain plug, so I just topped them both off. Should I pump the oil out?
 
Earlier intermediate housing don't have drains. You can suck most oil out thru the big fill hole. You'll need the dip stick type sucker.
As for the clutch, I just pop the cover off to drain. Early ones used just a gasket, later had an O-ring too.
 
I made it out to San Pedro for sea trials, and it didn't go well. The engine started right up every time, which is the good news. I have that fuel bulb in the fuel line, all 3/8", and pump the bulb till I get resistance, give the throttle a few blasts, and it starts right up, after many weeks. I was testing it out at 500 rpm intervals for a few minutes each and checking the speed and the temperature. I got all the way to full throttle, about 4200 rpm, 40 knots and 175 degrees, and after 2-3 minutes the motor shut down. I kind of expected that, as Grok told me that the two-barrel carb may cut out at high throttle, with the upgrades that I have on the engine (larger 600 cfm intake manifold, electronic ignition, iridium plugs, Bar-style exhaust manifold, permanent magnet starter). Well, it started up after I pumped the fuel bulb and thought I would see how many rpms I could go before it cut out, so I tried it at 3500 rpm and after a few minutes it cut out, and I reduced the throttle and the engine did not die, so I tried it at 3000 rpms, and then the really bad news: I lost forward drive, AGAIN! It was like it slipped into neutral and the rpms peaked, so I throttled back and still had reverse, so I backed up a few miles in reverse back to the ramp.
It seems like the same thing happened, the forward clutch spring broke - my guess. Maybe It wasn't shimmed right. I didn't have a shimming tool, so left it like it was. Not sure if I should just buy another lower at this point and keep the spare. I'll check it out.
Also, I have that Chinese knock-off of a marine 4-barrel Edelbrock 1409, and I know how most feel about putting that on, but I may give it a try since I have it - It's a Truck Tok 1409! Whoo Hoo! It is pretty - has kind of a gold finish. The Holley 2-barrel always looked so lame to me.
I may also put in a new fuel filter with 3/8" NPT fittings and with a water separator, since in California, all gas is 10% ethanol. So, the fuel line will be all 3/8", except for the fuel pump, which is new and has 1/4" NPT fittings with 3/8" nipples and has about 6 pounds of pressure. I like 40 knots
Any advise?
 
Sorry to hear about FWD gear failing...

On the engine dying, was it similar to the first start, when the float bowl in the carb was mostly empty?? The fuel line size is adequate...so what's the details on the fuel pump??
 
The fuel pump is standard for 302/351 Ford. It is new and tested at 6, was it psi or in/mercury? I can check it again.
If you are talking about the engine dying after the stall, it did not start right away, and then I pumped the bulb, and it started - so the fuel was probably depleted in the bowl. It is my second new fuel pump. I don't remember what happened to the other one. I guess it didn't check out well.
 
if all the fittings and clamps are tight, I would doubt the pump failed in such a short time frame...I think you replaced the anti-syphon valve, so I think that just leaves the vent line....and the quick test there is to crack open the fill port...
 
I did replace the vent on the transom, not the line itself, which Is big - 5/8" I believe. Yes, I did replace the anti-siphon valve with a 3/8" NPT, which was a 1/4" NPT before. All new marine grade 3/8" fuel line. We have been through this gas feed pretty thoroughly before. The good thing about having that bulb pump in the fuel line is that I can see any leaks by pressurizing the line with the bulb. The only 1/4" NPT fittings (with 3/8" barbs) are in the filter and the fuel pump. That's why I was planning on replacing the fuel filter, with the added benefit of a water separator - especially if I went with the Chinese junk.
 
Probably a good idea to inspect the existing vent hose and make sure it doesn't have any sharp bends in it
..or any low spots either...
 
Back
Top