Logo

Volvo 275. Filings in drive oil

JASONITUS

New member
I recently changed the drive oil in a 1986 Volvo 275 for the first time in 6 years. I noticed that the oil had a shimmering in the sunlight. There appears to be very fine almost powder filings in the oil. There were 4-5 very small metal flakes in the oil as well approximately 1mm in size. The larger pieces were ferrous however it appeared that the fine metal may have been aluminum. The boat runs well but I am worried there is an underlying issue. I ran for an hour or so and changed the oil again to flush. There was mostly the same condition with the oil the 2nd time. I plan to check it again after running for a week. By the way I am using 10-40 synthetic motor oil in the drive. I noticed that I can hear the gears quite loudly when I spin the prop by hand right above the lower gear housing. Is this normal and does anyone have any advise for me?
Thanks, Jason.
 
Jason, I'd say that some very very fine metallic residue would be considered normal. Being that it's ferrous does not necessarily alarm me.

Unless you were having a major issue, the aluminum residue can only come from one area.... and that would be the lower unit slinger pump impeller.
Has anyone installed heavy gear oil in this before?

Your single prop 275 drive requires engine oil, not gear oil. 30W for cold water...... 40W for warm climate water.

When/if gear oil is used, the heavy viscosity can over-load the slinger pump drive pins.
If the slinger pump drive pins have been sheared off, the die cast impeller will not turn, nor will it pump oil up to the transmission area.
Instead, the lower unit "driven" gear will spin against the die cast impeller causing aluminum debris.


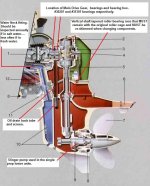
There is also a gravity return oil screen between the lower unit and Intermediate housing (it's actually in the lower unit housing).
If you pull the lower unit, this is accessible.

You'll want to take a look at this screen also. If there is any large debris, it will be right there.
 

Attachments

  • cut a way view of MDG Bearings.jpg
    cut a way view of MDG Bearings.jpg
    85 KB · Views: 50,247
Rick, thank you again for the reply. Is there any way to check the screen for debris without pulling the drive? For instance using a probe/ cam after draining the oil? I do not have the shop manuals and am concerned with shimming, torque values, ect... Thoughts?
Thanks, Jason.
 
  1. Is there any way to check the screen for debris without pulling the drive? For instance using a probe/ cam after draining the oil?

  2. I do not have the shop manuals and am concerned with shimming, torque values, ect... Thoughts?

Thanks, Jason.

  1. You can access the screen from above with the transmission removed. Then you can probe the screen with a magnetic stick.
    You'll pull up magnetic particals, but not non-ferrous particals.

  2. The main drive gear Bearing Box on the Pre-A 275 can be removed and disassembled with no change to any shim control. Keep track of the shims.
    NOTE: if the seal surface washer is replaced.... then a new rolling torque value must be set. (shim control is within this washer)

    The transmission and lower can be removed with no change to any shim values, and again if you keep track of the shims.
    • There will be several shims underneath the lower driven gear bearing of the transmisison. Re-install with these shims in place.
    • When the lower unit is removed, any shims will be above a bearing race (friction fit into the Intermediate housing) that you will not be removing.
      No shims to worry about unless you would be changing this lower for another lower.
 
Hey Rick,
NOTE: if the seal surface washer: The rubber O ring seals between the intermediate and BB? If so I fear I have replaced these without setting new rolling torque values. I wouldn't even know where to start regarding those.
Thanks, Jason
 
This is a 275. When I removed the upper gear box (where the aft U joint connects) there were 2 rubber O rings. One large and one small for the oil return tube.

[h=1]18-2597 - SEAL KIT[/h]UPPER GEAR UNIT SEAL KIT For intermediate housing: Fits: 200, 250, 270, 270T, 275, 275A, 280, 280DP, 280T, 285A, 290, 290A, 290DP, SP-A, SP-A/MT, SP-A1, SP-A2, SP-C, SP-C1, DP-A, CPA1, DP-B, DP-B1, DP-C, DP-C1, DP-D, DP-D1, DP-E, DP-G, DPX, DPX-S, DPX-S1
Part Number
18-2597
Manufacturer
Sierra Marine

Are these OK? Thanks, Jason
 
Jason..... I think that we're talking about two different things here.

Seals are generally thought of as being a single or double lip shaft surface seal....... but O-rings are also refered to as "seals".

The main drive gear seal and seal surface washer are in the Bearing Box.
The two O-rings that you mention, are directly underneath the transmission.


.
 
Last edited:
Hey Rick,
NOTE: if the seal surface washer: The rubber O ring seals between the intermediate and BB? If so I fear I have replaced these without setting new rolling torque values. I wouldn't even know where to start regarding those.
Thanks, Jason
OK, earlier I said that I wasn't following you, but I'll take a new stab at it here.

In this schematic, SEQ #12 is the bearing box assembly. A steel tube, two tapered roller bearings, etc.

SEQ #21 is the seal surface washer.... (aka wear washer).

With any Pre-A transmission, inside of this #21 will be shims (SEQ #23).
These shims control the bearing pre-load, of which controls the rolling torque value.

If SEQ #21 was replaced, checking and/or re-setting this value must be done.
This is because not any two washers are identical in terms of the inside depth of the washer.
If off by only .0015" or .001" or .002", it can make a big difference to this rolling torque value.

The two O-rings that you mentioned do not pertain to this.
However, there will be two O-rings that seal the AFT-most area of the BB where it joins the aluminum clamping collar.

6227_1.png

Here's where this assembly rests within the drive.

attachment.php


In this image, they're showing the washer as #2, and fitting within the seal #3.
The black circle is a thin O-ring seal that fits into the small groove. This seals the washer to the male yoke face.

This gives you an idea of where and what this washer does, minus the explanation regarding the shim control.

 
Last edited:
Man, you are the real deal. Thanks for the info.. I have not taken that apart yet. I was a little intimidated but know I feel better about tearing into it this fall for U joint replacement.
Thanks again, Jason.
 
Back
Top