Logo

Question on Evinrude 150 Looper Crankcase Casting

Woodybelle

Contributing Member
Pics below are crankcase ports on a ‘96 Evinrude 150 V6 60 deg (Looper). Note that the starboard bank has silvery patches on bottom end of each port….portside does not. Patches appear to be from exposed casting where black (paint?) factory finish was worn away. I thought they may have been caused from abrasive contact from leaf valve assembles, A test fit of the leaf valve assembly easily fit into opening without any unusual or noticeable contact. The leaf valve assembles are in good shape.

I would like know what may be the possible causes of the marks, and if there may be cause for concerns or required corrections prior to re-installing rebuilt carbs, throttle bodies, and intake manifolds.

Thanks in advance for input.
 

Attachments

  • STARBOARD SIDE CRANKCASE Large.jpeg
    STARBOARD SIDE CRANKCASE Large.jpeg
    245.5 KB · Views: 9
  • PORT SIDE CRANKCASE Large.jpeg
    PORT SIDE CRANKCASE Large.jpeg
    257.7 KB · Views: 9
Thanks. Since no grind marks are evident in portside bank, do you think I can assume castings weren’t as significant on that (port) side? I’m also guessing; the builder may have removed the leaf valve assemblies for inspection. If so, that may point me to further assume the problem I’m experiencing (starts won’t run) was never fixed. Do you know a test to determine vacuum in crankcase and/or condition of lower crankshaft seal? Fyi, top crankshaft seal was recently replaced when I replaced a bad stator. I definitely have a lean condition (no fuel restriction). Motor will run if fuel is manually sprayed into carb throats. Fuel bowls have fuel. Carbs have been rebuilt; check valves are good. Thinking poor vacuum preventing fuel from being drawn into carbs. Thanks again for your reply.
 
The motor has six separate crankcases.----I doubt all are bad.-----Motor will start and run on 3 of six cylinders in the driveway.-----Test compression , post the numbers.----And does spark jump a gap of 3/8" on each lead , yes or no?
 
Thanks for your feed.
Compression is 95-100 psi on all cylinders…and that was on a cold motor. Recall it’s a V6 150 - 60 deg "Looper."
Spark tested and arcs 1/4"- 3/8" on all leads. ALL ignition components have been replaced, including: flywheel; stator; timing sensor; VR/rectifier; power pack; coils; wiring; & plugs. Link/synch and timing performed and checked several times with OMC analyzer.
 
It has never run properly. I (foolishly) bought boat/motor 3 years ago from neighbor who lied about condition of boat. It would NOT fire when I got it. So, the reason for the new ignition parts. Finally got it to start, but wouldn’t run without enrichment being half engaged. Changed fuel filters, lines, rebuilt VRO2 and carbs, replaced vacuum switch, etc. Also using new auxiliary fuel tank and new primer bulb. Gas gets into fuel bowls, but motor will only start if fuel is sprayed into carb throats….then runs momentarily until fuel spray is depleted. So, leading me to believe lean condition caused by air leak / loss of vacuum preventing fuel from being drawn into crankcases.
 
Sounds like the electric primer valve is not working.-----Your motor has 6 separate crankcases.----A carburetor for each one !-----Doubt that you have 6 bad crankcases and six bad carburetors.-----perhaps hoses hooked up wrong.------Do some real trouble shooting here.----Throwing parts at it is expensive.----And do you push the key in and hold it in while cranking it over ?
 
Sounds like the electric primer valve is not working.-----Your motor has 6 separate crankcases.----A carburetor for each one !-----Doubt that you have 6 bad crankcases and six bad carburetors.-----perhaps hoses hooked up wrong.------Do some real trouble shooting here.----Throwing parts at it is expensive.----And do you push the key in and hold it in while cranking it over ?
Primer solenoid replaced and is functioning. Yes, actuating primer solenoid by key supplies more fuel, but does not improve starting. Troubleshooting has led me to lean condition. Lean condition may be caused from insufficient fuel supply or air leak. Fuel is getting to carb float bowls. Needle valves and seats are new and float settings adjusted to manual specs. Engine ONLY starts if fuel is squirted into carb throats and runs momentarily until (squirted) fuel is depleted. So, it seems there may be inadequate vacuum from crankcase to draw fuel from carbs. Btw, Reed valve assemblies look good and are properly torqued with new manifold gaskets. All new carb kits, throttle body seals, and intake manifold gaskets are by Evinrude and supplied by ME. So, I think I have an air leak causing vacuum loss, possibly from deteriorated lower crankshaft seal. Upper seal was replaced during the replacement of the stator. So, what am I missing? I would like to learn how to perform a leak down test on my V6 looper engine and the procedure required for lower seal replacement.
 
Basically there are 6 separate motors on a common crankshaft.----I do not see how you can have a vacuum issue that affects all 6 cylinders and the carburetor for each cylinder !-----Lower seal only effects cylinder #6 .
 
Sound like carbs are not getting fuel. Did you install OEM carb kit? Did you install plastic washer under seat? Did you use correct o-ring seal on carb?
 
Racer,

Wow, I’m way off base here! First I didn’t know that about the lower crankshaft seal only affecting #6 cylinder. That’s a huge factor! That definitely changes my direction. So, what is affected by the upper crankshaft seal?

When I replaced the primer solenoid, I checked it’s operation by first listening for the solenoid to actuate (which it does), and then by a noticeable change in rpm when engine was running. The solenoid can still be heard when pushing in the key. There was a time a few months ago that I could keep the engine running by periodically engaging the enrichment with the key when the engine began to stall. However, that condition changed. Now, I can’t keep it running, other than by continually squirting fuel into the carbs. So, I returned to possible float / needle / seat problems in carb. Just finished rebuilding carbs again, and found little to account for current problem….other than, two very small slits (one in each of two carbs) in the gasket between the float bowl and the carb body. Although the tiny slits shouldn’t have occurred (new gaskets and float bowls properly torqued per manual specs), I question if they would have actually affected performance given the locations of the separations. So, I surmised that an air leak or loss of vacuum may be an issue. Btw, I have NOT re-installed carbs, throttle bodies, and intake manifolds yet. I’m delaying until I determine if anything else should be done prior to re-installation.

So, if what you say is true, and since the solenoid seems to be actuating, I guess I should re-examine the primer and check for a break in the seal. If there is a break, it’s a bit perplexing why that would have happened? Question: if the primer is the reason for not starting, why wouldn’t the engine continue to run (once it started)….or is it still an enrichment issue until the engine warms.

So, in consideration of all this, it seems my next direction should be re-installing carbs, etc, followed by a new link/synch. Then another replacement of the primer solenoid switch. I would truly appreciate your correction if you think I’m on the wrong track.

Thanks, again!
 
Sound like carbs are not getting fuel. Did you install OEM carb kit? Did you install plastic washer under seat? Did you use correct o-ring seal on carb?
Float bowls had fuel in them when I removed them last week. Carbs are definitely getting fuel. Upon tear down of carbs, I found one of the nozzle well (plastic) washer missing in one carb. I also found a small slit (separation) in gaskets of two carbs (refer to previous post).

Carb kits were Evinrude from Marine Engine. I matched the carb seals to my carb part number, per Evinrude instructions.
 
Upper seal is for #1 cylinder only.-----Crankshaft has metal sealing rings to keep other crankcases separate.----Darn keyboard is acting up.
 
Racer,

Computers…outboards….no problem….if it’s not one thing, it’s another.

So, do you think I should dismiss concerns for air leakage via the crankshaft seals and proceed with the direction stated at the end of my post #13?

I wonder if a keakdown would be appropriate, but uncertain how to perform it.

Thanks for trying to educate me. I appreciate your help.
 
Your motor has six separate crankcases!-----Understanding how your motor works will make your trouble shooting easier!-----Pushing the key in activates ( opens ) the electric primer valve and it does the same thing as you squirting fuel into the engine.----Are you running with 50:1 mix or is the VRO in service and tested ?-----Sounds like your carburetors are not working.----But I can not see , hear or touch your motor !------I know how your motor is put together and how it works.-----Have a 93 and 97 model myself.
 
I’ll return to manual and do more studying.
In reply to your post: The VRO is in service, and has been rebuilt using new Evinrude kit.
Service manual states testing of VRO requires engine to be running. Is there another way? Besides, if fuel is filling float chambers, why would VRO be suspect? Even if the VRO is not providing sufficient volume, that shouldn’t prevent starting, if float bowls are full.
If fuel fills float bowls, then isn’t the issue what’s preventing fuel from being drawn into crankcases? Recall, the float valves and seats are new. I tested their actions before final carb assembly.
If engine fires, starts, and runs (momentarily) until squirted fuel is depleted, and won’t start with primer valve, doesn’t that indicate a faulty primer valve?
 
It is so easy to test the primer valve.---Remove one of the wee hoses from the primer.-----Have your assistant squeeze the primer bulb.-----Push key in.-----Fuel should spray out of the primer valve.-----Note , the electric primer is a valve that opens and sprays fuel into the intake air..----It is NOT a pump that fills the carburetor bowls !
 
Have you had the lower unit off to replace the impeller ?-----Is the exhaust housing and exhaust out the propeller clear and not blocked ?
 
It is so easy to test the primer valve.---Remove one of the wee hoses from the primer.-----Have your assistant squeeze the primer bulb.-----Push key in.-----Fuel should spray out of the primer valve.-----Note , the electric primer is a valve that opens and sprays fuel into the intake air..----It is NOT a pump that fills the carburetor bowls !
I understand. I’ll check primer valve operation today.
 
Have you had the lower unit off to replace the impeller ?-----Is the exhaust housing and exhaust out the propeller clear and not blocked ?
Yes. One of the first things I did when I got the boat was to replace the impeller. Yes, exhaust housing is clear. Exhaust is obvious when engine starts.
 
I you installed the plastic washer under the seats, carbs need to come apart. did you replace the calibration pocket gaskets? If they leak it wont idle, will sneeze and pop back.
 
There were no washers under the valve seats, nor were any supplied in the kit. As previously mentioned, the kits provided new nozzle well seals. Yes, I completely cleaned all ports in throttle bodies and installed new calibration pocket gaskets.

Btw, I was unable to test fuel flow from the primer solenoid earlier today, due to the discovery of a broken nozzle on the fuel filter. I was having work done on the driveway which created a dusty condition. So, in an attempt to protect the exposed internal engine parts, I covered it with a garbage bag prior to installing the hood. Apparently, the fuel line (disconnected for removal of carbs & throttle bodies) got caught-up in the bag and broke the nozzle to the fuel filter. When it rains, it pours! A new fuel filter was ordered today. That said, I was able to confirm that the solenoid was activated when pressing the key. The fuel flow test will need to be delayed until a new filter is installed.
 
I you installed the plastic washer under the seats, carbs need to come apart. did you replace the calibration pocket gaskets? If they leak it wont idle, will sneeze and pop back.
This is really, really painful, but after laying awake half the night replaying the work I’ve done….and your input, I have an admission of an error in past carb rebuilds.

I decided to check the carb needle seat and float installation. I removed one of the float bowls only to find a plastic washer under the float needle seat. I’m in total disbelief, since I absolutely don’t recall installing it. Obviously, I did. I also recall hearing from others, throughout this process, that the washer should be omitted, although I don’t understand why.

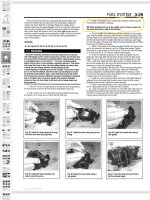
I have 3 manuals for my engine, although I primarily only reference the OMC and Seloc manuals. Since the Seloc manual was more convenient, I returned to the Seloc manual and have attached a page describing carb assembly. I highlighted the paragraph regarding the instruction to place the washer under the needle seat. Refer to attachment below. Interestingly, the OMC manual did instruct the installation of the washer.

So, my questions are: Was the omission of the gasket a subsequent tech bulletin….and why was it removed from the assembly, yet still included in the rebuild kits? It seems to me, removal of the washer, lowers the seat (and needle) only a fraction….which seemingly would still be within the tolerance range (11/16” - 1-1/16”) of the float drop, although it would also lower the top float position, potentially increasing the 1/32” space between float and carb body gasket. I also question if omission of the washer may possibly increase the potential of fuel leakage at the bottom of the seat?

Lastly, I also found the needle spring was attached to the back of the float, which is where I found it, as opposed to the position described in the Seloc manual (on the port side of the float chamber). Again, the OMC manual made no distinction on the position of the needle attachment to the float. I assume the wrong position may potentially cause binding of the needle in the seat.

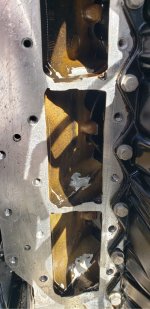
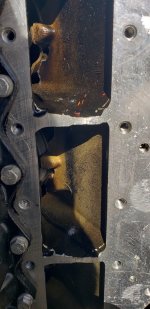
Still, all things considered, since fuel was in the float chambers, what may have prevented fuel from being drawn into the crankcases.

Regardless, I am totally embarrassed and offer my apology for posting misleading information. That said, I’m hoping my optimism for progress may be warranted.

I hope you guys are still with me. Thanks.
 

Attachments

  • CARB ASSEMBLY - SERVICE MANUAL - EVINRUDE V6 150 HP (5)  65-300 HP 1992-2001 Large.jpeg
    CARB ASSEMBLY - SERVICE MANUAL - EVINRUDE V6 150 HP (5) 65-300 HP 1992-2001 Large.jpeg
    429.1 KB · Views: 3
It can be and has been said many times.-----The Seloc manuals come in handy in the little house with the 1/4 moon in the door.
 
It can be and has been said many times.-----The Seloc manuals come in handy in the little house with the 1/4 moon in the door.
Ok, lesson learned (the hard way) regarding service manuals. But, again my questions:

Was the omission of the gasket a subsequent tech bulletin….and why was it removed from the assembly, yet still included in the rebuild kits? Or better yet, why was the washer ever included in the rebuild process?

I also question if omission of the washer may possibly increase the potential of fuel leakage at the bottom of the seat?

Just trying to learn. Thanks.
 
The plastic housing is sufficient to seal this assembly.-----And the needle and seat is common for many , many motors.----Therfor the washer is included !!!
 
The plastic housing is sufficient to seal this assembly.-----And the needle and seat is common for many , many motors.----Therfor the washer is included !!!
Got it. Washers will be removed! Thank you.

Still, it’s a bit quizzical why the washer would create such a problem. Although the washer raises the seat, the float settings are performed subsequent to assembly of needle and seat and includes the additional height of washer. It would seem the float adjustments would compensate for washer thickness. Or, is it a concern for binding? Just curious, since I’m wondering to what extent the washer may have contributed to current problems.

Thanks again.
 
Back
Top