Logo

Mercruiser Cable replacement

20miler

Contributing Member
Hello again guys,

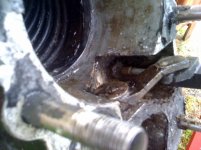
Well, I replaced my lower shift cable and went to the mercury parts certidfied guy and asked for a kit for a prealpha drive. He gave me something that required redrilling and tapping so that the cable mount INSIDE the stern drive end is mounted in the reverse manner of the old. So when I assembled it, it was quite smooth to shift EXCEPT it "hitches" if I try reverse on that darned brass sleeve- thus I cannot shift into reverse unless I really crank on it. So in summary the plastic shifting end piece is NOT clearing the brass sleeve on the end of the cable, nor sliding up over it smoothly enough to do without the engine stalling. What should I do? Is this deisign for real? I almost couldn't believe that it was designed like this. That it could possibly encounter this problem. Is there a way to adjust this that I simply missed?:confused:
 
So no there is nothing guiding the shift slide over that brass sleeve before the nut. It WILL fit over it, if perfectly lined up but the lip of the brass catches the shift slide EVERY time I shift. Again, with grease and pressure, I can get it to shift, but it takes enough force that it would stall the engine through tension on the cable. As far as I knew, there is nothing you slide on that would allow the slide to slip over the sleeve. Shrink tubing? taking the edge off the sleeve with a file? Drilling out the inside of the slide a little?:confused::confused::confused:
 
Thank you very much for the advice- and the diagram- WHICH shows a rounded edge on the brass sleeve. mine SURELY has a square untapered edge, but is an orginal mercruiser part!
 
IMG_1756.jpg
 
Thank you very much. So the slide works well over the white part and then "hitches" in the lip of the brass. Every time. Even with a ton of grease. NOTE: I did not change the arm or the roller- my kit did not come with those.
 
Most likely you tightend the allen screw in the end of the CAST shift arm all the way tight and the shift arm is not free to move. Or you may have left it too loose.

The cast shift arm allen screw must not be tight, the cast shift arm should have about 1/32 " of slop to the cable end NO MORE and this should help.
 
Last edited:
Well I tightened up that brass insert today so that I could only see a single thread or get a dime in there- also I checked the tightness or looseness of the allen screw- that was done as instructed- but I made it slightly tighter- so it was tough to spin. What I found was this- there is sooo much slop in this design and the "prongs" of the slide even hit the side of the arm as it advances- that there must be something missing from the rest of the assembly, ie there is no washer above or below the shift axis- but with lots of grease and bending that white plastic cable, I was able to get it to slide over that sleeve. I still cannot believe this is how it is supposed to work. I wonder if this will stall the motor.
 

Attachments

  • photo (4).jpg
    photo (4).jpg
    60.8 KB · Views: 270
A very common problem with older outdrives it the small wheel on item 25 in your diagram wears out for what ever reason and will creates to much slop between the lever and the cable end.

If someone has been in there before and considering the age of you unit I would suspect that to be true, if item 26 is missing I would make sure you put one there.
It is hard to see so make sure first that it is there.

Also make sure there is NO slop between the lever and the threaded screw/pin that secures the lever to the vertical shaft ITEM 27
 
One other question

How did you tighten the cable to the bellhousing??

That requires a special tool.

If you did not have that tool and used a standard socket the that would answer the question as to why the white plastic cable end was bent.
 
One more thought,

When all is done, I do not believe the metal end that slides over the white plastic ever goes off the plastic when everything is all assembled.

When you assembled the other end of the cable did you feed the inner core all the way thru the black plastic canle end? and did you tighten/thread the metal threaded tube with the brass trunion all the way in and I mean all the way in?

any of these not done correctly could add to your isses.
 
THERE we go! That little wheel isnt even cyllindrical any more- I wish I'd have known about the slide not going over the brass sleeve
 
That is a very common problem and the screw/pin you are about to try to remove can sometimes be a real bitch........take your time and you may need a impact screw driver to break it loose. If you have to drill it out it is only threaded on 1/2 of the wheel where the screw driver slot is the other half is the pin shape (no threads).

when and if you get it appart and you go to install the screw/pin back in whether it is new or the original, DO NOT USE LOCKTITE!!! use grease!!!

The screw/pin is stainless steel so if you need to drill it out USE GOOD QUALITY DRILL BITS AND GO SLOW!!
 
SHIFT CABLE ADJUSTMENT PROCEEDURE

Here is my proceedure.

Trim out drive up 2 inches from all the way down.
Take keys out of ignition!!!!!!!!!!!
Have a second person stand at the prop.
You, remove the short shift cable from the shift bracket.
After the cable has been removed, push the plastic cable end all the way in and hold in place while prop is being spun C’Clockwise..
Have second person rotate prop counter clock wise until the prop is fully engaged and wont turn anymore. Maintain light effort on shift cable plastic end pushing it to keep forward engaged.

Measure the distance from the center of the brass trunion to the center of the round mounting hole in the plastic end. Adjust trunion to make that distance 6 inches. no more no less! In cases where the shift cable is old but still works well you can adjust this dimension to 5 15/16”. NO MORE.

Put shift control handle in forward FULL throttle position.
Remove the control shift cable from shift bracket at this time.

Install short shift cable back onto bracket at this time.

Take the shift control cable and adjust the trunion so it fits perfectly back into the shift bracket.
Before installing it turn the brass trunion 4 complete turns away from the plastic end and reinstall into shift bracket.

Now put shift control handle in the neutral position.
Have second person spin prop, it should spin freely.
Put shift control into the forward detent position at ~ 10:00 position. NO FUTHER.
Have the second person rotate the prop counter clockwise. You should have solid engagement with no ability to continue to turn the prop.

Now shift back into neutral. Prop should spin freely with no clacking or clunking.

Now shift to reverse to the 2:00 o’clock position detent NO FURTHER!!

Have the second person spin the prop clockwise.

If you have positive engagement with no clunking or jumping out of engagement, you are done.

If it does not fully engage into reverse than look at the shift bracket where the short shift cable mounts and there is a slot. Loosen the 7/16 hex that is touching the bracket and move the stud so you are pulling the short cable.

Try this and retest in water under load.
 
This is extremely helpful- except I could not get that arm out. There is significantly better throw with the trunion screwed in more, but the cable is hard to operate. I think the wire "figure eight" I made was scraping the side... This is quite an ordeal. I put it all back together and will haul out next week and reconsider drilling out the arm if problems arise.
 
You must replace the arm if the wheel is worn, no way around it.......

It is very difficult to remove sometimes and there is no other way but to drill the threaded 1/2 of the screw/pin out.

The cable should not be tight at all.......if it is you must find out why, otherwise the motor will stall when shifting

the cable should move easily with just your index finger and thumb pushing and pulling the plastic end of the cable on the engine side. If it is more difficult than that it wont work.

The wire should wrap tight around the little tit that is in the cast shift arm and around the set screw then twisted and tucked inbetween the tit and the screw.
 
Well, I did manage to get everything back together and while I would not say it is smooth. It works and does not stall. But man that thing doesn't just clunk into gear- IT SLAMS and at low idle speed too. Both FWD and REV - This whole thing is pretty messy. I will pull it out next week and recalibrate. I will try to get this dialed in by adjusting the barrel at the shift cable before I throw up (my hands)
 
clunking going into gear is not a symptom of cable adjustment it is caused by high rpms..........

Idle speed Must be 600-700 in my opinion, spec is 650-750

The lower the better but not under 600 ish

if you are adjusting idle speed by your tach in your dash it may be off, If you have acess to a hand held tach, IE: timing light with a tch built in or a tach dwell meter try to use that. If not try adjusting it by ear.....turn down the idle a litlle until the clunk is minimized. It will always clunck as that is how it is designed to work so some is good.
 
Back
Top