Logo

Honda BF29D Carb with Auto Choke

Hi Guys I bought a 3.7m dinghy with a Honda BF20D motor that had been standing for a year and obviously wouldn't run well so I stripped the carb and gave it a good clean but it still struggles to start. I need to ask two questions for those experts with these little carbs. I took the float chamber off and cleaned and checked the float and valve then I also pulled out the emulsifier tubes in the middle and carefully made sure the jets and the tiny holes were all clear. However once the float cover is off there are two very thin (maybe 1/8" or less) hollow brass tubes that extend into the float chamber ..one goes up to the fuel enrichment unit and I used a tiny sewing needle to clear the inside of the tube the other seems to go up near the sealed mixture screw but seems to be blocked .. should this one be blocked ? I don't see any mention of these in the Honda Carb Manual (mine is the BG carb) Are these just guides or do both need to be clear.
My second issue is the actual fuel enrichment unit .. the motor struggles to start cold but with a tiny bit of "aerostart" in the back of the carb .. does run until it's warmed up .. there is 12v getting to the unit and it does seem to get quite warm but whether it's connected or not cold staring is an issue. Any way to test to see if the auto choke is actually working if I apply 12v to it. Does the needle inside if you feed it 12v? Many thanks for any advice!!
 
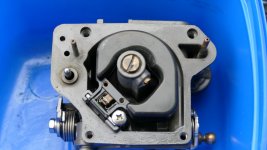
Here is a photo of the carb with the float top taken off ... the two offending bits are the brass tubes left and right ...the right one is clear but the left one is solid ..a sewing needle only goes in about 1/2" ..the left one is the one that goes up next to the mixture screw

Sorry about the title which says BF29 should be BF20D
 

Attachments

  • carb001.jpg
    carb001.jpg
    396.4 KB · Views: 4
Hi Chris,
These are very finicky, hard to get clean carbs.

You ask great questions though.

It's 1 am here so I will answer a bit but might need to stop and get back to you tomorrow.

First, the start enrichment:
The pintle pin or "needle" should extend when 12 volts are applied for more than 1 to 1 1/2 minutes.
The enrichment is defaulted to FULL RICH at start up. After start up the enrichment electrical coil under the flywheel delivers the volts to heat the element that moves the pintle. The pintle pin extends and closes the enrichment reservoir feed to lean out the mixture.

When testing the SE valve, apply 12 volts for 2 minutes or more and look for the pin to extend...about 1/8" to 3/16" if I remember correctly.

The SE valve rarely fails. Typically, it will fail with the pintle fully retracted. The resulting symptom is an engine that starts easily when cold but then runs too rich and dies when warm.

However, it is possible for the pintle to "stick" in the fully extended position and shut off the start enrichment orifice and causing hard/no cold start.

Next issue....the clogged brass tube.
You already know that the one tube...the one on the throttle cable or "inboard" side of the carb is for the Start Enrichment. I hope you didn't damage that orifice while cleaning it.

The remaining tube located on the side with the accelerator pump ("outboard" side) is called the PRIMARY FUEL JET. It too must be clear.
The jet is up, inside, the tube and is hard to see. It is really small. It can get badly plugged.
WARNING!: Be VERY cautious cleaning thet that jet! If you accidentally enlarge that orifice or jam a piece of debris in there, you could damage the carb irrevocably. That tube is not replaceable. See page 6-61 of the carb manual.

There are cleaning rods for these carbs but I don't have them.

Try using an eye dropper or dip a needle into some descaler product like CLR and allow a drip to fall into the tube end. Let it sit on or in the orifice for a few minutes and then try blowing some carb cleaner through the high speed orifice at the top of the carb throat to try and clear it. Then try blowing the carb cleaner through the bottom of the tube. It can take many, many tries to clear that orifice.

This is where an ultrasonic parts cleaner might help.

I'm going to stop now and leave you with three questions:

1. Did you clear and check the delivery of the accelerator pump tube orifice?

2. Did you replace the oring at the end of the slow jet tube?
(Page 6-58 of the carb manual)

3. Did you remove the idle mixture adjustment screw and clean the passage?

More later.
 
Thanks sooo much!! with the carb I used a sewing needle and the SE tube cleared easily I have tried using the same needle and using carb cleaner to clear the primary fuel jet but was dropping a bit of carb cleaner instead into the hole with no avail but will get some CLR tomorrow and do it your way. that tube (the blocked one looks like it runs thru the mixture screw so would the high speed orifice be on the inside of the air intake side of the throat or is it on the machined face of the throat and one of the round holes that are to the right of the bolt hole that secures the carb?

I did unscrew the SE unit and cleaned it and hopefully I put it together correctly it seems to be ok but will check for pintle movement tomorrow.

In regards to your questions : Yes the accelerator pump works so I assume the tube is clear but will check. No I didn't change the o-ring in the slow jet tube (that's the tiny emulsion tube with the o ring at the end?) My Carb manual is the Honda 2001 one. Lastly after reading all the comments that say "don't remove the seal" of the mixture screw, I haven't touched the screw. Apart from some gentle prodding with a needle in the blocked tube all other oriface cleaning was just spraying carb cleaner and no mechanical or implement use!!

Your efforts and dedication is really appreciated.
 
Ok, yeah. Your carb manual was printed prior to this model carb.
1st edition?
No matter, I just won't reference the manual anymore.

All the fuel delivery orifices, idle, intermediate transition, and high speed, are located at the back of the top of the carb throat. All but the idle orifice are hidden when the throttle plate is closed.

This carb is most effectively cleaned when you can find a way to prop the throttle plate wide open. I use a small, pocket screwdriver inserted in the linkage to keep it open.

My technique involves using the plastic straw provided with the spray cleaner and carefully bending it 90° at one tip. You can then use it to get the tip directly over each orifice to "backflush" each part of the delivery circuit. I use the term backflush alot because it's necessary. Especially in a case like yours where it's obvious that you had water in fuel that then sat for too long.

I will tell you now that if you can't clear that primary jet, you may need a new carb.

If the jet won't clear with several tries, you might be able to more effectively flush it by removing the slow speed tube and flushing from the area of the oring. It's almost impossible to see in there but trial and error might get your 90° bent straw in that feed orifice.

You can also keep backflushing the idle, intermediate and transition orifices since they all lead back to that passage.

Also....at the front of the carb, on the mounting flange are the passages for the high speed and low speed air jets. Those lead directly into core of the carb and you might notice fluid exiting there when backflushing the orifices. Plugging those holes with your fingers can help raise the pressure in the passage to help get the blockage moving.
Actually, Plugging ANY fluid flow, from anyplace other than where you want it, helps increase internal pressure and it's something I have learned to do by using fingers and thumb while spraying.


As far as removing the idle screw, I have never understood why someone would attempt to clean a carburetor (especially one that won't start) and not do a thorough job of it. Yes, it can be difficult to remove the screw because the oring acts as a lock to hold it in. And, yes, it's very easy to break off the "false head" of the screw. But a very sharp pick tool used to pry while turning the screw gets them out every time for me.

But if you don't intend to replace the oring....which may be bad btw....don't bother disturbing it.

I would not even open one of these up if I didn't have, at least, a new gasket set that comes with the small orings for the slow speed tube and idle screw.
And, if you're inclined to replace the anti tamper cover for the idle screw, you will need a new screw set if you break off the old one.

You can remove the tamper cover without breaking the false screw head by heating it with a soldering iron while gently pulling with needle nose pliers.
I've read that some "just pop them off" but I never had luck doing it like that without breaking off the false head.

As to the accelerator pump circuit....
You have to verify that the nozzle in the delivery tube is COMPLETELY clear.
The brass tube juts out into the incoming air at the front of the carb. But you have to look into the rear of the carb throat to see the nozzle that faces rearward.

You test that nozzle like this:

Turn the disassembled main body upside down and locate the feed passage for the tube. It's right next to your plugged primary tube.

With the throttle plate propped wide open and the rear of the carb FACING AWAY FROM YOU...squirt carb cleaner into the feed hole and ensure that a stream of fluid SHOOTS out the rear of the carb a distance of approximately 8 feet. YES! 8 feet!

If it's less than that, you need to clean the nozzle by placing the tip of the plastic straw (a straight one) through the rear of the carb and carefully placing it over the nozzle orifice and BACKFLUSHING the nozzle and tube.
Test it again for an 8 foot stream and continue to backflush and retest until clear.


Glad to answer any questions.

Good luck.
 
Many many thanks again! I will go thru all your suggestions with a fine tooth comb!! The motor sat next to the previous owner's boat unused and in the elements for probably a year or even longer ..Yes, the fuel tank had at least 50% water in it too and the motor was covered in seabird "poop" as was the boat. After 3 weeks of boat cleaning and motor cleaning and 2 initial carb cleans I actually got the motor to run. I'm surprised it ran (even roughly) with the primary tube blocked. Since I'm retired I have plenty of opportunity to do a comprehensive clean and thanks to you I know what to tackle and where!! Will keep the forum updated as your comments can also be helpful to others!
 
Well, in case you don't know, the BF20D is a really fantastic outboard and is very popular. I own one myself. 2006.

One of only a handful of small displacement outboards that it will likely be pretty easy to get parts for as time goes by.

Well worth the effort to revive one. With proper care and feeding should last a lifetime.

Looking forward to seeing you have success.
 
Thanks! the primary fuel jet tube doesn't seem to be playing ball at all ..I have modified a plastic syringe so it slides over the tube and poured a small quantity of CLR into it ..been sitting for an hour already with now results .. I used the smallest sewing needle I could find which easily slides into the SE tube (so it doesnt cause any damage but the primary fuel jet tube only allows the needle to go in maybe a quarter of an inch at best so it's well and truly blocked. I'm assuming if it's clear the same needle will pass easily down the tube the same as the SE tube ..I have left it soaking for now (I guess that tube is inserted during manufacture so no chance of taking it out? The motor actually runs despite the blocked tube but not very well. I might have to bite the bullet and get a new carb!!!
 
I can't tell you the measurement of the jet in that tube. I don't know where that info is published. I can't find it in either of my carb manuals.,.3rd and 6th edition. But I'm pretty certain that it's smaller than the SE tube passage.

I've personally only had to unblock 3 of them and always got them using carb spray and CLR. I did put the most stubborn one in a sonic cleaner but that didn't get it clear so I kept spraying it and it finally cleared.

I have worked with others that had a very hard time getting their"s clean but they finally got it. So...I don't know what to tell you. I think if you keep trying you will get it but I don't know for sure.

I'm not an advocate of using a pin because I think it could make things worse because you could pack whatever is in there even tighter doing that plus the pin is likely too large.

Some guys use a wire strand plucked from a large stainless steel wire brush. But I am worried about the wire breaking off in the orifice. If that happens, you'll never get it out with spray cleaner.

I have used strands from copper automotive electrical wire. The copper bends and doesn't break... ....usually.
But it's not strong enough to push through a solid blockage.

So, unless you're willing to spend the time working on it, you might have to punt.
 
Thanks !! I actually tried some copper wire too but it just bends. What I do ponder is if you start the motor with a tiny squirt of "aerostart" ..once it's warmed up the motor runs on it's own ..so what is the actual function of that tube if the motor (once warm) runs with the tube firmly blocked cos in my feeble brain it shouldn't run at all ... right in the end of the tube I can see a little jet with a black inner ring and even with the sharp needle it only goes in a tiny amount so it must be pretty blocked up! I had a little tube sitting over the offending piece filled with CLR and it did absolutely nothing. I will check out local agent for carb prices ..I can get one from the USA for around US$200 which is cheap but it ends up at AUS$450 which is still not a bad deal but it takes over a month to ship it!! Will continue with some cleaning this week but whatever is in that tube doesn't want to move!! (remember this motor sat for probably 18 months out in the marina so one should expect the worse) but it feels like whatever is in the tube is packed harder than cement!)
 
Acetone? Stronger than carb cleaner but will also evaporate so you may have to keep adding some frequently. Might try it to see if whatever is in there softens a bit.
 
Well, for that kind of cash I would just keep digging.

A couple more thoughts....
If you have PB Blaster (rust penetrant) available, try that.

Use a heat gun or hair dryer on high to warm up the tube and then apply the PB....or whatever penetrant you can get. Don't use WD 40....it won't work. I love WD 40 and use it alot but not as a lube or penetrant.

Back in the day I would submerge a carb in Berrymans for 24 hours and it would come out SPOTLESS.

That stuff was POWERFUL! BUT...if you were to put one of these little Keihin carbs in it I'm afraid it would desolve all the plastic pieces.

They still sell Berrymans B-9 cleaner for dip cleaning carbs and if I were stuck, I think I would get a bucket and just use a few drops as you've been doing with the CLR. It's not cheap but it it is less than a new carb.and it lasts forever.

If you decide to try that, don't get the Berrymans B-12....it's not the same as B-9.

As to your question about what the primary tube feeds.....well.....
It pretty much feeds everything.

All those little orifices....idle....intermediate...transition and high speed at the top of the carb throat all feed from that tube in stages as the throttle plate is opened and closed.

Without that tube being clear, the carb can't fully function and full power will never be achieved.

Here's one more thing I might try to clear that tube.
....tiny precision drills.

I had actually intended to check with my local hobby shop about getting some for doing things like this but never did.

Of course, the problem is.....
...what diameter?
If we don't know what size the jet is then there's the danger of enlarging it with too big of a drill

Anyway, just some ideas I've had but never really tried.
 
Thanks again
Not too sure what we have here but sounds like I need a penetrant ..No Berrymans here but I have seen some penetrant that might work ..I saw on another forum that a 50/50 mix of acetone and transmission fluid works a treat and released rusted nuts better than any commercial product..interesting!! .Heat gun is no issue ..I have one! I'll go that route first before taking the drill route ..I can get a microdrill set here that goes from 0.3mm to 1.6mm but probably need to but a mini drill as well (like one for drilling printed circuit boards) The actual jet seems to be right at the end of the tube so finding a drill bit a fraction smaller would make sure the jet size is not compromised.
 
I have used 50/50 atf acetone on rusted pistons, it works very good. I think the atf keeps the acetone from evaporating so it stays around for a prolonged soak. Not sure how acetone will effect orings so keep away from rubber.

I suggested acetone alone as that will be the strongest solution for attacking rust or crud. For a long soak, say overnight, the 50/50 is best.

I am an old car guy, 283, 327, 350, and 409, if you know what those are. All have carbs, some are aluminum, some are what I call pot metal. Lots of brass bits.
 
Just a short conment to add to Jimmy's wealth of knowledge on these little motors. The lightest steel fishing trace is an excellent jet cleaner when wiggled around in the orifice with the presence of seafoam or similar. Re starting the motor, assuming your accelerator pump is fully functional, three slowly twists of the throttle prime them up nicely and should fire straight up. Those auto chokes for some reason become problematic and the throttle twist works just as well.
 
Wow that tube seems to be blocked with concrete!! Nothing will dissolve the crud inside The only other option is to buy a pcb drill and a set of tiny drill bits which will probably set me back $150 here so I decided to just order a brand new carb before I end up spending more than the cost of a new one. I ordered one complete with the auto choke (SE unit) and it came to AUS$480 .. if I had ordered from the USA it's cheaper for the actual carb but after shipping and tax it's a mere $36 cheaper and takes up to 6 weeks to ship. Many thanks to all the experts that helped me try to get it running but I think it just has been exposed for too long to the elements!! The tiny brass tube is also badly discoloured so that can't be good and there was a mixture of (what looks like) fine sand and water and fuel mix so that couldn't have been good for anything in the float chamber. My used Whaly 3.7m boat and the motor complete with centre console and wheel steering plus a nice bimini top retails here for over $12, 000 (motor alone is $6400 new) and I bought the whole lot for $4000 (including a Garmin depth sounder, transducer and GPS plotter) so I don't mind a few expenses to get it all good!!
 
Ok Guys I had the new carb shipped today and this afternoon I fitted it .. the motor started first touch ! yay! idle is a bit rough so I will look into that tomorrow. I did leave out the gasket between the air side of the carb and the plastic cover that has the little grill in it ..the gasket was trashed so how essential is it??? I will also continue to try and unblock the old carb primary jet tube as it might be useful for other 20hp owners.

Should I order a "rear gasket" next time I'm at the agent???
 
Back
Top