Logo

Honda 9.9 water check hole does not discharge water

Yeah, the recoil is three bolts and either dangle it off the start inhibit cable or disengage the cable altogether. Not difficult at all.

I really think the full "Monty" pump repair kit will have you smiling. You shouldn't have any trouble sourcing one [n boats.net although I haven't had the pleasure of working on any XL high thrust models....so I could be all wet. Where do you usually obtain your parts?
If you ever do get the motor ashore, I have some ideas about flushing that you may be interested in.

Good luck.
 
I got the incorrect parts from Boats.net. So I have an unusable impeller from there. I was not happy to find that out only after having removed and disassembled the motor!

I am open to hearing any ideas re: flushing. I will need to remove the motor in order to move the mount down anyway.
 
Last edited:
Well, there's the Salt Away that you mentioned. I have heard of reasonable success using that but I have never tried it.

There is at least one thread I know of here about using white vinegar. That seems to have gotten that individual great results.

Then there is what I have been considering for some time and will be trying here soon. I use a product called Prestone Super Radiator Cleaner to get car cooling systems shiny metal clean.

The stuff makes old, corroded radiators look like new inside. I've never had it adversely effect the water pump seals or head gaskets so I have confidence that it won't harm the impeller.

BUT....just to be safe for my first one....I will be changing out the impeller kit and T-stat on my BF 20 D immediately after the flush. If I can get it done before you get to yours, I will write you a report on how it went.
 
I will eagerly await the results of your test. :) I would be willing to try the white vinegar, that is supposed to be the best household thing for mineral deposit removal right?

I think my problems stem from the motor being mounted too high.
 
Well I hope no one holds their breath waiting on slow, old, me. I'm trying to finish up repairing a wrecked car I bought at auction and it seems to have a new surprise for me every day. Comes under the heading "the more I look, the more I see". I won't be getting to the 20 until it's wrapped up and gone.

Yes, the white vinegar has many testimonials to it's credit and I believe that I have heard about the apple cider vinegar before too. So, there are many options for descaling.
 
Little update here - I am midway through my outboard bracket relocation project. The previous owner who installed the thing was overconfident in judging its placement, and used either 5200 or epoxy to affix the wooden wedge (between the articulating OB mount and the transom) to the transom. He also painted over the stainless steel backing plate and bolts/nuts/washers on the inside, below decks on the inside of the transom. None of which has made this project easy for me!

After a couple of wasted hours spent trying to get the old wedge off the transom, I gave up and decided to try to re-use the lower mounting holes (to become the new upper ones) and found that I could do so. I was afraid that the now-excess/top part of the wedge might interfere with the articulation (lowering/raising the OB), but happily it did not. I also managed to knock loose the backing plate, which will be slightly modified and reinstalled. I have fabricated a new lower section of wedge, which now needs to be drilled, painted and installed. I ordered some new 316 stainless steel carriage bolts to replace the ones I removed, which had deformed slightly from the weight of that big old 9.9 over the years.

Once I get it all back together, I will post another update here. With any luck, this will solve my circulation problems.

One interesting note, the last time I had the boat out and had my fun problem with no water coming through the indicator - after I turned the motor off and had the boat docked, I loosened the swivel lock and gave the OB a good left-right swivel. This motor has the raw water inlets on the side of the lower unit, with screens over each side opening. The next time I cranked it over, water flowed out immediately. I think what is happening is that an air pocket is formed in the impeller chamber when the motor is tilted back into the water, and since the OB is not mounted low enough, there is not enough pressure (at rest/engine not running) to force the air pocket out. This would explain why the "shake" would help dislodge the air pocket. Perhaps some water stays in the uplift tube (or whatever that straw that runs from the water pump housing up into the powerhead is called), and that water prevents the air in the impeller chamber from "bubbling up" and escaping out up into the head. This would explain why I don't have this issue when putting the motor into the water the very first time (when I've left the boat sitting for days/weeks).

Anyway, the motor clearly needed to be mounted lower, so I am doing that as a next step. If this doesn't work, then I will be back to the drawing board ...

EDIT: P.S. - I bought one of those handheld tachometers and will be testing the idle RPMs as well. $17 on Amazon! Thanks for the tip.
 
Last edited:
Looks like you're making progress.
And I think your assessment of the pumping issue is correct. HEAD PRESSURE is a term used in hydraulics concerning the way the depth of a fluid at the inlet to a pump can be an aid in priming and pumping.
On an outboard, head pressure also impacts another aspect of operation besides the water pump. It's the exhaust.
Since the majority of the exhaust gasses exit the outboard under water, the depth at which the exhaust is placed under the water will produce "back pressure" to the exhaust leaving the cylinders. Ideally, close to 0 psi back pressure is desirable in most engine exhaust "plumbing" strategies. But, all systems have some back pressure and it doesn't usually adversely effect engine operation. However, if an outboard is placed in such a way as to have the exhaust too far under water, excessive back pressure can occur. This can cause hard starting with long cranking times and can adversely affect engine performance. Since 1/3 of the heat from combustion exits through the exhaust, extreme back pressure can elevate engine temperature in an undesirable way.
So, not deep enough causes problems but too deep can be troublesome too.

Good luck with your project.
 
That is a good point, jgmo. I often think of that when I see (and/or, usually when I HEAR) certain awful aftermarket exhaust systems that people put on their cars. Especially when you don't account for the increased flow, you have to think that a lot of engines suffer with these cat-back aftermarket exhaust systems, as the engineers who built them would have calculated a certain amount of backpressure, which you have now removed with your hi-flow exhaust.
 
I have completed the relocation of the outboard mount. The first test was successful in that the motor began spitting water right away, though I haven't put it through the true first test of taking the boat out, lifting the motor out, keep it out for a few hours of sailing, then tilt back down to come in. That will be the real test.

However I did run it for a bit at the dock. Unfortunately it did overheat (overheat alarm sounded and I shut it down) while idling. I would estimate it took about 2 to 2.5 minutes (from cold start) of idling before it overheated.

I took off the recoils starter from the flywheel (I let it dangle by the neutral/in-gear disengage, as suggested - thanks for that tip!) and used my new handheld tachometer. The idle seems to be at ~ 1,400 RPM, if the cheapo tachometer is reading correctly, so I am not sure how much more I could realistically increase the idle speed to help with the overheating problem.

I did let it cool, and started it up again, to run the rest of the fuel out of the carb and lines. I did my usual trick of holding up the fast idle lever a little bit, to increase the RPMs and boost the amount of water pumped up into the head, and as usual that trick did work, and the motor ran for several more minutes without overheating.

I did notice a new thing, which is now when I turn the motor off (and/or when it ran itself out of gas), now there is a bit of water that drains out from the pisser after the motor is still and silent - this is a good improvement, because previously when the motor stopped, the water from the telltale immediately ceased flowing.

Anyway, I guess I'll have to look up the idle RPM specs unless anyone here happens to remember off the top of their head. I will probably experiment a bit with the idle settings to see what is the lowest RPM it needs to keep from overheating, even if I cannot permanently adjust the idle speed that high (worried about it being too high to safely go from neutral into gear).

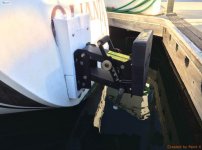
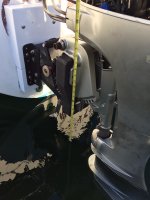
Here are a couple of pictures; forgive my dangling recoil starter. It's tough to see but with nobody aboard the top fin of the cavitation plate is about an inch above the water line and with me in the cockpit, that is about flush with the water.

Thanks again for everyone's comments!
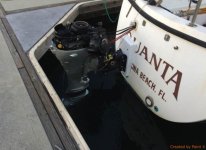
OB 1.jpgOB 2.jpg
 
Water MUST be about 6 to 8" above the water pump when motor is in the operating position.------------Post a picture of the motor fully down.------------These pumps are not self priming and submerging just the water intake is not good enough.
 
Last edited:
That is fully down ... the relocation allowed for about 6" improvement. I would say that the water pump is about 6-8" submerged at this point.
 
The idle specs in the shop manual indicate 900 RPM +/- 50, so I definitely can't simply increase the idle RPM.

I did some experiments yesterday, with the tachometer and a stopwatch, to see what is the minimum RPMs that the engine can run at without overheating. That magic number seems to be right around 2,000 RPMs. I ran it there (and higher) for over 10 minutes without issue. From a cold start, at idle, it will overheat after about 2 minutes. It's the exhaust side that gets hot (right where the temp sensor is, near the valve cover).

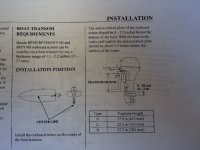
I've consulted the owner's manual and measured a few things. The manual specifies a transom height of 27 inches for the XL shaft model. My transom height, with the bracket lowered down to its lowest position, puts the transom height at about 19 inches above the waterline. So I am a full 8" deeper than I should have to be according to the owner's manual.

OB manual.jpg

OB Transom height copy.jpg

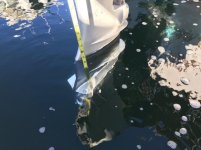
Here's a shot showing the depth of the water pump with nobody aboard the boat - it sits another inch lower with me in the cockpit:

OB wp depth.jpg

The fact that a little extra RPM and thus pressure keeps the engine running without overheating tells me that I have a loss of pressure somewhere between the water pump and the powerhead.

It's a bit frustrating because it seems like I keep getting closer to fixing this overheating issue, but everything I try (increase idle speed on carb; impeller replacement; thermostat replacement; lowered the mount) ultimately does not improve the situation. My wife says that as long as it works on some level (as long as you keep those RPMs up!) that I shouldn't worry about it, as it's a sailboat and that is the whole point - to sail it. On the other hand I know that it is a safety issue, perhaps a liability issue as well if you factor in maneuvering in crowded marinas near very expensive hardware. I feel like I am inching closer to purchasing a new outboard. I really need the thing to be reliable and to function without explanation or qualifications (such as, "just make sure you keep the RPMs up when in neutral).

I guess the next thing to try would be a new water pump unit, or perhaps the water tube seal at the very least.

Would it be worthwhile to go through the trouble of removing the water jacket cover and trying to inspect and possibly "scrape out" whatever surfaces and passages that I can access through there? I wonder if I could pull the lower unit and run a long pipe cleaner up the water tube. What about removing the thermostat altogether to flow more water?

I also disassembled my remote unit yesterday as it had developed a binding feeling when shifting in and out of gear, which I had never experienced before. It turns out that the "sliding plate collar", a plastic piece, had broken into pieces and was binding in the cam works. So I need to replace this as well.
 
I have worked on MANY of these outboards....9.9....8.....20......and a couple of the 15hp. They are all essentially the same. The MOST robust, reliable and easy to maintain outboards I have ever dealt with and I've worked on AND owned most brands over the years. I'm really sorry you're having this problem but if you can figure it out and straighten it out, you won't be sorry that you kept the Honda.

Having said that, yes, I think you should try all the things you mentioned above.

Yes, take the thermo housing off and LIGHTLY scrape, swab, and bottle brush as deep as you can. Take the gear case off while the t-stat housing is off and use air and water pressure....as high as you can get....to backflush the passages. If you see a lot of buildup, you could try a special flush technique using an automotive radiator cleaning product prior to replacing the pump. Make sure you replace the zinc part inside the stat housing while you're in there.

I NEVER replace just the pump impeller. I believe I've said this before. Buy the complete kit including the drive key and replace everything. The pump will NOT pump at 100% efficiency if a new impeller is placed in a used housing and cover (wear plate).

I've never run across the type of problem your having so there may be something happening with your outboard that I'm completely unaware of. But I really don't think so. I think the answer is in one or more of the procedures I've touched on above.

I know how frustrating this is but, by the same token, I look for outboards like yours to buy after a guy throws up his hands and sells it cheap. I buy them gladly. I don't want to see you be the guy that gives up on the verge of success.
 
Thanks for the encouragement, jgmo. I don't want to be that guy either! Honestly if the damn thing weighed less I would shlep it home to our condo's patio and despite lacking a proper work bench or other accommodations, would try to take it apart more thoroughly. The other thing is that of course I want to keep using the boat, so you can understand my dilemma.

It's got to be a blockage someplace. I Googled and found some pretty scary looking examples of clogged water jackets. God only knows how the engine was treated prior to my possessing it.
 
Last edited:
Yes, I can identify with what you're going through. My first sailboat (San Juan 23) came with a
used Chrysler outboard. I wasn't even close to being the mechanic I am today and, I had a tendency to be gullible about things I was told. The outboard was almost impossible to start when it was cold and everyone kept telling me that Chrysler outboards were junk and they all did that. When, in fact, it was a nice running piece when I could get it started and if I had enough confidence in my ability, I probably could have figured out and corrected the starting problem.
But, I was young and I just wanted to sail my boat and not be tinkering with the dang outboard!
I finally got so frustrated with it, I took it off the transom and stowed it under the companion way. I instantly became a better sailor because of doing that. I learned to sail in and out of moorings and marinas and learned the arts of warping and kedging when conditions were against me.
But.....it was only a 23' boat! Anything larger, especially in todays more crowded waterways, needs a reliable auxiliary. So, yeah, I get what you're dealing with.
I sure hope you can get it sorted out. The 9.9 truly is a fine outboard but it doesn't feel like it when it's giving you trouble.
Wish I could be of more help but all I can do is cheer you on from here.
Keep us informed (many others are lurking, I'm sure) and here’s to ultimate success.
 
I can sail to and from docks - that's how we learned, on boats w/o engines at all (Cal 20s) - but it is extremely nerve-wracking to do it when surrounded by expensive neighboring vessels and owners with little to no tolerance of even minor things like fending off etc. I sail to relax, not to push the limits of what is possible. :)

My next move will be to get that cover off and to see what's in there. I will bottle brush it to the best of my ability to bend a brush around in there. Hopefully the blockage is right up against the removable cover - what are the odds though, I do not know. What I will do is blast the thing with my hose/pistol attachment, and see if I can dislodge anything. I forgot to mention that when I had the lower unit apart earlier this year for the impeller change, I did blast up through the water tube, with said pistol attachment, and the flow that came out the telltale was pretty intense. So, I will probably not try replacing the tube itself yet.
 
Well, when you blasted the last time, that probably didn't help and could have hurt. Back flushing, as you plan to do next is the best way to dislodge and purge foriegn material. But I have never tried doing that with the gear case on. There's really no place for objects to go except right back to the pump outlet. Then, the debris will pump right back up to the power head as soon as you fire it off again.

Let me ask you, were there any missing arms from the old impeller? And, if so, did you find and account for all the pieces? Usually they fall down under the pump and you can get to them if you remove the pump "cover"....which is Honda's name for the wear plate underneath the impeller. You can also take off the inlet screens and fish them out that way. Leaving them in there might starve the pump for picking up water and could very well cause your symptoms.

Anyway, taking the stat housing off should tell you something. I recommend replacing the stat if it's not fairly new and don't forget the sacrificial zinc. Order a new screw for the zinc even if it looks ok because, most of the time, they are corroded and brittle.
 
Thanks again jgmo. I will be sure to order the internal zinc anode and its screw. I just replaced the thermostat, I think I have some pictures earlier in this thread. I have not disassembled the wear plate / cover that sits beneath the impeller. I will take it all apart again (now that I figured out how to do that w/o removing the entire thing from the boat), and will remove the inlet screens.

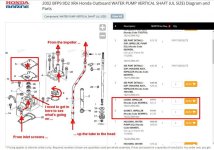
This is my understanding of all of this (courtesy boats.net, please pardon my crappy graphic design skills). Let me know if I am off base ...

HM diagram.jpg

When I did the flushing up through the water tube in the direction that the water normally flows, that was with the indicator hose disconnected from the fitting that passes through the fairing, which allowed for a larger volume to travel out through that little hose since it was not forced through the tiny fitting that goes through the cowling.

While I have owned the boat/motor, I haven't had any impeller splines go missing. The first time, I paid a local shop approximately $400 to "service" the motor which as far as I could tell, was an impeller swap-out and a few minutes running in their test barrel. Needless to say I was not a happy customer when I reinstalled the motor and experienced the lack of flow, and eventually after that was corrected, the overheating problem. "He tested it after the impeller replacement and it ran fine," is what they told me. I won't disparage the shop by naming it - popular shop in Wilmington, CA is all I will say - and perhaps if he just ran it for less than 2 minutes (the time it takes to overheat), then he was telling the truth. From my perspective, for $400 I expect the thing to be returned to me in tip-top shape.

When I got it back they gave me the old impeller which indeed did have two or three (of six) broken splines, but they also handed over all of the pieces.

One of my former dockmates suggested that it is possible, however unlikely, that when an impeller spline breaks off, it can travel up the water tube, where it could then potentially melt against the cylinder wall, or in some nook or cranny where it can serve as the basis for future blockages to form. That would be extremely difficult to ascertain, without (as far as my reading of the Honda service manual indicates) completely disassembling the motor to remove the head from the block. Ideally, if I had plenty of time and the appropriate tools and workspace, I would probably do that, to completely clean it out and see what is going on in there.
 
Your graphics aren't so bad and it looks like you have the gist of it alright. Your friend may have a point but I agree, determining if that happened would be difficult.

As far as the flow through the tell tale passage goes, it isn't a good indicator of what's happening in the head or even most of the block. It is a bypass and only intended to indicate that the pump is pumping. If the head's water passages were completely clogged, the tell tale stream would be pretty much the same if not actually a bit stronger.

There are liquids that dissolve rubber but I don't think I would try that. On the old twins (pre 97)
it would likely be disastrous. On the later models I'm not positive.

Hopefully the swabbing and back flushing will slay the dragon.
 
I stopped by the boat on my way home last night. I am determined to win this war!

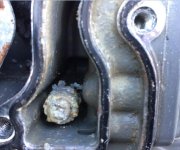
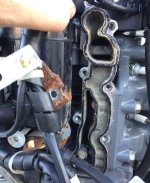
I pulled the thermostat and then the water jacket. I was pleasantly surprised to find it in much better condition than I was expecting:

WJ 1.jpgWJ 2.jpg

Plenty of corrosion and salt buildup on the anode, and lots of salt throughout. However the surfaces showed only minimal buildup, which is encouraging. I brought the water jacket cover and anode/screw home with me and used white vinegar to clean everything up. Don't worry, I ordered a new anode and screw. :) I keep old parts as emergency spares. I was surprised to see how well the vinegar dissolved the salt when cleaning up the cover. I may try to inject vinegar into the water jacket while I have it opened up ... not sure how successful that would be.

I did find a small piece of rubber next to the anode. Looks like a long-gone piece of impeller. God only knows what else is lurking around in there.

I've studied the shop manual AGAIN, poring over the diagrams of the cylinder head to see the shape and course of the water jacket. I ordered a bunch of parts including a new O ring for the water jacket, anode and screw, a couple of bolts (one became deformed as I worked to remove it, another was rusted), plus the plate and some gaskets for the water pump housing. Once I take the lower unit off and get to this part, I will see what lurks beneath that plate and gasket (beneath the impeller). I will remove the inlet screens and ensure all is clean down there. I've got some pipe cleaners to use on the water tube.

Once that lower unit is off, I will use the garden hose and pistol to blast out from the opened water jacket (backflow), as well as up the water tube. I presume that I can go full pressure without hurting anything? I don't have an air compressor unfortunately.

What else, any other recommendations? At this point I'm beginning to suspect that the blockage may be in the water pump intake track since the water jacket wasn't too fouled up.
 
Wow! That doesn't look bad at all! Except for the anode and screw. But that just shows it's doing it's job. I've opened up lake water only motors that looked way worse than yours.
This is encouraging for sure.

By all means try to get the vinegar in there and then yes, blast away. You won't hurt anything even if you had 100 psi water pressure. Make sure you give the vinegar ample time to work. I don't think it will cause any ill effects if left soaking for a while.

As a matter of fact try to get a good pressure seal at the hose nozzle with a towel or rag or anything you can come up with so as to get the maximum flushing effect.

I think you're doing the right thing and I hope this effort gets it cooling properly.
 
I got the lower unit off (dropped and lost my 10 mm combo wrench in the process), and got it home. Finally tonight I disassembled the intake screens and found it to be totally clean. Got the pump open and looked in the lower part, I could see through clearly to the intake below.

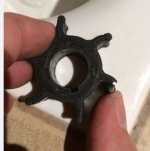
Then I noticed that one of the impeller vanes had already broken though it had not yet separated:

new impeller broken already.jpg

Ok, so a new (six months or less?) impeller nearly lost a vane already. I turned over the top part of the water pump housing and found something from the "you've got to be sh*tting me" file:

water pump sleeve rotated.jpg

Note that the sleeve has rotated counterclockwise and is blocked to maybe 30% of the size it should be. That would be consistent with the need for higher RPMs to maintain cooling flow!

I ordered a new part. I tried and was not successful in prying out the sleeve, or making it budge at all.
 
YES!!! I saw the problem as soon as I opened the photo! THIS is EXACTLY why I never JUST replace the impeller but do the entire kit anytime I do a pump. The housing has failed and allowed the metal insert to spin and close down the intake. This is COMMON and after seeing many like this when I would do a pump thats why I developed my policy of always going with the entire kit.
You do have to be careful to make sure that metal insert is properly secured and aligned by the locating tabs before you reassemble.

YOU HAVE FOUND THE PROBLEM SIR.

Now, you can get back to enjoying your fine Honda outboard as it was meant to be.

Get a large speaker magnet and tie it to a fishing rod or strong twine and go fishing for your 10mm. You might be surprised at all the "treasure" you find under your stern!
 
Ha, yes perhaps I will go fishing with a speaker magnet - good suggestion.

I cancelled my order last night, that I was about to place on Boats.net. The reason is that I had ordered an impeller from them previously, but it turns out that I have a "high thrust" version of the XL shaft of this motor. The high-thrust version has a larger diameter vertical drive shaft than the "normal" version. The impeller that Boats.net shipped to me was the correct outside diameter and shape overall, but the inside diameter was too small. I think that they would have shipped me the wrong parts (and in fact as I type this, I realize I will have to send back that wear plate and gasket in all likelihood).

I'll make a trip down to a Honda dealer down in Orange County where I was able to source the correct impeller last time. They were the ones who identified the high-thrust aspect of my engine, from the serial #.

I'll report back when I make the last-mile's worth of progress here.

Thanks again jgmo and everyone who contributed ideas and encouragement.
 
As you look back on all you went through, I think you will be happy that you lowered the outboard. It will, if nothing else, have it running quieter in a following sea and that means it will be more pleasant motoring.

Also you now know that the " innards" of your cooling system are pretty dang clean and with the new stat and anode the only maintenance needed going forward would be salt flushes for a couple of years or so.

You stuck it out and figured it out and soon it will be ....


SOMETHING ELSE!!!!
It is a boat after all.
B. O. A.T.
Break Out Another Thousand ;>)
 
VICTORY!

Tonight after work, I was able to stop by the boat to reassemble the outboard. I flushed out the water jacked both ways - through the opened side, top and bottom, as well as up through the water tube. Nothing horrible or even noticeable washed out, so that is good. New internal anode in, new bits and pieces in (new ignition coil bracket and a couple new bolts, new O ring for the water jacket cover).

Started it up, man the water was SHOOTING out of the telltale. I mean it is noticeably stronger! Let it idle for about 10 minutes - far longer than it used to take to overheat - no issues. Popped the recoil starter off and measured the RPMs, and backed the throttle stop screw all the way down. It does idle a bit fast still - at about 1280 - so I have a little work to do on that front. But, I managed to lower it about 300 RPM, so that is good.

All I have left to do is to replace this sliding collar part inside the remote unit, and I am back in business.

Thanks jgmo and everyone who helped me with this project, I am very grateful for the assistance, expertise and encouragement. Even with all my extra parts, I saved a couple of thousand dollars compared to buying a new outboard.

As the Kool Aid man said, "OH YEAH!"

kool-aid-man.jpg
 
Back
Top