Logo

AQ280 Prop rotation

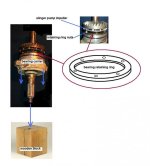
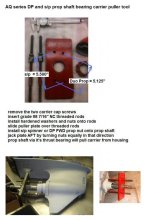
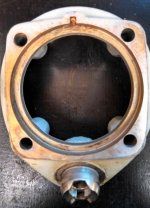
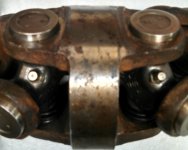
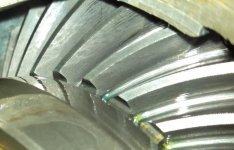
Simple method to remove the carrier from the prop shaft if you do not own the Volvo Penta fixtures:


Loosen the bearing retaining ring nuts a bit.
Apply some heat to the aluminum carrier housing to expand it.
Gently drop the AFT end of the prop shaft against a soft wooden block.
The carrier's enertia will cause it to drop some until the nuts restrict movement.
Now finish loosening and removing the nuts.
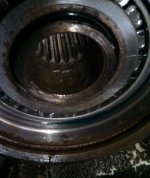
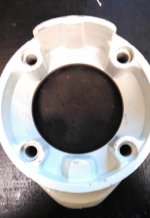
Gently drop assembly again, and the carrier should slide free from the bearing.

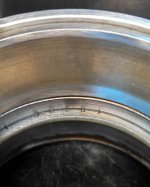
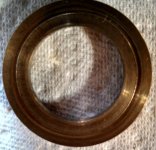
The adjusting shims will be either within the carrier or may be stuck to the bearing, or both.

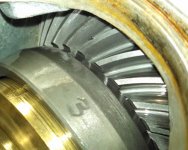
The seal replacement will be pretty much self explanatory.
Reassembly will be pretty much in the oposite order.

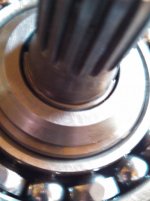
No need to remove the bearing from the propeller shaft unless:
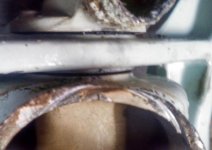
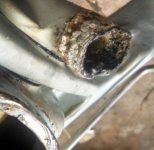
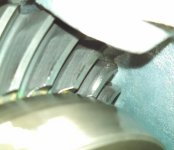
The slinger pump impeller drive pins have sheared off.
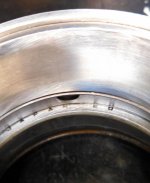
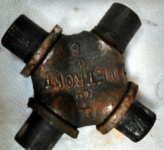
The main thrust load angular contact bearing will be replaced.

Forgive my rather crude image!
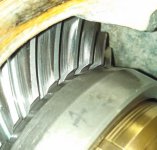
 

Attachments

  • Prop shaft carrier removal.jpg
    Prop shaft carrier removal.jpg
    50 KB · Views: 69
HAHA that's experience and the picture explains it clearly.

Hey Rick, I thought you had a technical way of doing everything. That's the way this caveman has been doing it for decades.

PatinIdaho and Gary, I figured that you guys might tease me about that....... (and I enoy being teased and poked fun at) :D

Funny thing is, and as I'm sure you know Gary, by the time you get the hydraulic press set up and adjusted with the correct fixture under it, the caveman method works pretty darn well, and much faster.
So yeah.... I guess I have a bit of caveman in me also!
The trick is in knowing when to use caveman and when to use modern day man methods! :cool:


Gary, the one thing that I've never been able to bring myself to use, is a slide hammer against the prop shaft.
That's why I designed and created my puller tool.


PatinIdaho, this puller tool is simple to build, and it will work for both the AQ series s/p and DP lower units. (use grade #8 7/16" NC threaded rod)
If I recall, one forum member built one using 3/4" or 1" plywood instead of the steel plate.

With an extra vertical shaft spline coupler and a small section of angle metal, you can also make yourself a simple bench vice fixture for either the transmission or lower unit (inverted).

(puller tool being used on Duo Prop lower)
 

Attachments

  • Trans fixture.jpg
    Trans fixture.jpg
    83.7 KB · Views: 55
  • Prop shaft carrier puller tool 1.jpg
    Prop shaft carrier puller tool 1.jpg
    48.9 KB · Views: 66
  • Prop shaft carrier puller tool in use .jpg
    Prop shaft carrier puller tool in use .jpg
    4.3 KB · Views: 138
So sense im waiting for my seal kit to get here maybe we can switch gears a little:p

Here is how my exhaust looks. Needs a little more work but not much. Looks like they will last another year or two to me.
Other then the part number cast into the manifolds there is also another number cast into them it says 78. I assume year?
Do you guys clean the water ports out ever. Maybe with something like CLR or muratic acid or just do nothing at all?
Inside the block is also pretty crusty looking and when i drain it rust also comes outta the block.
 

Attachments

  • Riser.jpg
    Riser.jpg
    41.1 KB · Views: 44
  • Manifold.jpg
    Manifold.jpg
    34.2 KB · Views: 54
Waiting for clearance to see if we can switch topics!
Yes....... we can switch! :D


Its very common to check and clean the exhaust manifold and elbow seawater transfer ports.
Yours look good.
The flatness/straightness of the mating surfaces is equally important.


.
 
Do you guys think this might be a good idea?
I can have machinist friend make me one if you do
http://www.ebay.com/itm/VOLVO-PENTA..._Accessories_Gear&hash=item2a468f4d83&vxp=mtr

Yes, an excellent idea if running a left-hand propeller or a duoprop lower unit!
All post "A" transmissions went to steel....... however, that split ring keeper will not fit the earlier transmission shaft such as yours.

I had 75 of the correct keepers made a few years ago...., and on a CNC machine and from stress proof steel.

I have these available if interested!


.
 
Seals arrived today. Dang the package feels like it weighs two pounds. There is a LOT of seals and o rings in there!!!.
I think I'm going to wait till next payday and buy the u joints so I can do it all at once. Makes it easy to remember how to put it back together.
 
Seals arrived today. Dang the package feels like it weighs two pounds. There is a LOT of seals and o rings in there!!!.
I think I'm going to wait till next payday and buy the u joints so I can do it all at once. Makes it easy to remember how to put it back together.
Some kits include parts that fit other AQ series drive models..... so you may end up with extras.

As for the bearing crosses.... look at the Spicer 5-1306X.
This is an exact OEM replacement (for the internally clipped bearing caps), and for a fraction of what Volvo Penta wants for them. The "X" designation puts the grease port in the apex of the cross.
Try an Off Road 4WD center..... you may find these for around $14 each.


images

You do not want these:

images
 
I have a pretty good place that should have the u joints i need about 5 minutes from my house.:D
http://tomsdifferentials.com/tomp.htm

Can't wait to get the u joints and split ring so i can get this done. Kinda exited to do it even though the boat will not see water again till about next March/April:( when warmer weather returns:rolleyes:
 
Well got a little energetic and went out just to check things out. Yes there are more pics!
Finished taking off the mid section and got a surprise! I bumped the steering fork and it fell out:eek:. That means the bolt on the steering arm is either broke or loose or maybe even missing. I did not feel like uncovering the boat to look figuring it will be there when i get to it.
The ujoint bellows are shot and i planed on replacing them anyway. It was not leaking but dang close and did have some oil in it.
I think the big seal that seals the drive shaft where it enters the GB was leaking. The sealing lip was a nice v shape on one side and a little flat on the other side. Kinda hard to explane.
The drive shaft sealing ring looks good. No rust or pits just some discoloration.
I have read in the repair manual that later drives had a allen head bolt holding the ujoint assembly in and a torx head in early models.
Also on later drives the 4 bolts holding the sealing ring on have 4 SS washers.
Mine has the 4 SS washers and the allen headed bolt. So im assuming i have a later drive.
The pivot pins holding the mid section on came out easy with just very light tapping with a wood dowl.
Its a little scary actually:confused:. Everything just seems to come apart way to easily after reading through the 50+ pages of problems so im kinda waiting for the bomb to drop as i keep digging a little deeper into it:eek: although its almost as far apart as i can go.
Here is also a couple pics showing two minor problems.
The water hose connection is corroded really bad and needs replaced.
Also where the exhaust enters the mid section something is hitting it. Maybe the flapper but im unsure. Ill be removing the flapper though and replacing it with the 290 style one.
 

Attachments

  • IMG_20141108_114448_388 - Copy.jpg
    IMG_20141108_114448_388 - Copy.jpg
    70.1 KB · Views: 53
  • IMG_20141108_112616_875.jpg
    IMG_20141108_112616_875.jpg
    58.4 KB · Views: 72
  • IMG_20141108_113346_799.jpg
    IMG_20141108_113346_799.jpg
    39.9 KB · Views: 61
  • IMG_20141108_113320_951.jpg
    IMG_20141108_113320_951.jpg
    60.9 KB · Views: 57
You're doing just fine. Nothing you have come across is new with Volvo Penta's. The steering fork falling out is really a blessing if one has ever had to get a stuck or frozen one out. Them falling down is not new. That bellows is junk just like you say. Keep up the good work.
 
Good call on retro-fitting the 290 exhaust outlet flapper onto your 280 housing.
Be sure to remove the exhaust bellows flapper!!!!

Aluminum water neck fittings are a wear item, and must be routinely replaced.

As for the collar steering fork spindle arm slipping down ...... the OEM pinch slot is too short.
When too short, the pinch bolt has difficulty squeezing the spindle arm splines tightly against the aluminum fork shaft.
If you'll increase the length of the pinch slot by 1/2" + or so, you'll not have a problem.
Make dang sure that the pinch bolt length is correct, that it's a grade #8 bolt, and the threads are greased well!

Note:
The spindle arm incorporates the port to starboard steering stops...... (not the collar steering fork)
The spindle arm can be indexed to the fork shaft in as many positions as there are splines!
(one spline off makes a huge difference)

Before reassembly, and while on the work bench ..... align the arm and fork at an exact 90 degrees to one another.
Mark both the arm and the top of fork shaft with a punch!
This will ensure the correct indexing when installed.


As for the bearing box clamping collar 4 cap screw washers....., if your bearing box is the steel tube style, you will have an early style transmission.
This would mean that these are wet area cap screws.
The 4 washers and 4 delicate shoulders are what prevent water from entering the inside universal shaft area!


.
 
Last edited:
Ok so finished taking most of the upper gear box apart and got it cleaned up. Looks kinda like the 2 bearings might be ok but wore for sure. You can see it in the races. The races feel totally smooth and this is only on one side of each race. The other side of each race looks nice and shiny. The bearings them self look new
What do you guys think?
 

Attachments

  • IMG_20141116_151309_220.jpg
    IMG_20141116_151309_220.jpg
    46.1 KB · Views: 50
  • IMG_20141116_151354_953.jpg
    IMG_20141116_151354_953.jpg
    60.1 KB · Views: 43
  • IMG_20141116_151408_888.jpg
    IMG_20141116_151408_888.jpg
    38.2 KB · Views: 46
  • IMG_20141116_151229_003.jpg
    IMG_20141116_151229_003.jpg
    49.7 KB · Views: 44
Last edited:
Ok so finished taking most of the upper gear box apart and got it cleaned up. Looks kinda like the 2 bearings might be ok but wore for sure. You can see it in the races. The races feel totally smooth and this is only on one side of each race. The other side of each race looks nice and shiny. The bearings them self look new
What do you guys think?
Your parts look nice and clean. Either this was a powder puff, or you've done a nice job cleaing it up! :D


As for the BB bearings..... the only stationary parts are the outer races. The rollers and inner race surfaces are constantly changing positions.
If you decide to not replace the bearings, you can pull the races and rotate them 180* and reinstall them.
This will place the roller load onto a fresh surface, so to speak.


I'd still go through the rolling torque value procedure.
The book will list a value for "run-in" or "used" bearings.
By reducing the shim pack value .001" or .0015", the rolling torque value will be increased some.


So... what do you think about how user friendly these are to work on? Pretty cool, eh?


.
 
Last edited:
i cleaned them up naturally.
I would change the bearings but i don't believe i can afford to have anyone re setup the transmission for me so maybe just rotating the races will suffice. Sure hope so anyway!
So far pretty easy but could be easier with no shim's:rolleyes: That would solve all the issues with bearings:p
 
I would change the bearings but i don't believe i can afford to have anyone re setup the transmission for me so maybe just rotating the races will suffice. Sure hope so anyway!
So far pretty easy but could be easier with no shim's:rolleyes: That would solve all the issues with bearings:p
Checking the rolling torque value is very simple.
With this style bearing box, we use the string/spring scale method.... (not the inch pound center-rotational-force method).

Volvo Penta has done the math for us, and you'll find the specs in the OEM service manual.

images


The shims are found within the seal surface washer p/n 832675.
(FWD side being shown..... shims are within AFT side)
images


Add shim value.... and the rolling torque is reduce.
Remove shim value.... and the rolling torque is increased.
 

Attachments

  • Bearing box shim control.jpg
    Bearing box shim control.jpg
    49.6 KB · Views: 52
Last edited:
If I changed the prop rotation would that change the load from one side of the bearings to the other?
Technically speaking.... yes! But NOT to the rollers or inner race..... only to the "stationary" outer race!

The transmission main "drive" gear is under an oposing load when turning either driven gear.
If running a LH prop (running from the lower "driven" gear), the oposing force is pushing the main "drive" gear's AFT bearing upwards in the bearing box.
If running a RH prop (running from the upper "driven" gear), the oposing force is pushing the main "drive" gear's AFT bearing downwards in the bearing box.

If your lower unit is a 270 or 275, your exhaust outlet will look like this.

images


If so, and when running a RH prop, the torque tab/trim fin is not as functional.

If your lower is a 280 or 290, the torque tab/trim fin works well for either hand prop.


.
 
Last edited:
The stationary outer fwd race and the stationary outer aft race are the only part that show ware that i can detect.
Yes its a 280.
It does look like it has ran a LH prop all its life (34 years)and been fine so i kinda think if i just put it all back together it should be fine still.
Trying to locate a spring scale though to check that rolling torque value
 
Just got around to checking the clearance between the top nut and bearing. Clearance is 0.024. Good thing i have a new split ring washer coming. Hope that is all it needs to bring back into spec!
 
Well not getting much done. Kinda slow going waiting for parts/waiting to buy parts.
Also had first snow today :( but did get this done.
Here is what bad ujoints look like and what new shiny ones look like.
 

Attachments

  • IMG_20141120_194623_200-1.jpg
    IMG_20141120_194623_200-1.jpg
    52.3 KB · Views: 65
  • IMG_20141120_200709.jpg
    IMG_20141120_200709.jpg
    63.1 KB · Views: 47
Also after having it apart and looking at it I totally understand the shim setup Ricardo was talking about in post #52
Also wish I was not afraid to change the BB bearings. New ones would sure make me feel better but I'm just not confadent in setting them up!
Younger days I would have just installed new bearings using the same shims but age has got the better of me damit!!
 
Last edited:
Good job on replacing the bearing crosses. The old ones were definitely past their days.

The shimming procedure, and the testing of the rolling torque is not all that difficult.
The most difficult challenge will be removing the 31307 inner roller cage race from the main drive gear.

If need be, we could arrange for a telephone conversation.
 
Got my split ring keeper changed. Clearance is now a very snug 0.018 so could probably be called 17 or 0.016. Its pretty easy to do and was no problem:)
From the pics its might be hard to tell but what do you think of the gear's?
 

Attachments

  • IMG_20141122_095503_290.jpg
    IMG_20141122_095503_290.jpg
    72 KB · Views: 53
  • IMG_20141122_095528_856.jpg
    IMG_20141122_095528_856.jpg
    46.1 KB · Views: 42
  • top1.jpg
    top1.jpg
    45.7 KB · Views: 45
  • top.jpg
    top.jpg
    52.4 KB · Views: 50
  • bottom.jpg
    bottom.jpg
    67.4 KB · Views: 48
  • bottom3.jpg
    bottom3.jpg
    65.6 KB · Views: 55
Back
Top