Logo

82 Johnson 15 - how many Gearcase to Driveshaft seals?

CMOS

Regular Contributor
Howdy All,

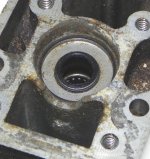
I'm ordering parts for this new (to me) motor. The diagram shows 2 of these seals (0321480) but when I look AT my actual lower unit I only see ONE. There appears to be a gap between the bottom of this seal assembly and the upper part of the drive shaft bearing itself.

Thoughts?

CMOS Seal-Gearcase to Driveshaft.jpg
 
Wow. It really appears that I have ONE in there. Are these just a friction fit in the lower housing? Just pry them out?

I gave it a light tug but it didn't move. Didn't want to do any damage before I looked into this.

CMOS
 
You pry them out with a hefty screwdriver.-------Make sure you do not gouge the bore of the cavity.-----And they press in using a suitable socket or similar tool.----Put some grease in between them.
 
racer - can't seem to get these out. Been using a large screwdriver and hammer like a wedge - not budging. Going to let sit overnight with some PB Penetrator.

IF the seals still won't budge - heat ou the surrounding metal with a small propane torch?


CMOS
 
I just use sheet metal zip screws and screw into the flat part of the seals in two or three places and grab the screw with vice grips and pry straight out on the seals.


LOL! That's exactly what I was considering! I'll let the PB Blaster sit overnight and try again.

Thanks,
CMOS
 
UPDATE: seals removed, but not easily.

I tried the sheet metal screws in the metal - broke off both screw heads trying to pull the bearing out. I also drilled a series of holes in the metal of the bearing in hopes to relieve some of the friction between the outer bearing ring and the housing itself. No help.

Tried the propane torch to heat up the aluminum housing and was finally able to get them to budge with the hammer and big screwdriver. Just wanted to show a resolution to this thread.

Thanks for all the replies.

CMOS
 
And how many seals were in there.?----------I always remove them with a hefty screwdriver.---Never a problem !!

Ah, there were indeed 2.

When I was using the screwdriver as a lever, I was concerned with deforming the housing, right where the screwdriver was pressed against it. And to a small extent, it did slightly deform the top, flat surface of the lower housing. Before I pressed in the new seals I used a file to smooth out the bumps caused during all the hammering ruckus.

Next, before installing the driveshaft and water pump assembly, I'm going to lightly sand the lower, primer with Self-Etching primer, and put on a new coat of factory white paint.

CMOS
 
Back
Top