Logo

65ESL72, reeds, carb mixture

zmany2k

Regular Contributor
Howdy folks. Haven't been on here in awhile. Finally got my boat from Washington state to Pennsylvania. Getting her ready to rock for the Chesapeake bay.

Last time ire I had her on the water, I couldn't get the #1 or #3 carb to adjust. Put new needles in both carbs. Pulling the bowls, I noted that both float needles were sticking closed.

I also wanted to check my reeds thinking that maybe it was a vacuum problem with them. I'm suspicious on one reed, but also not really sure how to check them. They all look like they're laying flat on their blocks after I pulled the base plate.
 
Well, no response I see. Regardless, pulled the intake down to the reeds. Sprayed the oil off of the reeds with some carb cleaner. They seem fine as they're all laying flat. Once the new gaskets come in, I'll throw it back together. I'm wondering if my problem is caused by weak vacuum. That wouldn't explain just one carb working properly though as that would affect all three equally.
 
?????----Each cylinder has it's own crankcase and vacuum is pulled on each one individually.---------------The air that is processed is not mixed between cylinders !--------But each carburetor is dedicated to one cylinder. They connect to the others by a balance circuit at idle.-----What does a compression test show on this motor.--------Do you have spark that will jump a gap of 7/16" on each lead ??
 
Last edited:
Last comp numbers for 1,2, and three were 112,110, and 120 respectively. Good spark on all three. Built a special tester just for it.
 
Alrighty. Got the motor put back together. Had sticking floats in the #1 and #2 carbs. Pulled the intake down to the reeds, cleaned and inspected the reeds. They looked brand new and laid flat with no obvious gaps that I could see. Cleaned out the carbs really good, threw everything back together, she fired right up with no choke. Lot of smoke. More than normal. Tried to adjust the low speed needles and same problem exists. Only the #3 carb will adjust. She has a heavy miss and a good shake at idle with lots of smoke.

if I choke her a bit, her idle picks up a touch but she won't rev like that. Open chokes and she smoothes out approaching WOT. All carbs are getting good vacuum and fuel. Covering each carb with my hand results in a palm full of fuel. Pretty sure the problem is in those two carbs, but I'm hoping to hear from someone who knows more about them than I do.

Hot spark, comp numbers between 110-120 for each cylinder. It's definitely a fuel issue.
 
#35 is the high speed jet (orifice plug). Unless it is totally plugged, it has little or no effect on the low speed circuit, that you are trying to adjust. Along that same line of thought, the needles have little or no effect on high speed operation.

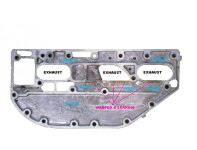
May I suggest you check to make sure water is not getting into one or more cylinders? A common problem that has destroyed lots of those motors. It comes from a warped exhaust cover on the side of the engine.
 
I'm sorry, I meant item 38. It says it's a bearing for the low speed needles. I did pull all three needles again but didn't see anything in there that looked like that "bearing" on any of the three. I went ahead and ordered a couple rebuild kits from here. Hopefully they show up by Tuesday and I get them done before Friday.

Ive had water get into the #1 in the past due to a faulty head gasket. If it's an exhaust issue, does the water end up in the crankcase or in the cylinder on the spark side or both? I would guess on the crankcase intake side, but I could be wrong obviously.

The he main problem I've having is not being able to adjust the idle mixture. The first two needles have a very limited effect. If I remove the needles altogether, she'll get a little tougher and die out, but there's no noticeable effect as long as the needle is still in, whether it's bottomed out or just barely threaded in.
 
The bearing is a plastic funnel shaped piece, hard to see in there. It stops air from going past the needle shank. You have to devise some sort of hook to snag it and pull it out. I've heard people say they use a drywall screw, but have not tried it myself.

Water from a warped exhaust cover squirts into the exhaust ports on the side of the cylinder, but then finds its way into the crankcase also, destroying everything.

Do you have this thing on a boat on the lake? Adjusting the needles one at a time while running on muffs don't have a big effect. Maybe there is nothing really wrong with it?
 

Attachments

  • 3 CYLINDER EXHAUST PLATE..jpg
    3 CYLINDER EXHAUST PLATE..jpg
    43.4 KB · Views: 34
She's in the driveway running in a 55 gallon plastic barrel so it has proper back pressure on the exhaust. I learned the muff lesson awhile back. That and I'm sure the neighbors appreciate the barrel vs the muffs.

I could pull the intake back off and check for water in the crankcase. I'll pull the plugs first to check them after I've run her enough for her to get warm.

I looked in each of the three low speed holes and didn't see anything in any of them. I figured I could use a dental pick but a drywall screw sounds like it would get a better grip with scratching anything inside of my carb.

Im welding new spindles into the axle trailer now. I'll play with the carbs some more when I get the axle finished.
 
Assuming that the carburetors and reeds (leaf valves) are absolutely clean, including the high speed jets that are located in the bottom center portion of the float chambers, and that you have proper spark and compression... keep in mind that the sequence in which those carburetors are adjusted are critical..... as follows:

(Carburetor Adjustment - Single S/S Adjustable Needle Valve)
(J. Reeves)

Initial setting is: Slow speed = seat gently, then open 1-1/2 turns.

Start engine and set the rpms to where it just stays running. In segments of 1/8 turns, start to turn the S/S needle valve in. Wait a few seconds for the engine to respond. As you turn the valve in, the rpms will increase. Lower the rpms again to where the engine will just stay running.

Eventually you'll hit the point where the engine wants to die out or it will spit back (sounds like a mild backfire). At that point, back out the valve 1/4 turn. Within that 1/4 turn, you'll find the smoothest slow speed setting.

Note 1: As a final double check setting of the slow speed valve(s), if the engine has more than one carburetor, do not attempt to gradually adjust all of the valves/carburetors at the same time. Do one at a time until you hit the above response (die out or spit back), then go on to the next valve/carburetor. It may be necessary to back out "all" of the slow speed adjustable needle valves 1/8 turn before doing this final adjustment due to the fact that one of the valves might be initially set ever so slightly lean.

Note 2: If the engine should be a three (3) cylinder engine with three (3) carburetors, start the adjustment sequence with the center carburetor.

When you have finished the above adjustment, you will have no reason to move them again unless the carburetor fouls/gums up from sitting, in which case you would be required to remove, clean, and rebuild the carburetor anyway.

Thousands of parts in my remaining stock. Not able to list them all. Let me know what you need and I'll look it up for you. Visit my eBay auction at:

http://shop.ebay.com/Joe_OMC32/m.html?_dmd=1&_ipg=50&_sop=12&_rdc=1
 
Thank you Joe, think I needed a reminder. She's not running perfect, but she's running pretty good at idle and under a load.

Now one I don't have trailer lights!!!! It's my truck though, not the trailer. Whatever. Always something right? I'll get that figured out. She's going in the water tomorrow come hell or high water.
 
Back
Top