Logo

2011 BF15D barking and backfiring at 3/4 to full throttle...i'm stumped.

I do agree with you that the symptoms does not sound like coil break but feeling desperate as well as when I bought that jet set.

This Honda is new for me, I bought it last autumn/winter 2018 (early December, That was freezing day, Hrr) , we did short test drive on lake and symptoms were present already then. Seller told to me that he has not used motor for many years and there might be old gasoline inside. Unfortunately, I don't have more information of the outboard's history.
I have done only the carb cleaning and also checkin the timing belt (I was wondering if belt has installed incorrectly or it has jumped one cog/tooth but I did not found any signs of that. Please find pictures of timing marks from the link below. I really appreciate if you can verify that the markings are enough in line. I assumed that if the timing belt is missed one cog/tooth those marks should clearly be misplaced, which is not the case. Please let me know if I'm wrong. Tension feels for me just great and the belt seems to be ok but it is a subject of change (Just to make sure). Valves are for me something that I haven't touched yet but thank you I will check those too. Metal clamps are really clean and there is no signs of oxidation or rusty.

https://drive.google.com/file/d/1-KZC9_P8mGYfupuQzHzTUk_OK1kBV8un/view?usp=sharing
https://drive.google.com/file/d/1-IQxjUH9jW-JfIKSppghBEEOXmfLpqdO/view?usp=sharing
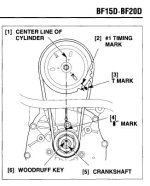
Guidance picture from shop manual.JPG
Upper picture is from my shop manual and it say's also for the valve clearance should be IN 0.15-0.19 mm and EX 0.21-0.25, I will try to check them tomorrow.
Thanks of your support, it's feeling great.
B r Jarkko
 
Very good photos!
Your timing marks look spot on!
And, your valve clearance specifications agree with what I have.
After you have checked/adjusted valve clearances, I think you will have eliminated some basics that should always be addressed when you have just purchased a used outboard.
 
Well...it looks like morecowbell gave up on me. I don't blame him. I went back and re-read the thread and realized I never answered his question about the OTHER BRASS TUBE!

The tube that protrudes into the float chamber from the main body (located near the accelerator plunger) is the high speed jet. Honda calls it the main jet but it only feeds the high speed orifice at the top of the carb throat in front of the throttle plate. And, yes, it must pass fuel. Back flushing through the high speed orifice and then fore flushing from the end of the tube usually works. Very tiny carb cleaning tools are available from Honda but I don't have those. Flushing and shop air has always cleared them for me. I prefer that method even over the sonic cleaners I have.
 
Hello again,
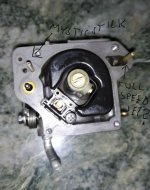
Well I'm optimistic that Morecowbell will tell how it is nowadays, hoping that he's motor is still running well. I'm really curios about that other brass tube...I borrowed Morecowbels picture and put some text into it, please open the picture and take alook.

Brass sticks.JPG

The tube which is located near accelerator pump is mystery for me, actual i do believe that the other (right side) brass tube might have connected to full speed orifice. At least my experience on my carburetor right side tube is open and left side is not. It's same way than Morecowbell told earlier. Could you please let me know more of this ? I tried to find Hondas Carburetor manual but I did not succeed, I would be happy to own it because today I have measured valve clearances and they are all ok, all are more closer lower limit which is good thing. Also measured compression (pressures) for both cylinders and they are according specs(Unfortunately engine was cold but I got good indication that the pressures are ok).
I also checked fuel pump one more time (opened it) and it works well. Diaphragm?/Rubber film? was ok and there was no dirt and it really pump small pressure to the carburetor.
I installed new spark plugs when I started do test runs (they are used only very short time) and now I removed them due clearance measurement and compression test. Both sparks are dark, black. I do believe that I have been tested motor with too rich air/gasoline combination because it accelerates better. See sparks: https://drive.google.com/file/d/1-hpIHvNMcKTxZ9FpPLTW6AEvhxuWFyEo/view?usp=sharing
Pilot screw has been opened sometimes more than 4 turns out....so I believe thats why sparks are dark...

To conclude this reply, I believe that you are right that we have to get back to basics and at the same time I do believe that there is something wrong with fuel side or air side. So I will one more time remove the carburetor and check all carburetor passages through again and try to understand it better. Starting and idling is ok but accelerating is not -> something wrong with accelator pump or orifices...
Frustrated Jarkko
ps. New ignition coil + high tension cords (integrated) costs here about 150 eur so that's too much for me now.
 
And yes I do agree that sonic cleaners are good for removing ceratain type of the dirt but for instance it does not remove any rubber particles (Gasoline lines)..only small pressure might work... I have cleaned my carburetot in sonic cleaner without reaching any good solution (every parts were disconnected). And one more thing, I have used primer pump to check if it helps with accelerating but NO I did not saw any remarkable changes...
 
Hi jarrko,
Once again, your photos are excellent quality. The tube that you have labled "mysticstick" is, in fact, the high speed jet. The one you have labled "full speed" is the diptube for your SE or auto choke system.

The "mysticstick" must pass fuel to the high speed orifice. The Honda carb book talks about how those plug because they go to the bottom of the float chamber. They recommend their jet cleaning tool for clearing it. But....If you consider that anything that would come into that tube to plug it, it would come from the bottom. So, if you start poking it from the bottom, there is the possibility that you could "wedge" whatever it is in there much tighter and make it impossible to remove. That's why poking at the passageways in these carbs is usually my last option. I advocate understanding the direction of flow and then attempting to back flush with spray cleaner and "back blowing" with compressed air before "poking". If that jet can't be cleared, it is not servicable and the carb would have to be replaced.

There are very tiny jewelers drill bits that could work but I haven't used them and don't own any. When I backflush any particular passage, I always have the carb completely disassembled. I first try to determine other paths the fluid could take and "escape" or bypass the section I'm trying to clear. I then do what I can to plug off those alternate routes so that I get as much cleaner and force from the propellant as possible working against the blockage. Often I can use my fingers and thumb on one hand to block the escape routes. But I've used pieces of pencil erasers held by zip ties too. It really does help to try anything you can think of to block off the escape of the cleaner.

I don't give up either. I've used up to 8 cans of cleaner on one of these carburetors and 5 or 6 cans is not unusual for a very clogged carb.

Also, the passage may be clear but so small you THINK it's plugged because nothing you have is small enough to "poke" through. In this case, only fluid can tell the true story.

Now, I want to talk about the air jet passageways. Looking at the front opening of the carb throat, there is the pointed oval mounting flange. There are two drilled passageways above the carb throat. The lower one is the slow speed air jet passage and the one above and to the left of the lower passage is for the main air jet. Most of us miss these when doing a first time cleaning.

Looking at your photo of the top of the carb body from the inside, look at about the 3 o'clock and 9 o'clock position in the dome. You will see the very small atmospheric vents. You can't see them in the photo. You have to look at the carb body. I referred to the photo because it is in such a good position for finding the vents. Make sure those are clear to the outer surface.

Lastly, yes, those cylinders have been VERY rich! 4 turns out for the idle mix screw is too much. A good starting point is
2 1/8 to 2 1/4 turns.

Let us know what you find.
 
Man! You are very resourceful! The absolute best photos and video I've seen on, not just this site, but ANY site! Very helpful!

I agree that you're accelerator pump looks to be working well. Also, when the camera is zoomed out, you can easily see the two air jet passages I was describing.

The carb body photo shows what I think is evidence of quite a bit of mineral deposits. I still can't make out the atmospheric vents but that's a good reason for you to find them and make sure that they are clear.
 
Thanks for picture quality mentioning, Im happy to have LG G6 smart phone, that's old model but works fine for me. I have been thinking that "mysticstic" and believe I have get it cleaned. I have been poked it already earlier to find out is there any "holes inside or not, so I'm afraid that I do need small miracle to get it open. I could try hot and cold treatment...perhaps it help me removing the dirt...So I have to put some carbcleaning and pressure to "high speed orifice at the top of the carb throat in front of the throttle plate". Could you please explain more specific? I attached picture of clogged high speed tube and a picture from upper carb throat, where can be seen 3 group of orifices. In picture most up is only one, I do believe that is idle/mixture orifice (1 hole), most left side orifices (4 holes) could be accelerating (Middle range) orifices and most right is full speed orifices (2 holes), could you verify that I have understood correctly or have I misunderstood something?
https://drive.google.com/file/d/101-wowfcUAMg2OHIyNDS4U7R6BHWngHb/view?usp=sharing
https://drive.google.com/file/d/100VqNO_yh2hkSOMkQb-xplzm7MxhDq6b/view?usp=sharing
Br Jarkko
ps I found ventilation to surrounding and thats ok. I will check other air passages tomorrow...
 
That is an amazing phone camera! I can't believe the clarity of those close ups are from a phone camera!

Anyway, yes, you are correct about the one orifice being the idle and the two orifices being the high speed with, of course, the cluster of orifices being the transition group.

Try squirting each of those while noting where fluid exits.

A couple of questions.....do you see any holes in the side of the brass tube (high speed jet)?

Also, I don't see any tool marks on the emulsion tube plug. You have had that out haven't you? You will want the jet set and emulsion tube out when backflushing so that you can identify and block the optional passages the fluid can take. It's hard to get everything clean without doing some blocking and directing and concentrating the fluid's path.

Be very careful removing and re-installing the jet set tube. The best scenario is to have a new oring handy. But if not, you can't afford to damage the one that's in there. Use vaseline or WD-40 to install to prevent catching it and pinching it.
 
Last edited:
Thanks of verifying orifices and all valuable advises.

do you see any holes in the side of the brass tube (high speed jet)? NO, there is NOT any holes in side in tube/stick which is located left side in the picture below, INSTEAD in right side tube has side hole(Don't mind my texts in picture anyore).

attachment.php


Your comment of emulsion tube plug and tool marks on it is something what I don't understand, where it should be(tool mark ?) ? Last time when I removed jet set tube I put new O-ring in place and I used WD-40. So I do understand Jet Set tube (Numbers 16 & 17 in boats.net picture) but please let me know more emulsion plug ? I have not taken it out, is it missing? Link below presents my carburator.
https://www.boats.net/catalog/honda...-bamj-1000001-to-bamj-1099999/carburetor-auto
Br Jarkko
 
Well, I think it's just that you are meticulous about how you do things. You MUST have removed it if you replaced the jet set and oring. You just didn't leave any evidence that you were there! ;>)

It is item #8 (screw, plug) in the carburetor parts blow up. Sometimes they are in so tight my driver slips.

Just curious.

I am tempted to take the carb off of my 20 and look at that high speed tube. The reason is that it's been some few years since I took one apart and I can't recall ever needing to clean that tube! But, looking at the Carburetion manual, it DOES talk about cleaning it and provides a photo of it.

I'm afraid I'm getting old and misremembering. I just hope I'm not leading you astray about how to address that tube.

With what I have going on now though, I just don't have the time to go and do that. I'm in a situation where almost every minute for the next two weeks is spoken for so I hope you can sort it out.
 
Oh, thats great..nothing is missing :). I'm sure this will be educational for me (already has been) and hoping that someone else is also getting more understanding of carburetors, especially BF15-BF20 model's. Sure I'n trying to get it right and don't worry of your time schedule, please take care first things first and my troubles with the carburetor is small topic but interesting one. I will let you know later on what was the result :). Choke system tube is clear and open but that second (High Speed Jet) is totally clogged...
Take care and big thanks of your time so far.
Jarkko
 
It’s getting better, there is now tiny hole (0.25 mm) in high speed jet which is dipping the float bowl. Question, does anybody know what should diameter be in that jet? Does the carburetion manual says something about diameters?
thanks, Jarkko
 
Hi jarrko,
I just went through the carburetion manual page by page. I found nothing that would indicate how large that opening should be. All I can say is that I wouldn't use any device other than the spray cleaner to open it up more. If you over do it, you can't go back.

The problem with the manual is that it was written quite a few years back. Then, it was "updated" at least once as the by-start (auto-choke or start enrichment) and the accelerator pumps were developed for the emissions certified engines.

As a result, your carburetor (and mine) is covered in what I would call an "adendum" to the original manual. There are a few questions that just go unanswered.

Honda would do well by us small outboard owners and mechanics to do that manual one last time. It is pretty good now but if the proper points of interest and concern were addressed by a complete revamp it would be an AWESOME document.

But, alas, in this day of fuel injection slowly replacing carburetors I really don't think it will ever get done. So, guys like us will just have to "wing it" and use the one that's available.
 
Hi jgmo, Thanks of the latest effort to find largeness of opening. I have taken few steps further (Cleaning up after cleaning up :)) and I think I have reached level where to stay. It is enough good now and I will continue to use some "fuel system cleaners" in gasoline, so hopefully these will help to keep reached level and perhaps even get it better than today. Please find a video which was taken 25:th of July (09.40 pm).

https://drive.google.com/file/d/104MZkXx7KdAgMOLF_5U5REepLRC-Otdg/view?usp=sharing

I will keep my video links open for some time and after I have noticed that there is no watchers anymore I will shut links down.

Thank you all and wishing great time with Honda motors.


Jarkko
 
Hi Jarkko,
That looks and sounds pretty good!
Do you have GPS to clock your speed?
It's hard to tell exactly but it looks close to 20 mph??
I think your work has paid off and it would seem the 0.010" you opened up in the high speed tube must be about right.

Yes, I think I would be satisfied with that too.

GOODONYA!
 
Thank you jgmo, Have to say you have a very good eye to estimate speed :), my gps shows 19.3 mph as a maximum speed (2 person + 23 perch (Perca fluviatilis) :) @ Finnmaster 415). And yes high speed tube caused all troubles( hoping that STP or CRC Fuel system cleaner open up all rest what is needed) thank you one more time of your support and knowledge.
Br Jarkko
 
Excellent news!
23 perch! Sounds like a delicious fish fest.
Glad to hear that Honda is doing the GOOD WORK it was designed for!

Keep the carb drained and the oils changed and she will serve you for years.
Happy boating
 
Back
Top