Logo

2004 BF 225 Check engine light on but no alarm

I think he concluded it was not practical to drill additional/larger holes for more water to get to the bushing. BUT, I'm not totally sure of that.

I didn't pay a lot of attention because my engine already had the lower unit with the larger holes.
 
I think he concluded it was not practical to drill additional/larger holes for more water to get to the bushing. BUT, I'm not totally sure of that.

I didn't pay a lot of attention because my engine already had the lower unit with the larger holes.

Ok cool...searching his posts now.
 
Just heard from the yard - it was the key switch harness...they ordered a new one and should be ready this week...waiting for photos of the corrosion.
 
nothing definitive in Aristakat's posts...does anybody with the newere design happen to have good photos of the mid level housing?
 
Hey guys. I got the boat back today and they installed a new impeller kit and midshaft bearing. They also installed a new ignition panel and harness.

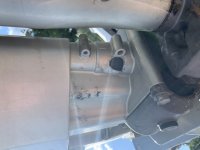
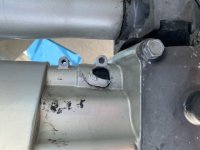
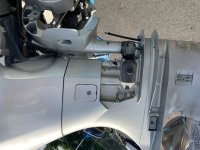
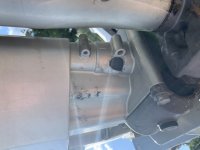
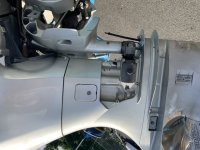
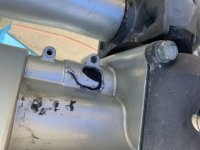
bad news of course is the corrosion on the extension. Here are some photos...thoughts? Can I leave as is indefinitely? Can I leave as is for this season? Can I have a piece of aluminum tig welded over the hole? I can’t find a photo of the newer version to see where Honda put drain holes - should I drill a couple holes? I don’t know if that rubber bushing itself spins or just stays put and the shaft spins inside it?

appreciate all the thoughts!
 
Photos
438cfaac-05d1-4a61-9d4b-ba3647bef357
 

Attachments

  • 5FE86ED7-90BB-4656-A4F4-D3BFA8F6A5D8.jpeg
    5FE86ED7-90BB-4656-A4F4-D3BFA8F6A5D8.jpeg
    73.2 KB · Views: 42
8C57160F-627C-4AD5-BC0F-B382E7E816C5.jpeg
 

Attachments

  • 6BD1A342-D557-40FE-A634-A5DC715257D5.jpeg
    6BD1A342-D557-40FE-A634-A5DC715257D5.jpeg
    100.9 KB · Views: 38
  • 8A3A7A82-91ED-45D5-BE52-C6B843592D2B.jpeg
    8A3A7A82-91ED-45D5-BE52-C6B843592D2B.jpeg
    73.2 KB · Views: 36
Last edited:
This is just an opinion, and hopefully others will jump in with a better perspective.

I would just leave it alone for the season. Water will just go in and out of that hole and may even provide some extra cooling to the bushing. Then, when you haul the boat, find a master welder who has lots of experience with aluminum castings. He could probably put a good patch on it. Then clean it up really well, primer it with a primer made for aluminum - probably at least two coats (three would be better) then paint it and clear coat it with several thin layers.

thank you for your thoughts chawk...kinda what I’m thinking too. I just don’t really know how that whole area works, but I like your thinking. I can go to the machinist who worked on my thermostat and he can do that. I wonder if it should be done with the bushing removed?
 

Attachments

  • 869E8E4F-283F-4181-B03E-34153EAA54B0.jpeg
    869E8E4F-283F-4181-B03E-34153EAA54B0.jpeg
    100.9 KB · Views: 30
Whether or not to remove the bushing first is a judgement call. It depends on how much work needs to be done to seal it. You don't want to damage or distort the seat for the bushing, but you also don't want to damage the bushing itself.
 
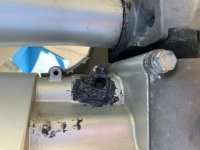
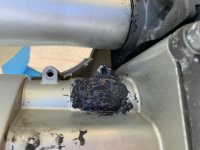
85FF352B-873D-4316-A60A-06D4A52F78B1.jpegHey guys, so first off thanks for all the help with the issues I was having. The new ignition works and no check engine light! I have the old harness and have no clue where the issue is...oh well. Second, I patched the hole using JB Weld Kwik Set. This allowed me to slowly build inward from the edge to close the hole. Probably took about an hour by doing a round every 10 minutes or so...I needed the material to get stiffen up a bit but remain tacky. This allowed me to not push inward and interfere with the bushing. The bushing itself is seated well so no worries, for now at least!

couple pics for posterity...mind you I’m not trying to win a beauty contest here as it’s under the cover.

EABC282D-0C9C-484B-890B-A20FBAF5B314.jpeg
 

Attachments

  • ACB13005-1B7E-40F1-A4EB-78B81288490B.jpeg
    ACB13005-1B7E-40F1-A4EB-78B81288490B.jpeg
    91.8 KB · Views: 40
Last edited:
Well, OK with that. Certainly no beauty, but if it works, that's all that you need. Function over form any day. I would continue to check it at every opportunity to see if it is still holding up.
 
That’s the plan. And given that repair is under the cover I’m not worried about it however I take the time to clean it up this fall.
 
Back
Top