Logo

1972 Johnson 25 - Flooding with suspected high-speed nozzle as the cause

anthony-g

New member
Answer to first question likely to be asked: No. I do not have a model number. I've yet to even identify the year, or whether or not the powerhead is truly a 25 or if it's an 18 (part numbers match across the board for the 72s, except for the high speed orifice and reed stops--even the cylinder bores and exhaust tubes are identical). This is a "frankenstein" outboard recently given to me. Model number on the non-original transom bracket comes back as a '66 18 Evinrude. Top cover decals are 25 Johnson, matching the designs of the '77 model. No idea whatsoever of the lower unit down. Paint scheme does not match transom bracket and the powerhead mounting hardware is incorrect (I had to add shims to eliminate slack, and the existing rubber shock pads showed no cracks, deterioration, or missing parts; the pads mismatched their bushings by approximately 1/8 inch per each 4, resulting in the slack). So the powehead has at least been previously removed if not transplanted from another outboard. All-in-all, it has the overall smell of an outboard someone pieced together from a scrap heap as something to sell for spare cash. My uncle bought it and gifted it directly to me.

So no reliable model number. Though I do have the powerhead's serial stamp, If there remains anyone with access to OMC's or BRP's factory records, I would be grateful for the reverse lookup. That stamp number is E3602142.

So to the topic...

The motor was long overdue for some love. Combined, my father and I have freed the seized cylinders, freed the seized electric starter, replaced the start solenoid and related wiring/button switch. Thoroughly cleaned the points ignition system, repaired a seriously worn and sloppy magneto plate (caused by upside-down support ring--fixed that too), precision-calibrated the breaker points, fixed incorrectly synchronized cam follower to the throttle plate, and rebuilt the carb.

First crank and run--in what likely had been decades--was a remarkable success, given the powerhead's initial condition and ignoring imperfections in its operation. We did note symptoms of air bubbles entering the fuel system while otherwise running extremely rich throughout the entire throttle range. We had almost the entirety of the low speed, with engine stalling still within the lower portion but where still expected to idle. Subsequent fuel delivery system inspection showed no leaks (new line and primer bulb) between the tank and fuel pump. Did not disassemble the fuel pump as blow-through tests at both the inlet and outlet met expectations with positively no pressure leaks (no fuel visible in the cylinder port). Replaced the fuel line from the pump to the carb; though we found no signs of leaking, the line was very old and brittle.

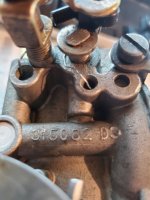
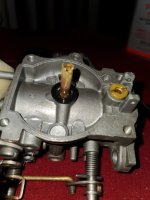
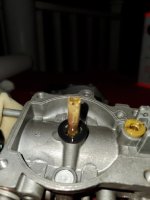
After several more test runs, I did finally noticed a very slight amount of fuel leaking from the carb bowl gasket. I retorqued the screws, odd that all 4 should be not "loose" but loosened from the threadlock used during the rebuild. Following test run showed no improvements. So I tore down the carb for a more careful inspection and cleaning. This time, I noticed that the high-speed nozzle had some damage at its bottom end, where it enters the top port of the high-speed orifice housing. It appeared as though someone had attempted to remove it with a flathead screwdriver, as the slots resembled the slipped head of a screw and were slightly flared out. Additionally, there was a long burr extending down. Looking into the high-speed port, there was a corresponding davit on the mating surface. That burr was preventing the bowl from completely mating to the carb body. I resolved the issue by sanding the burr off with 220 grit sandpaper. Additionally, I sanded the flared ends so that the diameter matched the rest of the nozzle. Recleaned in order to eliminate metallic dust. The bowl now seats securely to the carb body, screws maintain their torque, and no further signs of fuel leaking.

This time, the test run showed a significant difference in operation. A lot of power was restored, though not nearly all. The motor no longer surges with symptoms of fuel aeration. But the previously rich fuel mixture has turned to a near drowning flood. Still, throughout the entire throttle range. At low RPM, even the slow-speed needle makes no noticeable improvements even when rotated to a max-lean stop. However, flooding does worsen after rotating the needle several turns towards the rich. Motor behavior is consistent with no misses, hesitations, or stalls beyond lower idle speed. Spark plugs have so far not fouled, though I pull and dry them between each test run. No pooled fuel remaining in either cylinder.

Compression tests are 118 top and 116 bottom, cold. No tests have been made at running temp.

I'm not a mechanic, nor am I "expertly" knowledgeable of carburetors. But that nozzle remains the only unrepaired component I know to find. From experience with other OMC outboards of similar design, I have seen that high-speed valve adjustments can also impact low RPM performance on models that have that adjustment available. So I'm suspecting that the damaged end of that nozzle could be enabling excess fuel flow up and into the barrel. But again, I lack the working knowledge to prove or disprove that theory.

I see there's no part number for that nozzle, nor is it even shown on OMC parts diagrams. So I'm assuming I cannot order a new replacement. I do have a good mind to attempt fabricating one, as it doesn't appear to be a complicated part. Has anyone else had any relatable experience? And if so, how were you able to resolve it? Additionally, should I be looking for another less obvious cause?
 
Welcome to the forum. Have you got a picture? Gotta shrink to under 1000k. Then we can identify the carb and we can direct you to a solution. The picture I have in my mind is telling me that the little donut gasket/sealing ring in the damaged area is allowing unregulated fuel to enter the high speed nozzle. If this is the case, should be a simple fix. Your repair of the damaged area obviously helped some.....once again, you should dismantle, then publish a picture so we can observe the damage.
 
Last edited:
Sure. I'll provide some photos for context later this afternoon after work, when I tear it back down. I also considered that same gasket, but dismissed it thinking that with the bowl sealing tightly, it too should be making its own good seals. But again, that is assumption. It does make perfect sense to me that it leaking would cause the flooding. Thank you! And I'll respond later with those photos.
 
The high speed orifice plug "jet" (deep in the hole behind the bowl's hex drain plug) is what meters the fuel, not the nozzle. Furthermore, the gasket between the nozzle and bowl is necessary, because without it, fuel can bypass the orifice plug. The nozzle is not removable on most carbs.

Good luck with your venture, You don't know what you have and we certainly don't know either. Sounds like a chop shop job. But for your information. 18 and 25hp carbs are NOT the same. Venturi sizes are different as well as orifice plugs. And 18-20-25hp powerheads are NOT the same. 25 has different pistons and cylinder head, resulting in different compression ratios. Also, 25 has a balanced crankshaft to withstand higher RPMs. Mixing and matching parts just doesn't work.
 
Yes in 72 and adjacent years, the 25 is different as you say, Gator. We don't know what you have here, Anthony....and we can help you with the carb issue. That jet hidden inside the base of the float bowl will also tell the story. Don't know if you had it out, or if it's the wrong jet. If you had it out, did you mark down the number off it? The carb bodies may be the same on the 18-20-25's for 1972, but the main jet will be a 67 for the smaller hp motors and 72 for the 25 hp. So if the bigger jet is in the 18 or 20 hp, then they will not be able to handle the extra fuel because of the cylinder head, piston, and crankshaft differences.....as Gator mentioned.
 
Last edited:
Good info, thank you both! I typically do my reading bedside and sleepy, so no question I've confused myself on the crossovers of parts.

No info on the high speed orifice, except that it's in there. I've not removed it. I did however thoroughly clean it, to include spraying carb cleaner directly into it and exiting freely into the bowl. I realize that's not a solid confirmation of unobstructed flow; but I would not expect an obstruction there to cause flooding.
 
My vision sees fuel leaking by the aforementioned "donut" and getting sucked, uninvited into the high speed "nozzle". This is not an uncommon issue and affects many motors of this era.
 
The nozzle does NOT meter the fuel.-------How did you determine that the motor is flooding ?-----Are you sure that motor is running on both cylinders ?----Disconnect one plug wire at a time and see how motor responds.
 
Right, good suggestion. Not sure if your correcting me, Racer, but so glad you came to this post. Anthony is in good hands. What I'm saying is that the "nozzle" is getting unmetered fuel through that little stupid seal at its base. Many mechanics assume this will seal "good enough". That is certainly not the case because as the float bowl gets distorted, it creates less compression on this seal and it can leak. There is certainly plenty of suction here at this point, but the main jet itself is supposed to determine the metering.
Sorry if I wasn't more clear with my original explaination.
 
I'm really into timguy's theory, too. The burr was large enough that I can imagine the bowl was warped when I torqued the screws.

Later when I tear down, I'm also going to experiment with another donut gasket, cut from some thicker gasket material. If that's the culprit, then I should see an improvement if not an outright success.
 
And racerone...

Not to sound arrogant, but I'm very well aware of flooding. And you probably missed the answers to the rest of your questions in my dissertation.
 
You have to understand, Anthony, that we really don't know who we are working with until a few posts, sometimes. For me, however, I recognize a fairly experienced team, working on this old relic.
 
Looks like Gator and Racer bailed on this one. If you need carb parts....say you can't fix the damage....I might have something here in the mess.
 
......Not to sound arrogant, but I'm very well aware of flooding.

Tony... I'm not jumping in here as Tim's got you pretty well covered, however, a question....I've read through the First Edition of "Frankie's Outboard" (above) and see a mention of the fuel primer bulb BUT see no mention of its function ie........ Does the fuel primer bulb become hard within a half dozen squeezes, and if so, does any further squeezes result if any fuel escaping the carburetor, or elsewhere?

If the float needle valve is seating properly and the float level is as it should be, one should be able to really apply pressure to that fuel primer bulb without a "flooding" problem.

Frankly, there was so much to read that, with me at least... it got to a point where much of it ran together. It might be worth while to rehash the problem, putting it into as short and simple a explanation for us old timers to digest. No offense intended.
 
Excellent Joe, thanks. You did bring something else to mind, and that would be the possibility of a diaphragm leak on the fuel pump. The "blow through test", as Tony mentioned, of course does not effectively indicate that the main fuel pump diaphragm couldn't have a crack or hole in it allowing fuel to enter the cylinder that operates the fuel pump through its pulses on the intake side. That would still allow the fuel pump to function, but introduce excessive fuel into the cylinder which operates the pump. So this "leak" would only affect 1 cylinder's mixture, Tony.
 
Good Point Tim. That one did slip my mind... a little something from my ole database here then I'm gone.

********************
(Fuel Pump Diaphragm Test)
(Two Hose Type Only)
(J. Reeves)

Note: This pertains only to the regular Two Hose type fuel pumps.

Leave the hoses attached to the fuel pump. Remove only the two screws that attach the fuel pump to the powerhead. Re-insert those two screws and install a nut to each of them so that the fuel pump is securely clamped together. With the fuel line attached to the engine, pump the primer bulb while observing the pressure/vacuum operating hole on the back side of the fuel pump. Should any fuel leak out that hole, the diaphragm is faulty.

If the diaphragm is faulty, the fuel pump will require rebuilding or replacing. Note that repair kits are not available for all fuel pumps, in which case replacing the pump would be necessary.

********************
(Fuel Pump Diaphragm Test)
(Three Hose Type Only)
(J. Reeves)

Note: This pertains only to the regular Three Hose type fuel pumps.

Remove only the pressure/vacuum hose that leads from the fuel pump to the crankcase. Leave the other hoses attached. With the fuel line attached to the engine, pump the primer bulb while observing the pump pressure/vacuum fitting that you just removed the hose from. Should any fuel leak out that fitting, the diaphragm is faulty.

NOTE: If the carburetor is obviously flooding, clamp the hose shut that leads to the carburetor.

If the diaphragm is faulty, the fuel pump will require rebuilding or replacing. Note that repair kits are not available for all fuel pumps, in which case replacing the pump would be necessary.

********************
 
Last edited:
Excellent, Joe.....your posts are always of high value. I might add that these fuel pump diaphragms will be destroyed, in time, by ethanol. Newer outboards are basically " ethanol resistant", but pre 2005 or so, are not. Consider also, that ethanol fuel's safe shelf life in a moist environment, and not completely sealed off from outside air......is at best, 3 to 6 months, then phase separating will most certainly occur.
 
I'll reread through the comments to be sure I haven't missed anything. But from a glance, I think I took action on all of your suggestions. By the way, thank you all! Those are really awesome!

Broke my word on coming back with photos that evening. I didn't anticipate so much attention so quickly, so I changed course and took a couple of days to follow suggestions and recurse over some previous things.

Removed and verified the high speed orifice. It has "72" etched onto the side, apparently matching specs from parts listings. No visible damage, clean and round opening. I recleaned the threading surfaces before reinserting.

Rechecked and verified the float height and level. Also verified that the needle seats and seals. Tested that 2 ways: old-school "blow" test. But also followed a tip from a retired automotive tech--my father--by inserting a transparent tube into where the bowls drain plug port, securing the tube vertical to the carb. Then observed the fuel level while pumping fuel into the carb. Fuel level stops approx a quarter of an inch below the bowl gasket, and rises no further--as expected. Accordingly, the primer bulb firms up with pressure at that point; though not so firm that I can't keep pumping--I can, however, continue pumping against the pressure. Where the remaining fuel goes, I've not yet confirmed...but I neither find nor smell any leaking out anywhere around the powerhead.

That was a temporary "ah ha" moment. I pulled the fuel pump and inspected for leaks. Blow testing revealed no leaks--it seems airtight. But there was some residual fuel in the crankcase port. I have to conclude, naively, that was from the flooding and via correct route. I made that conclusion by replacing with a known good pump from another outboard--with which flooding continued with no change in performance, and residue in crankcase port persisted. So fuel pump is now eliminated.

Back to the carb...I pulled it back off and followed through with what previously seemed to be the strongest lead by fabbing and replacing the "donut" gasket with one of roughly double thickness. I did note that the OEM gasket had imprints from the nozzle shaft on both sides, indicating that it had force against it with the bowl secured in place. And tests with the thicker gasket showed no change--negative or positive.

So I again tore down the carb to replace the OEM gasket and redundantly clean the crap out of everything. This is about the point where the most interesting and unexpected thing occurred. I'll also provide a link to a video I put on YouTube (you know it's got to be good when video evidence exists--ha!). After this assembly, I was going to leave the carb on my work desk while I spent some time researching and meditating. I'd not done anything new for testing, and wanted to gather new ideas before reinstalling the carb. So I decided to insert the slow-speed needle valve to protect it while sidelined. When I picked it up and held it upside down to insert into its port, its needle point slid freely out of the brass collar and fell onto the desk below. Neither the point nor the collar was broken or bent. No visible damage or scratches. The needle point will slide freely back into the collar, likewise. So that was an interesting and unexpected plot twist. There's no residue of glue or epoxy on the point's shank. My assumption is that it was press-fit into the brass collar at the factory.

Many moons ago, I worked as a millwright and had the privilege of touring various manufacturing plants while certifying for the machinery I maintained. The way that needle point and brass shaft fit together is very much inline with common manufacturing precision technique. In similar situations, the factory would "buy" some tolerance in the precision of the shaft link by designing the fit collar to be slightly deeper than necessary. They would press (in this case, the needle point) the part into the shaft--and that press would be calibrated to push the part down to a point so that the entire length of the assembled parts would be precise. So falling back on the experience from my younger working years, I now had a fresh new lead to follow.

I started by searching online for photos of that needle valve, of the same part number, shot from directly above (not at an angle). Downloaded 3 of the best photos. I then measured my valve's brass shaft from its end to the edge of the collar. That came out to exactly 3 and 5/16 inches. Using a photo editor, I resized each of the 3 reference photos (with proportional scaling) so that their brass shafts were the same length. I then calculated the offset factor from the original photographic length and factored that against the photographic lengths of the corresponding needle points. On all 3 photos, the needle points for those valves extended 17/32" from the collar. Mine, when pushed all the way into brass collar, extends to exactly 1/2"--making it 1/32" too short. So there's the factory tolerance I was looking for! As well as a an increased promise in this new lead.

I'll admit, 1/32 doesn't seem like much--I haven't used a micrometer to check the valve's thread pitch; but a visual estimate seems like those are about 1/32" as well. So on one hand, I'm thinking that would eliminate the loose needle point as a cause for the flooding. After all, it should mean I just have to turn the valve at least one more full turn in order to compensate, right? But that's also ignoring the collar of the shaft itself. Judging by its machined appearance, it seems like it too places an important role in controlling the fuel flow through the slow-speed circuit. With that assumption, a 1/32" variance would then be a very big deal, depending on the geometry of the valve seat. (For which, I was unable to find any visual reference online--and I don't have a scope to peak inside my own.)

So late last night, after mulling my options, I decided on how I would fix the needle valve. I don't have the kind of tool that could "crimp" the collar back to a press fit, nor do I have a press that will reinsert the needle point. But additionally, I have nothing to lose--as there's no way I'm putting that back in with those 2 free to separate from one another. Replacement will be necessary if I don't fix it. So I decided to solder the 2 back together. I found a strategy to mark the 1/32" offset on the point's shank, pre-melted a couple of drops of solder into the collar, then sank the point into the collar at that offset mark. Final measurement has the needle point extending to the 17/32" length--matching the analyses from the photo references.

I haven't reinstalled the carb yet, as it was after 2 this morning when I completed the "hack" solder repair. But the needle point feels secure enough to trust. Later this evening, I'll reinstall and test. Hopefully this finally fixes the entire ordeal. Otherwise, I'm out of ideas. I've gone through, again and again, every freaking thing I can think of--including all of your suggestions, and others from other sources. The only thing that has made any kind of difference was removing that burr from the end of the high speed nozzle--which only fixed the fuel aeration while allowing the carb to continue flooding even worse without the rogue air leaking into the circuit. Barring no new ideas, I'll be left with no choice but to find a different carburetor altogether. Which would really suck; because I greatly enjoy solving puzzles like this, and going with a new carb (without understanding the exact defect with the current one) would be a personal failure, ha!

But sincerely, thank you all again! Win or lose, I've learned a lot from this adventure. These outboards are a new hobby for me, and I feel like I'm finding a new "home" in them, so to speak.
 
Whew, not much I can add to that story. Seems like you went far and above the ordinary.

Too late now, but I would have secured that needle tip the easy way---a drop of Locktite. But I'm sure your way is just as good or better.
 
Along with ruling out the fuel pump by testing with a known good one, I did note that both of the spark plugs had an equal amount of residual fuel/oil on their anodes. I take that as an indication that flooding is reaching both cylinders--otherwise, I'd expect one to appear drier than the other.
 
Whew, not much I can add to that story. Seems like you went far and above the ordinary.

Too late now, but I would have secured that needle tip the easy way---a drop of Locktite. But I'm sure your way is just as good or better.

I did consider Locktite, as well as a few other adhesives. But I didn't have confidence that those would endure the vibrations under normal operating conditions. But with the sobriety that comes with sleep, I will go that route if I ever encounter this scenario again. Soldering that tip is a tricky business--too much, and some will spill out when forcing the needle back into the collar. I don't have the best nerves, so cleaning up the spillage on such small parts is a bit of a challenge, ha!
 
One last theory--when you inspected the orifice plug, did you check the actual orifice diameter? A #72 plug should be 0.072" diameter hole. Lots of misguided folks will drill it out in the theory that more gas will make it go faster.
 
One last theory--when you inspected the orifice plug, did you check the actual orifice diameter? A #72 plug should be 0.072" diameter hole. Lots of misguided folks will drill it out in the theory that more gas will make it go faster.

That's one thing I've not done! I will say that I didn't notice any signs of scoring, as though from a drill bit, when I inspected it. But that really doesn't say a whole lot considering my vision. That will certainly be the next thing I check. Thank you!!
 
Back
Top