Just found this forum due to routine drive maintenance transitioning into not so routine (for me at least) work.
started afternoon pulling boat from salt after 30 months since last out drive service, new bellows and lower seals, etc. was done by me at that time.
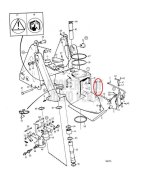
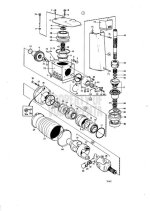
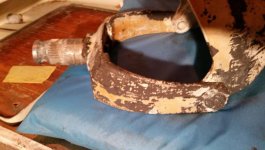
finished evening with drive off boat after I realized bellows clamps had failed and the milky oil was found. The upper bearings and shifter gears look OK and oil milkshake still had some viscosity to it. Didn't see glitter in oil but magnet on drain plug had its share. I haven't checked the PDS bearings yet but expect they need to be replaced based on reading:
http://www.marineengine.com/boat-forum/showthread.php?407281-AQ290dp-gimbal-bearing-help-volvo-gods!
and noticing some light vibration and noise from bell housing area last 2 hours of operation.
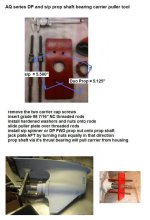
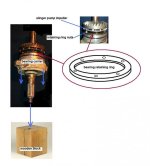
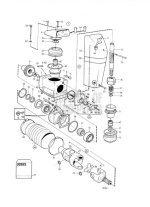
my question is; what other parts are commonly damaged with a bellows failure? And what are some tests I can do to see what is good and not good? Do I need to seperate the lower from the intermediate and inspect anything?
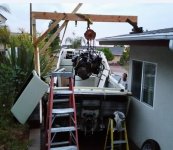
I have the drive off and the upper box with the U joint off currently and am mentally preparing to pull the engine soon. My guess is the failure occurred 2 months ago and drive has seen about 8-10 hours in that time.
FYI, the cause of bellows failure was me being cheap with Chinese bellows kit, the bellows held up fine but the clamps did not. 3 of 4 cooked, BTW still have the VP ones I installed the time before and removed, 30 months ago after at least 30 months of service and they look great... Probably why I saved them. Lesson learned the hard way... I already bought VP bellows a couple weeks ago in preparation for today though I did buy the Sierra lower seal kit. I guess if I had done the maintenance at 24 months the lighter clamps would have been fine but from now on I will make sure to replace 24 months or sooner and always with VP product.
now I have all sorts of work ahead of me instead of having the bellows done and the oil filling overnight and trying to learn another part of my boat for the first time. After 10 years I am running out of parts to break for the first time!
new here and thanks in advance for help. I searched a bit but couldn't find exact info, any redirect to appropriate previous post is appreciated.
donny
started afternoon pulling boat from salt after 30 months since last out drive service, new bellows and lower seals, etc. was done by me at that time.
finished evening with drive off boat after I realized bellows clamps had failed and the milky oil was found. The upper bearings and shifter gears look OK and oil milkshake still had some viscosity to it. Didn't see glitter in oil but magnet on drain plug had its share. I haven't checked the PDS bearings yet but expect they need to be replaced based on reading:
http://www.marineengine.com/boat-forum/showthread.php?407281-AQ290dp-gimbal-bearing-help-volvo-gods!
and noticing some light vibration and noise from bell housing area last 2 hours of operation.
my question is; what other parts are commonly damaged with a bellows failure? And what are some tests I can do to see what is good and not good? Do I need to seperate the lower from the intermediate and inspect anything?
I have the drive off and the upper box with the U joint off currently and am mentally preparing to pull the engine soon. My guess is the failure occurred 2 months ago and drive has seen about 8-10 hours in that time.
FYI, the cause of bellows failure was me being cheap with Chinese bellows kit, the bellows held up fine but the clamps did not. 3 of 4 cooked, BTW still have the VP ones I installed the time before and removed, 30 months ago after at least 30 months of service and they look great... Probably why I saved them. Lesson learned the hard way... I already bought VP bellows a couple weeks ago in preparation for today though I did buy the Sierra lower seal kit. I guess if I had done the maintenance at 24 months the lighter clamps would have been fine but from now on I will make sure to replace 24 months or sooner and always with VP product.
now I have all sorts of work ahead of me instead of having the bellows done and the oil filling overnight and trying to learn another part of my boat for the first time. After 10 years I am running out of parts to break for the first time!
new here and thanks in advance for help. I searched a bit but couldn't find exact info, any redirect to appropriate previous post is appreciated.
donny