Logo

replacing top seal on lower unit 60hp 1970 hydro electric johnson

Len walls

Member
Ok so for those of you who read my last post you know that I have a 1970 ish 60 hp hydro electric that had failed into forward, the gear oil had turned to custard and the solenoid readings where all over the countryside.

Thanks to some good advice I persisted in my dog and bone attitude and went ahead and removed the lower unit.

I found a broken lead to one solenoid, that was the good news, the bad news was I also discovered the source of the custard gear oil, a really leaky top seal on the drive shaft.

After spending a couple hundy I really shouldn't have ( I'm sure everyone here knows all about that) I'm back in the workshop proceeding to work on pulling out what ever hair I have left.

Does anyone have any advice on replacing this seal, I've removed the four bolts on the round (what I would have imagined to be cap) beneath the impeller housing, the shaft is loose in the seal but the cap won't budge.

I don't want to attempt to force it off in case it's not a cap or I'm missing something.

Any help would be much appreciated.
 
Last edited:
Yep... What racerone said.

But before prying that housing up and off, grab the drive shaft and see if you can move it back and forth, sideways, whatever. If you can, that indicates a worn bearing within that seal/bearing housing. In which case replacing the seals wouldn't help as the driveshaft can whip about within the bearing.

Should the bearing be worn, replace it or the entire housing assembly.... and while you're at it, check the driveshaft for wear at that bearing area.
 
Awesome thanks guys, looks like the bearing is in fact worn Joe, such a shame because every other part of this motor has been so well looked after. The gears seem to have been over looked or perhaps it was just in the too hard basket.

Well off I go to continue my hairbrained adventure of restoring a forty something year old hydro electric.

Better start hunting for those seagull teeth while I'm at it!
 
Well that's a funny story. When I went to get some parts for it from the shop........

The tag on the bracket has an e85 model number.....

the first thing that entered my head is stolen engine......stolen boat!

It's evidently not the engine as this is a three cylinder 60 hp.

I rang the local cops and they ran all the numbers on the engine and boat and couldn't find anything in their system so they advised me that under out laws im in the green.

But back to the engine.

I could post some pics if that helps, I was getting good results using the 1970 breakdown for parts at the shop.


I'm not sure how accurate the diagrams are but I have noticed the cap I was talking about is round and in all the break downs for the gear case the cap appears to be square. But as I said I'm not sure if that means anything.
 
If it is indeed a 3 cylinder and the lower unit has 2 solenoids vertically stacked on top of one another, the lower unit shift setup would be what is called "Hydro Electric Shift."

If the powerpack setup is a fairly large black box with only a few wires leading into the top of it, the year and hp could be a 1968/1969 55hp... or a 1970/1971 60hp.

If the powerpack is smaller with wires leading into both sides of it, it could be a 1972 65hp model.

Apparently we're going to need a few clear photo of the engine. However, look closely for a quarter size core plug on the powerhead... looks like a small freeze out plug. The model and serial number may possibly be found there.
 
Ok, I'll post some pics when I can. I'm away from home atm.

The plug on top has what appears to be a serial number but no model number. That's the number I had the cops run.

The power pack is large. I'd go with the 70/71 as the badge on the side of the cover has 60hp on it.
 
It's definitely hydro electric shift. I've pulled the solenoids which are vertically stacked, ones in very good condition but the upper one has some warping and delamination of the top.cap on it. There is some indication from the impeller housing that the motors been run dry or had insufficient water flow in the past so I've acquired a new impeller housing.

I've bench tested both solenoids and they are still working.
 
That bearing/housing assembly is #383119, quite expensive and apparently no longer available. I'd suggest heating the housing (after you remove it from the lower unit) to expand it so that you can easily remove the bearing which will have numbers on it. Then you can go to any place that handles bearings to match one up.

Note that all bearings have a rounded end, and a flat end. Make a note of which way it sits in the housing. The flat end is used with a press install/remove tool.
 
Awesome thanks Joe, I got it off with a bit of lube some tapping and a bit of wiggling.

I was wondering that exact thing. One of my friends has a bearing press I think I'll pay him a visit. She's a bit corroded on top but it still looks structurally sound.

I'm sure I could find one in the box next to the seagulls teeth but my wallet would most likely not play ball so replacing the bearings is the only viable or sane option.
 
That bearing/housing assembly is #383119, quite expensive and apparently no longer available.

I looked that up as a 71 60HP and it shows available here for $186 and at boats.net for $155 ..... I have a good spare you can have it you can't get a new one.

Should he seal the lower unit to the mid housing since it had a gasket????? ........ Should I seal my manual shift lower that had no gasket?????
 
What would the part # be for that gasket ?---------And what motor do you have that you are thinking may need a gasket ??
 
I looked that up as a 71 60HP and it shows available here for $186 and at boats.net for $155 ..... I have a good spare you can have it you can't get a new one.

Should he seal the lower unit to the mid housing since it had a gasket????? ........ Should I seal my manual shift lower that had no gasket?????

I double checked... 383119 was still available in 2004 but was no longer listed in 2010, causing me to assume that it is no longer available. Glad to hear that it is available from Marine Engine. Very generous of you to offer one free.

The lower unit to exhaust housing metal to metal match..... I always sealed it with OMC Adhesive... NOTE: OMC Adhesive is now Bombardier 3M Product #847 and may be listed as Scotchgrip 847, part number 776964.

It's not necessary to seal that area BUT water squirts out here and there (looks weird) until the spaces eventually fill up with debris.
 
Hi acams thanks for the generous offer.

The original part number on the housing is 313345 but I believe it's exactly the same part as 383119.

I did notice that some are still available on line however for my ends that won't suit me.

As I'm in New Zealand 186 USD plus delivery equates to a lot more than a new bearing and seal.

I will have a look around down here but going off that pricing I would imagine any parts place down here would want a premium for the part.

I like Joe's idea of heating the old bearing out and replacing.
that was the first thing I wondered when I removed the casing and saw how it was constructed.

seems like a waste of money to my mind to buy a vintage bearing housing when I could just replace the worn bearing.
 
The original part number on the housing is 313345 but I believe it's exactly the same part as 383119. I like the idea of heating the old bearing out and replacing. that was the first thing I wondered when I removed the casing and saw how it was constructed. seems like a waste of money to my mind to buy a vintage bearing housing when I could just replace the worn bearing.

Yep... That's the route I'd take. And usually the people that sell and stock those bearings sell them at a fraction of the cost.

NOTE: 313345 is not listed as a part number going back as far as 1982... no need to go back any further. If that is a number imprinted on the housing itself, you will probably find that it is simply a casting (mold) number.
 
I am not 100% sure, but I am over 90% sure that newer bearing caps will work on that motor ..... 70HP, 75HP all the way up to ?????? 1988 probably, maybe later!

Go find an old junker lower and look and see!
 
Last edited:
Yea I'm sure the housings are all the same as well I've done a bit of looking around online. But the going rate is still the same for that part .

Buying used is not an option either when bearings is involved is worse than a coin toss, at least with a coin toss you'd get a 50/50 chance, with a used part it's 100% there is wear on the bearing.

The housing is still good, I'd sleep better at night if I knew the bearing was brand new.

And as has been mentioned it's a fraction of the cost.

so mechanically and financially replenishing the bearing seems to be the best way forward. A bit more work but in my opinion a better result all round.
 
While your still checking this thread Joe, I'm wondering about the top solenoid. There was a fair bit of warping going on with the washer on top of it. How critical is spacing between the top solenoid and the housing cap. I understand that the spacing of these solenoids is crucial to correct operation.
 
None of those upper solenoids look pretty !-------This solenoids are only energized in nuetral and reverse.------They do nothing for forward gear.------------If it has the correct ohm value then do not worry about it.
 
While your still checking this thread Joe, I'm wondering about the top solenoid. There was a fair bit of warping going on with the washer on top of it. How critical is spacing between the top solenoid and the housing cap. I understand that the spacing of these solenoids is crucial to correct operation.

The washer on top of the upper solenoid is a "wave Washer", made of a spring type metal and designed to resemble a wave as one runs their finger around it.... a washer spring of sorts, designed to keep downward pressure on the solenoid assembly. As such, there should be no free space to allow movement between that wave washer, the cap, and the solenoid.
 
Thanks for that racer, one of the solenoids gives a funky reading when installed in the gear case but when benched both solenoids give the correct ohms reading and function correctly when power is applied.

I'm fairly sure that it's a case of dicky wiring so I'm going to replace the entire section, I'm leaning toward solid soldering the joins and heat shrinking with a healthy dose of heat resistant marine grade silicone.

Do you think I can get away with using standard marine auto cable up through the mid section or should I be using some supplementary shielding or a heavier grade of wire?
 
Just a quick update. I applied some heat from a butane torch and the bearing just slid out with a little twist of the screwdriver. The seals are readily available here and I'm betting a bearing like this one shouldn't run up anymore than $30 kiwi dollars. I purchased a gear removal tool that should pull the bearing back in quite nicely for $30 at the hardware store ( I'm sure that tools going to earn it's weight over the next few years) so I won't include that in the cost.

All up I'm optimistic I can recondition this housing for well under $100.
 
I wouldn't be surprised if you picked that bearing up for $10 or $12 dollars.

I'm wondering about this "gear removal tool" to re-install the bearing. I'll look in the service manual tomorrow to see what OMC recommends as I don't remember what it is (age! sigh). Keep in mind that you DO NOT want to apply pressure to the rounded edge of that bearing.
 
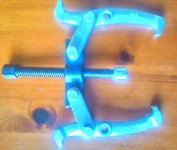
Its a standard manual gear and bearing puller, you use a wrench to tighten a center bolt and it has a cross member with adjustable hooks either side.

I was going to use a flat piece of steel with a drill out in the middle for the center bolt to pass through in order to press the bearing back into the housing, the flat edge sits flush on the underside of the housing so it shouldn't cause it any grief doing it that way.

Just seemed a little more diligent to my mind to replace the bearing that way.

Im sure your right about that bearing as well.

Its a Torrington needle bearing, Torrington have been re branded Koyo and from the looks of this size bearing the cost will be not much more than a couple of morning coffee's! Heck I might grab a couple lol.

Now if only I can track down the manufacturer of the oil seals, Im sure I can avoid the ludicrous marine supply mark up and buy them at a tenth of the price from an auto supplier!
 
Last edited:
This is the gear puller, with a little addition it can be turned into a manual mini press.

8046009.jpg
 
Last edited:
Bad lighting, but this is the actual tool straight out of the box, on the bench here in New Zealand! $30.89 NZD
 

Attachments

  • P_20151227_182242_HDR.jpg
    P_20151227_182242_HDR.jpg
    46.7 KB · Views: 64
Last edited:
I checked the service manual this morning. Apparently that is one step they would rather have the entire seal, bearing, housing replaced as a unit as they do not show any steps in the removal of the bearing.

The tool however resembles a punch rod... with the end portion being just a hair longer than the bearing and the same exact diameter as the ID of the bearing... The rest of the punch having a OD slightly smaller than the bearing with a flat step to engage and apply pressure to the flat portion of the bearing.

Really just standard removers/installers. I always kept an assortment of them with my tools. However, I'm sure you have figured out just exactly how to do that job with the tool you've shown us. BTW... how did the bearing surface of the drive-shaft look?
 
Back
Top