Logo

Powerhead rebuild or not

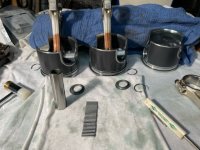
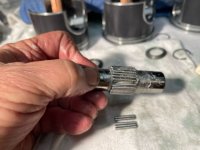
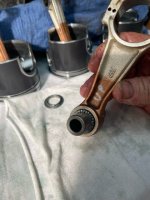
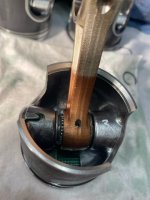
Ok on the rod, boxes and bagged and they look super! The caps are smooth as glass no finger nail hanging at all! However I noticed this and it’s alright but wanted to mention it. There is no raised dot on the cap and rod like the factory rod so before taking them apart I’ll be making sure caps and rods are marked accordingly. The inside of the rod with cap installed is seamless I can’t see the crack between the 2 halves! Tomorrow night I’ll be installing the 28 needle bearings and wrist pin. I’ll post some pics on the progress!
 
Got the piston and rods together tonight got a late start but was able to get everything marked and needle bearings installed. Here’s some pics if anyone’s interested.
 

Attachments

  • 0451CE9C-618A-4003-BE1F-11D1A7AA4F2F.jpeg
    0451CE9C-618A-4003-BE1F-11D1A7AA4F2F.jpeg
    146.7 KB · Views: 6
  • 48B947B8-1C13-4E14-8ECC-D00EFAE63662.jpeg
    48B947B8-1C13-4E14-8ECC-D00EFAE63662.jpeg
    98.2 KB · Views: 8
  • 496C4B82-25D5-43BF-A106-4170478326D5.jpeg
    496C4B82-25D5-43BF-A106-4170478326D5.jpeg
    56.1 KB · Views: 8
  • 11586F85-865F-43DB-82A1-8D8921866B47.jpeg
    11586F85-865F-43DB-82A1-8D8921866B47.jpeg
    50.3 KB · Views: 8
Hey everyone want to add an update on the progress. Pistons, crank, and finally the rods installed. I had absolutely no issues installing the rod caps they matched perfectly! No issues torquing them in the 3 steps either. 5CC3533B-D5A5-4D52-9342-134D7141FF3D.jpeg6E237946-DDA6-4129-BD42-1DD2F8E3FC2D.jpeg
 
R1/FB, can you help with some advice on installing the crankcase cover? I have everything all cleaned up including the bolts. What I’m concerned about is the bead of gel seal and where to put it. I took a sharpie marker and drew where I thought it should go just wanted to be sure. Also is it just a bead or lay the bead and spread it out? I also have the primer for the gel seal but I’ve read in the manual where it’s used only if you plan to run the motor that day. If you let it’s cure over night you don’t need the primer. Wanted to get it right was looking for some sound advice.
 
R1, searched and found a few threads on sealing the half’s together, not much mentioned about the primer applied to the cover just to make sure it’s clean. On the block it’s a thin bead of 518 and stay at least 1/4” away from bearing and such. I’m thinking the 1/16 bead then smooth it out with a finger. The process needs to be completed once started. 518 starts to cure right away once the half’s are joined. Am I on the right track?
 
Moving forward I put the crankcase cover on. Small bead of 518 on the block the way the manual stated and I put the cover on. Torqued per specs in the manual. Then cleaned up what squashed out on the outside. Here’s a couple pics65FF83D5-0F77-413A-9842-89440B28655B.jpegB77FE726-2734-4B71-A3CE-1B34B28838C9.jpeg
 
All heads are warped after years of service.----If it has not been done it needs to be resurfaced.-----Some will argue , but easy to do at home !
 
Oh yes! You’ve already mentioned it earlier definitely will be done before it goes on! Just received yesterday thought I’d post a pic to let you know I found one!
 
RC1 I was looking thru all the posts for something about the carb main jet, I think there was something about going up 1 size since it’s been bored 40 over. So pull the plug on the bowl and unscrew the jet to see what size it is?
 
Still have a few things to finish up on, cables and such but for the most part it’s back together. I hope maybe some of the pictures and great help and advice from everyone on the forum will help others! I’m thinking this will complete the Rebuild or not thread! However how about a new thread “breaking in a rebuilt powerhead”! I’m definitely going to need some help with that! Special thanks to Racerone and Faztbullet for ALL YOUR HELP AND GUIDANCE!
 
Back
Top