Logo

Spark Plug Wire Termial Crimping

(Replacing Screw In Type Plug Wires)
(J. Reeves)

It's next to impossible to find replacement spark plug wires for the older engines that have the brass screw in terminals which screw into a distributor cap. The solution to correcting a spark plug wire (or a coil wire in some cases) of this type is as follows:

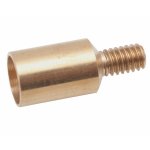
Purchase however many brass screw in terminals as you may require (OMC Part #510364). Price is about $1.75ea. If you also need the spark plug boots and the spring terminals that connect to the spark plugs, purchase them also (OMC Part #581027). This includes one boot and one spring connector. Price is about $3.25ea.

Purchase whatever amount of spark plug wire you need. Be sure to purchase the kind that has a steel twisted wire leading through the center of it....... not the carbon type plug wire that many automobiles now use.

Have a piece of 2"x4" handy or any other piece of wood that will suffice, and if you have a vise, clamp that piece of wood in it. Punch or drill whatever amount of holes you want in the top portion of the wood...... you want a almost perfect size hole that you can easily screw one of the brass screw in terminals into. I normally use just one hole, reusing it as many times as necessary. The terminal should screw or push in easily so that removal is just as easily...... but you do want the terminal to be held securely.

Using your old plug wire, cut the new wire to a length about one inch longer. If you have no old plug wire, just make sure that the wire is longer than you'll need as you can trim the other end later. The end that the brass screw in terminal will go on... cut the insulation back about 1/4". With your finger, seperate the wire strands so that they are seperated and angled off at about a 45° angle when viewing the wire being held straight up. Tint those wires with electrical solder, then fold them down against the wires insulation, cutting the excess of so that the wire ends do not extend past the circumference of the wires insulation, meaning..... holding the wire dead on, those tinted wires form a circle.

NOTE: Electrical solder is 60% Tin and 40% lead with a Rosin Flux Core, available just about anywhere.


Before doing any solder work on the brass terminal, check to make sure that the wire you've just prepared will slide into the brass terminal withough being forced.

With a hand held propane torch with a pencil tip, heat the brass terminal just hot enough to fill it with "Electrical Solder". Do not use any other type solder. Do not overheat the terminal. When the solder is a liquid, filling the brass cup, having the prepared spark plug wire handy, insert the prepared wire end into the melted solder within the terminal..... and hold it there for a few seconds to have the connection secure. That should take care of the screw in brass terminal end. Use "Caution" as that melted solder could spit out somewhat as the wire is shoved into the brass terminal.

The above procedure also holds true for the engines that have "Battery Capacitance Discharge" ignition, which is a fancy name for a battery operated powerpack.... quite a few engines in the 1968 to 1972 range. That would be the type that has one coil whereas the coil wire screws into a distributor cap located under the flywheel.

The rubber boot, spark plug end.... With the wire cut to the length required, trim back 1/4" insulation again but do not solder tint the wires. Simply fan out the wires and fold them back against the insulation, cutting the excess off as explained above. Holding the spring wire terminal, estimate where the prong should be inserted so that the spring will be flush against the exposed wire. Hold the spring terminal away from the wires end (sideways) and insert the prong into the insulation and into the center wire, then swing the spring terminal in front of the exposed wire portion (makes a tight fit for continuity purposes).

Spraying the inner portion of the boot where the wire will insert with a small amount of WD40 makes the installation of the wire a easy project. That's it.... you're done.

Thousands of parts in my remaining stock. Not able to list them all. Let me know what you need and I'll look it up for you. Visit my eBay auction at:

http://shop.ebay.com/Joe_OMC32/m.html?_dmd=1&_ipg=50&_sop=12&_rdc=1
 
I know this is an old thread, so i apologize, but it contains one of the better write-ups i've been able to find on how to install the screw end type connector (Sierra 18-5224-9).

The OEM pre-assembled wires crimp the brass screw terminal. In joereeves write-up there is no reference to crimping this connection, solder only. It doesn't seem like an oversight, but wanted to be clear.

Are these ends supposed to be crimped in addition to the solder?
 
Back
Top