Logo

High altitude adjustments for 1981 Johnson 70hp mod J70ELCIM

jo hall

New member
I have never been able to get this motor running properly at 8500 feet. Runs fine at idle but wants to stall when throttle advanced except if advanced very gently it will usually rev up to normal RPM. It will always rev up when in neutral but stalls as described when in gear (loaded). It always stalls if I try to drive it onto the trailer. A dealer sold me what was supposed to be high altitude jets a couple of years ago which I installed; little change in how it ran, no improvement in power. I removed those today and compared the orifice to the one in the original (sea level) jets and found that it (or rather they since this thing has three carbs) is larger than the sea level orifice. hmmm methinks that's the wrong direction!? I have also diddled around with the prop ie switched back to aluminum from SST to reduce weight, reduced prop pitch (but only slightly), made little if any difference. So the questions: (1) can anyone out there say whether this is a prop size/pitch issue, a high speed jet issue or both? Or for that matter is it something entirely different and if so what? (2) if a change in the prop size/pitch is recommended is there a scientific method to determine what size/pitch is called for or is it a matter of trial and error? (3) If it's a high speed jet issue does anyone know of a reliable source for high altitude jets? The parts lists I've found show only one jet, #68, which is the original in this motor to which I referred above as the "sea level" jet. Sorry to be so long winded on this but I've been screwing with this for way too long and I know there is a solution. Any and all ideas will be appreciated.

J O
 
Last edited:
Best way to experiment with idle air jets is to take a small diameter wire (I use old guitar strings about 3" long) and insert them into the idle air jets and secure temporarily by trapping it behind the airbox screws. If that cleans up the idle you can either affix the wires permanently in place or get a set of jets that are tighter.

If your carbs have idle mixture screws just back them off 1/4 turn (cc) to richen the idle mixture.

Increasing the HS jet size won't help a poor hole shot much..... you need a richer mixture coming off of idle to make the leap smoother.

Good luck.
 
Thanks fishinwrench for your input. Thing is this motor will run at idle or very low speed all day long. I sometimes troll with it that way. But then when I get ready to head in it don't want to rev up to higher speeds.

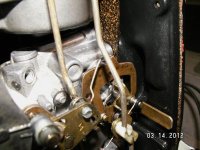
If I remember right, carburated car engines are designed to inject an extra shot of fuel on acceleration. Don't remember how that is accomplished in auto and have no idea if something similar is supposed to happen in this engine, of if so how. But this could be part of the problem. I noticed yesterday that there is a spring on the throttle shaft of one of the carbs that is obviously not installed correctly and/or has been bent out of shape. Maybe the problem or part of it. Cannot tell how it should be unless I can find a good picture of an assembled carb.
 
Last edited:
Thanks kimcrwbr1. So far I haven't found a parts store that sells anything but the original #68, part #327740 (except the guy that sold me the wrong ones that I mentioned in original post). Still looking.
 
Last edited:
Thanks again kimcrwbr1. You're right about the accelerator pump; it's been a long time since I worked on one of those. I do not have a service manual but am about ready to spring for one. I will definitely check out the sync issue. Where are you seeing the spring #52? The exploded drawing I'm looking at has no #52 and does not show the spring I'm talking about.....I will also check the choke butterflys.
jo
 
Look at the " intake manifold " pictures for spring #52.-------------------That spring will look wrong / poorly installed or whatever.-----------The purpose of the spring may well be to hold the choke butterflies at full throttle so that they do not flutter and wear out.---Any knowledgeable dealer will be able to look in the service manual for smaller jet sizes and the part number for them !
 
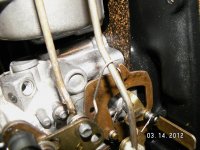
That does look like the spring I was talking about. The way it is installed on this engine it is under no tension and is free to "flop" around, which is unlike any correctly installed spring I've seen. You're saying this may be correct in this case?
 
PICT0010.jpgPICT0007.jpgOn a closer look the spring doesn't look so mishapen as I first thought.
The picture on the left is the way I found it; the RH one is the way I assume it should be. In that configuration it is under tension, full range of throttle. In the other configuration it just flops. Don't know how long it has been this way but I'm guessing from your comments it is unrelated to my current problem.
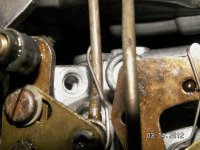
PICT0013.jpgOn a third look, I found that the above configuration don't work because when the choke is actuated the spring pops off the choke connecting rod and returns to the state shown in the LH picture above. So I assume the correct configuration is the only other possibility that I can see, shown in the bottom picture although I cannot see that is serves any particular function that way. It does however stay put through the entire throttle and choke range.....by the way the chokes seem to move freely and snap into the fully open and closed positions. ...........You've been a great help and no need to respond to this unless you see that I am missing something.
 
Last edited:
What you need to do is accept the fact that you are wrong.------------Picture on the left is the way it should be !------------Operate the throttle piece on the one carburetor to see what this spring does.-----------It holds choke shaft stationary at full throttle.
 
Racerone you are absolutely right. With throttle wide open it operates as you say when the throttle gizmo on the middle carb is actuated. Thank you so much for clearing that up for me.
 
Today I talked to the local dealer/mechanic, the guy who sold me the #73 jets that I mentioned in my original post. Turns out this carb has three jets a low, mid and hi speed. (According to him the mid was increased from #68 to #73 to richen it up for the hole shot.) The exploded carb view seems to confirm that, item #27 being the low speed jet, #35 the mid and #33 the high. Tomorrow I will remove one each of the low and hi speed jets to see how they are stamped. Contrary to what Sea-way said the drawing shows the original low speed jet to be 42 and the high speed jet to be 52D. I will see if that agrees with what is actually in there and work from there, probably order .006 larger for the low speed and .006 smaller for the high speed. (By the way I also talked today to a guy at Sea-Way, Jody, who said that item #35 on the drawing was an air jet not a fuel jet which contradicts what my local mechanic said and means we went the wrong direction if the intent was to richen the mid speed jet up. Go figure............)
 
I just tried to remove the high speed jet and am beginning to like your wire method. It was going to be very difficult to extract and I am afraid of damaging either the jet or the threads and have to drill and tap or replace the bowl. I suppose brass or most any wire material would work. Looks to me like with the right diameter and length of wire one could insert it replace the cap and if it works just leave it there.
 
I'm going to resurrect this very old string because I'm having the same altitude issues on my '78 Evinrude 70HP outboard. I can't find orifice charts for that specific motor but it has 54D air bleeds and 32 fuel jets and it runs great at sea level. I live in the foothills and regularly visit lakes up to 6000ft where the boat will idle fine but bogs and or dies when you give it throttle, even gently.

I'd heard of the wire method somewhere previously and then stumbled on Fishinwrench's post above. Orifices for my motor have become a lot more scarce so I'm going to try his method not just for troubleshooting but as a long term adjustable solution.

Here's the math I'm using, probably won't get to this for a couple weeks but I'll update with results once its done. I'll start by drilling out the air bleed to 52 size and putting one .017 wire in the fuel orifice and testing at 3450ft.

When I'm back at sea level I just move the wire back to the air bleed and I'm back to a stock jet and equivalent air bleed. If this works it'll be a 10 minute adjustment and I don't have to buy 6-12 orifices at today's prices...

View attachment 31033
 
the image didn't seem to attach right so here's a direct paste on the #s

starcraft evinrude 70 alt adjustments
diaareaarea changeequiv dia wire
air bleedsea level to 3000540.0550.00950
air bleed3000 - 6000520.06350.01267diff 54 to 520.003160.0179
air bleed6000 - 10000500.070.01539diff 52 to 500.002730.0166
fuel orificesea level to 3000320.1160.04227
fuel orifice3000 - 6000340.1110.03871diff 32 to 34-0.003570.0190
fuel orifice6000 - 10000360.10650.03563diff 34 to 36-0.003070.0177
drill air orifice out to .0635 and leave one 0.017 or 0.018 strand wire in place at low altitude. Move the guitar string to the fuel orifice above 3000ft.
or drill air orifice out to .07 and leave 2 strands of wire in place at low altitude. Move the 1 wire to the fuel orifice above 3000ft, move 2 above 6000
 
yup, I pulled them to check. the only chart I can find is for 85hp and up, it lists 58/30 orifices for air/fuel on the 85hp so 54/32 on this 70hp seems to be in the ballpark. regardless it runs great at low altitude so I'm ok with using them as a baseline. that said if you have any better reference material for a 1978 70873C, i'm all ears
 
based on parts diagrams, various research and the info at the beginning of the thread i have no reason to think that it isn't... the 54D idle air orifice is at the top of the carb, the 32 fuel orifice is in the fuel bowl.

i'm not a complete noob to engines, I own a lot of old stuff but you obviously have more experience with outboards than I do. am i missing something?

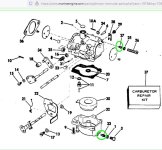
carb diagram.jpg
 
Find the description of item #33 and it is at the very bottom of the carburetor.----It is the high speed orifice ( jet ) , measures FUEL for full throttle operation.----And I believe #27 is the idle orifice and measures fuel for low speed operation.-----I do not believe there is an air bleed on that carburetor.
 
racerone, thanks for the heads up. glad to find that out before i started drilling anything. i can't find an orifice chart for this era 70hp anywhere, if you have any advice on what altitude adjustments are appropriate, i'd appreciate it.

pending other input, since it runs fine at idle I might leave the idle alone and try one wire in the high speed orifice and see if it leans it enough to act right at 3000+
 
Back
Top