Logo

270 outdrive removal, I think I screwed up!

pugetsounder

Advanced Contributor
I read the online manual instructions. It said to loosen the helmet nuts before punching out the swivel pins but it did not say to remove the them or the helmet. Well I turned the outdrive and punched out both swivel pins, one came out the other is pinned against the helmet and won't go any farther. I can't get at it punch it back and I can't get to the helmet fastener to remove the helmet. I priced out helmets and pins, not cheap! What are my alternatives?

I can grind the pin off and punch the shorter piece out. Is the pin some kind of hardened steel? Will it be difficult to cut/grind it? At least I can get to it. I noticed new pins have a threaded hole I think for extaction should I drill and tap one (if I can get to it) and try and use a bolt to extract it? Again is this pin some kind of hardened steel?

Or I can keep punching and chance breaking the helmet.

I know Volvo Penta is a good device but wow, what were those swedish engineers thinking? It should be easier to remove a drive than it is.

Thanks in advance.
 
All you had to do was turn the wheel one way for one pin and the other way for the other pin. Do what you gotta do to get them out now and Rick or I have what you need to replace at more than fair cost. Stand back survey the situation and go at easy with the least amount of carnage.
 
yeah I got that now. I spent the entire day yesterday trying to figure out what to do that hopefully didn't involve detroying one part or another. I think I'll try drilling and tapping a bolt into the pivot pin first if that doesn't work then its break out the grinder.
 
That pivot pin is stainless!!!! Good luck drilling and tapping. Can you reeach in and grab it with vise-grips and twist it back into the shield some? Just cut it somehow and I'll send you a pin if you want.
 
Do not try to drill and tap the hinge pins. You will make a mess.
If you want pins that are threaded, buy yourself a couple of 290 hinge pins. Same diameter/same length.

I've been doing AQ series work for 23 years or so. I never remove an entire drive.
I begin by removing the helmet pin, I raise the helmet up, then I remove the transmission only.
If the lower unit needs to be worked on, I remove it while the Intermediate housing remains installed.

This leaves the main suspension fork hinge pins free to come out in either direction by rotating the collar steering fork one way or the other for clearance.

Seldom do we need to remove the entire drive. On occasion I will if there's suspension fork or reverse latch work to be done.
Even so, the transmission is removed first.... and re-installed last.
It'll cost you two O-rings only.


If you break the helmet, you may also end up breaking the collar steering fork.
You'll pay more for a good used fork than you will for a helmet.
If you are still stuck, rotate the collar steering fork one way or the other. The hinge pin should come on through.

In the future, drive the hinge pins from the center outwards.

Keep in mind that these hinge pins are soft. If you drive on them with anything harder than an Italian bread stick, you will expand them, and they will
become stuck in the aluminum bores. Heat the aluminum ears and expand the aluminum some.

If you do re-use these, roll them gently against a circular sanding surface.
If you are careful, it will only cut the expanded areas down, and will bring them back to the original diameter.
Clean the bores out, and grease them when you re-install.


If you do end up removing the entire drive, I'd strongly suggest that you leave the transmission until last when going back together.
It will leave the area open for the shift cable attachment bracket, easier water neck fitting and S hose connection, and exhaust bellows will even be easier to install.

While attempting to hange the entire drive, you'll be dealing with hinge pins, female yoke onto the PDS splines, water neck and S hose, shift cable bracket, bellows manipulation..... etc. all at once.
Not fun!


Your call!


.
 
Last edited:
Boatdoc, thanks for the tip on the visegrips that did the trick. I was able to twist and pry gently and got the pin back in far enough to turn the steering fork. Then punched it out. A bit of smoothing with emery cloth and fine steel wool and they look like new.

Ricardo you hit the nail on the head, the reverse latch needs work. the only way I can see to do that was to pull the drive. Also replacing the shifter cable. And the water inlet neck is corroded and there was practically nothing left holding the rubber hose on! Glad I found that out before being out in the middle of nowhere. I figure three issues is worth pulling the drive over. Its also a good time to grease the u-joints while I have the drive off.
 
Once a person works on the reverse lock enough, anything can be changed out but the piece that the water tube goes though, with the drive still on the boat. Seeing how you're doing so much more, I can understand you removing the drive but the way Rick says to do it, is by far, the easiest way of removing the drive, especially when you get old and weak. Gotta do intermediate shaft bearings in a AQ V8 tomorrow, not really looking forward to it but it pays the bills.

Glad you got the pins out and now you learned a new trick. Clean the bores out real good and use lots of grease on those pins and next time will be easy. Don't forget to clean those pin keeper bolts and grease those also going back together.
 
Last edited:
Dumb question but what are bearing crosses? The manual I have seems like swedish translated and a lot of the terminology is quite different from what you guys are using. Also way different than Mercruiser terminology as well. I can remove and refurbish an alpha 1 unit in my sleep but these VPs are a different animal.
 
Dumb question but what are bearing crosses?

The manual I have seems like swedish translated and a lot of the terminology is quite different from what you guys are using. Also way different than Mercruiser terminology as well. I can remove and refurbish an alpha 1 unit in my sleep but these VPs are a different animal.
Forgive my being a stickler on terminology.

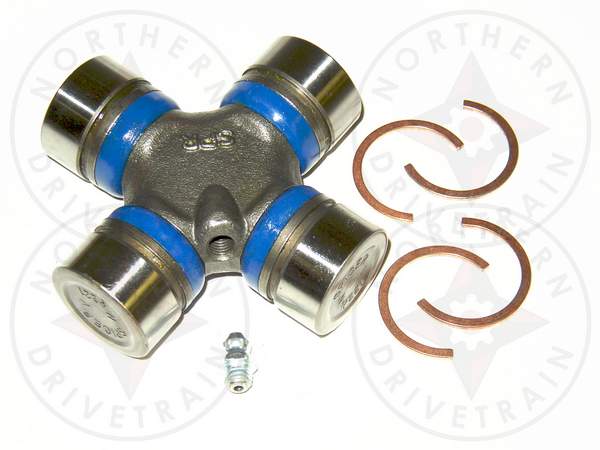
This is a bearing cross below...... commonly called a U-joint.
A universal joint is actually the sum of all components... (male and female yokes, the center section and the two bearing crosses.)

For about $15 each, you can buy a US Spicer 5-1306X bearing cross that is a direct replacement for a 270 drive shaft.


............. Its also a good time to grease the u-joints while I have the drive off.
How long since these were replaced?

In a car/truck, the drive line should be angled equally at the transmission and rear pinion gear. This is by design to cause the bearing cross to articulate and cause the trunions to rotate within the bearing caps, constantly changing positions.

In a Marine scenario, the trunion surfaces and bearing caps aren't changing positions quite the same. The needle bearings are pretty much loading the same area on the trunions, causing them to "point load" wear sooner than if in a car/truck application.


When I replace these, I usually see a wear pattern of about only 20 degrees wide on loadside of the old trunions.
(remember.... there's only one load side in the marine application)

The remaining 340 degrees (on the no load side) is pretty much new looking.
So when we feel these to check for wear, the 340 degree "good contact" tends to cause them to feel OK, but when under load they may cause a vibration.

For as inexpensive as these are, you may as well replace them.


.
 
Last edited:
Bearing cross, that's almost greek to me :)

U-joints look fairly new and in good shape move very smoothly. I greased them liberally. Drive bellows was dry with some grease residue which is good. No water intrusion or salt residue. The guy i bought the boat from would take it into the shop all the time for maintenance. He did say he had some work done on the outdrive just before I bought it.
 
Last edited:
Bearing cross, that's almost greek to me :)
I know, and you're not alone..... many call them U-joints. Heck, you can even do a search using "u-joint".

To me, these have been a "Bearing Cross" for as long as I can remember.... and I began doing mechanical work in the mid 60's.
My Father, my Grandfather, the older mechanics who I worked with, all called these a "Bearing Cross".
Over the years the term "U-joint" has become used in a misnomer fashion........ sort of like calling an Engine a Motor.


Like suggested..... you can lube the crap out of these, but if the trunions are worn from the needle bearings, the grease will do ZERO.

Your call! :D


.
 
Last edited:
Cross bearings: There is Old School and then there is Old As Dirt School, who am I to question such wisdom? I will change them out since the drive is off. Shouldn't take too long.
 
Yep.............. bearing crosses, cross bearings, spiders..... you name it.
Universal Joint is the sum of all components.
http://upload.wikimedia.org/wikipedia/commons/b/b5/Universal_joint.gif

From 4crawler.com
http://www.4crawler.com/4x4/CheapTricks/Images/uj-explode.gif

The universal (or u-joint) is considered to be one of the oldest of all flexible couplings. It is commonly known for its use on automobiles and trucks.
A universal joint in its simplest form consists of two shaft yokes at right angles to each other and a four point cross which connects the yokes.
The cross rides inside the bearing cap assemblies, which are pressed into the yoke eyes. One of the problems inherent in the design of a u-joint is that the angular velocities of the components vary over a single rotation.


There is a way to change the bearing crosses without removing the male yoke from the main drive gear.... of which involves removing the double bearing box from the main gear case.

If you index the yoke correctly, you will have the space to R&R the bearing caps.
The risk is in loosing a needle while doing so.


Transmission-web-303x219.jpg


The Spicer 5-1306X has the grease zirk in the apex of the cross.... (it will come without the zirk installed).
Do not instal the zirk yet, add grease to the bearing cap so you won't loose any needles.
Assemble..... and the extra grease will purge itself via the open zirk port.
Now install the two zirk fittings.

The grease that is inside of the hollow cross section will be centrifugally pushed into the needle bearings.
Add grease if you want to.


.
 
Last edited:
Everything is done and installed. It wasn't too bad installing the drive as one unit. The tilt lock works like a charm. New shifter cable is smooth as butter. Thanks for all the advice. I love these forums.
 
Everything is done and installed. It wasn't too bad installing the drive as one unit. The tilt lock works like a charm. New shifter cable is smooth as butter. Thanks for all the advice. I love these forums.
I'm glad that everything worked out for you.

Next time, and just for the fun of it, remove the transmission first, and re-install it last. It's much much easier this way!


Several years back I put together an AQ series Volvo Penta thread in the BOC vault.
If you are a member, take a look at it.


.
 
Last edited:
I'm glad that everything worked out for you.

Next time, and just for the fun of it, remove the transmission first, and re-install it last. It's much much easier this way!


Several years back I put together an AQ series Volvo Penta thread in the BOC vault.
If you are a member, take a look at it.


.

I tried to find the article Ricardo, without any luck...could you give us some navigational help please? Barry.
 
I tried to find the article Ricardo, without any luck...could you give us some navigational help please? Barry.
Barry, I'm sad to say that my BOC Vault thread is no longer functional!
The thread itself is still there, but most hyperlinks are now corrupt.

The BOC recently underwent reconstruction, including the migration from V-bulletin to Kenuna.
During the migration, apparently no one considered that these links should have remained active and functional!
I can't say whether or not this was an oversight, or disrespect to those of us Volvo Penta Bayliner owners.
Nonetheless, my hours and years of work have gone down the toilet.

It was suggested that I spend some time seeing if I could find these past threads, and reconstruct as much as possible!

I'm left with the thought:
I did it once, and I did it well! If no one cared then, why should I care now?

The best that I can offer today, is to help you guys on a one-at-a-time basis!


.
 
Last edited:
...that is such a shame...a shame for you of coarse as your efforts are nolonger accessible, but a bigger shame for present and future VP owners who have the inclination but not the knowledge to do basic jobs on their rigs.
 
Between your articles and rkcarguy's articles on these old VPs gone now. That's a lot of good info gone with the wind! Shame. I hope BOC can somehow bring back the links.
 
Back
Top