Logo

2004 BF200 overheating at cruising rpm

Randy Brunson

Contributing Member
I did a pretty extensive service over the winter including new impeller kit, replaced internal zinc anodes (mentioned because it involves taking the exhaust manifolds off), foot oil, and engine block oil. The boat has run great for several trips (including the weekend before), but this past weekend I was gearing up to take the family out and as I was running over to pick them up from the dock, the overheat alarm came on (about a 30-minute ride with a good bit of idling in no wake zones) while I was cruising about 3300 rpm. The alarm brought it down to "limp" mode. I turned it off and let it cool down for a few minutes. It cranked up fine and I tried it again, but after a minute of running on plane, it went off again and I turned around and limped back home. The engine has a very strong pee stream. It's a 2004 with about 1100 hours. I'm not aware of a time when the t-stats were changed.


  • My first thought is to go ahead and change the T-stats. I'm hoping it's this simple, but I'm just confused how a t-stat would be fine one Saturday, and then start acting up the following Saturday.
  • In other threads on overheating, there are mentions of a "pressure relief valve." I can't figure out where those are located. Can anybody elaborate on that?
  • Anything else I should be looking at? Like I said, I'm planning to change the T-stats and O-rings. I just wanted to check with y'all before I place my parts order.

Thank you.
 
The more research I do online, it seems like people with similar issues end up chasing issues related to oil pressure. However, I would assume that would be the oil pressure alarm indicator (green), right? My alarm was constant with the left-hand, red (temp) alarm light on. Should I be checking into anything involved with oil pressure?
 
On a four light key switch, the green oil pressure light should be on even when you have an overheat alarm.

The engine goes into limp mode (1800 rpm) for only two reasons. One is overheat. It will go into limp mode at somewhere around 200 F. If that is not remedied in 20 seconds, it will shut down. The second limp mode is low oil pressure. It will go into limp mode, but the engine continue to run at no more than 1800 rpm. That's according to the Helm Shop Manual.

The T-stats are pretty easy. They sit on top of each manifold and a have a triangular cover held in place by three bolts. When you remove the bolts, note which hole the long one goes into. Use new O rings. The T-stats should start to open at 140 F and be completely open (all of 3 mm) at 160 F. Test them in a pan of water on the stove and use a good instant thermometer to measure the temperature of the water as you heat them up. If one of them doesn't open, that is likely your problem. Also, when you remove the t-stats, check for obstructions and gunk in the opening where it sits. See: http://www.boats.net/parts/search/H...0A4 XA/EXHAUST MANIFOLD THERMOSTAT/parts.html

There are two pressure relief valves - one on each side of the engine main mount case. See item 7 at: http://www.boats.net/parts/search/Honda/Outboard Engine/2004/BF200A4 XA/MOUNT CASE/parts.html

I've never had to get into that, so I can't give you any advice on how to go about doing that. I suspect it's not easy.
 
Thank you, CHawk, for chiming in. I appreciate the advice.

All this digging around prompted me to go back to an email from wdneal (great guy, very helpful) from a couple of years ago when I was having issues that include the procedures for pulling fault codes and the alarm code meanings.

Buzzer Lights Condition
Oil Pressure Overheat MIL Alternator
(Green) (Red) (Red) (Red)
None ON OFF OFF OFF Normal
Continuous OFF OFF OFF OFF Low Oil Pressure
Continuous ON ON OFF OFF Overheat
Continuous OFF ON OFF OFF Low oil pressure & overheat

Seeing this, that Continuous Overheat (Red) on, with everything else off means "Low Oil Pressure and Overheat" concerns me, because that's the only light I remember seeing.

I've already ordered the T-stats, they're on the way. They do look like a simple change-out, so I'll plan to do that and pull the MIL codes while I'm there. Depending on what the fault codes show, I'll go from there. It looks like the 24, 25, and 26 MIL codes have to do with overheating and oil pressure. Once I get that figured out, I'll go from there.

Sound like a good plan? Any other thoughts?
 
Good plan. That green oil pressure light is often hard to see whether it is lit or not. Also, a serious overheat could thin the oil to the point where it drops oil pressure. Try to fix the overheat first, and see what that does to the oil pressure. Also, on the advice from my dealer and his shop, I have moved to 25W-40 oil.

BTW - I'm WDNeal. Thanks for the compliment.
 
Ha, you're welcome!

I can't believe that I forgot your forum name...(I'm the guy that was having fuel-related surging issues and sent you a video of air bubbles in the fuel line while running, if you happen to remember that...)

Anyway, I was very appreciative for your help, and appreciate your advice here as well. I will be sure to update with my findings.

I'm not sure what I'll do if the MIL codes come back with oil pressure-related issues, but I guess I'll cross that bridge when I get there.
 
Re: 2004 BF200 overheating at cruising rpm (Updated with Pics...)

Update: I was able to get over to the boat Saturday night and pull the T-stats. Here's how it went.

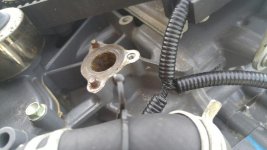
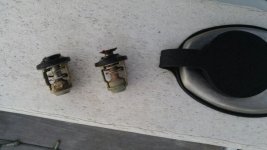
Pulled the starboard t-stat and it looked a little gunked up. On the port side, the o-ring seal was definitely compromised and two of the bolts broke off as I was trying to open the housing. The good news is, by the looks of the t-stats, it definitely seems like this has a good chance of fixing the problem. The bad news is that I've got to figure out a way to get these bolts out. I guess I'm going to get a screw extractor set and give it a try when I get a chance. Of course, I'll have to order some new bolts as well...

- Also, I tried to pull any error codes, but the MIL light stayed on continuously...no saved codes, I think?

Should I do anything in particular while I've got this stuff opened up? i.e. run a garden hose into the t-stat opening to flush things out? I did scrape off some salt crystallization and corrosion around that starboard housing, and some probably fell in...

I'll take any advice I can get...thanks.

T-Stat Housing Broken Bolts.jpgOld T-Stats.jpg
 
Last edited:
If the MIL comes on, then stays on, there are no codes in the EPROM.

It looks like the t-stat on the right is stuck open. The one on the left is badly corroded. Both should be replaced.
 
Bad News: I drilled out the broken off bolts last night and was working on them with a screw extractor set and ended up breaking off a screw extractor in one of the bolts. Basically, there is now a hardened piece of steel embedded in one of the bolts.

From what I can tell online, here are my two options at this point:

1. Try to drill it out with a carbide drill bit, and then maybe keep drilling out the bolt with larger and larger bits until there's only a little bit of material left and scrape/knock it out somehow. Of course, you would have to start with a perfectly centered hole, which seems unlikely. This would probably end up with having to re-tap the hole with a larger thread. How hard would that be to do? Is that a viable option?

2. Maybe call a machine shop and see if they can do anything for me. Of course, the boat is in the water and can't be run. I would have to tow it to the marina, pull it out, and bring it to them. This would be very difficult for me. Maybe they would come to the boat, but I'm sure that would be expensive.

Any thoughts or advice on the best way to tackle this problem?
 
That is a nasty problem! Been there, done that.

Was this a standard "easy-out" that broke off - the type where you drill a center hole and turn in the threads counterclockwise to get a grip?

Is any of the broken extractor above the surface?

If you can get the broken extractor out, I don't think there will be a problem with re-tapping that hole. I would first consider using a Heli-coil insert.

Some things I have done in the past in different situations. If the broken off extractor is right at the surface, or hopefully, a little above the surface - carefully chip out the metal around the broken extractor until you can get some vice-grips on it and try to work it out. A Dremel tool would be helpful here. Once out, you can rebuild the surface with some JB Weld.

If the end of the extractor is below the surface, get several of those Dremel grinding stones that are pyramid-shaped and start grinding away. You must keep the tip of the grinding stone square on the center of the broken extractor to prevent doing serious damage to the original bolt hole. It may take a long time, but it should eventually grind out the extractor.

I have had people suggest to use a good punch and bang on the extractor until it cracks. This supposedly works because they are hardened steel, but very brittle.

Also, back in the fog of my memory, I recall that someone makes a special drill bit for drilling out broken off extractors.

Hopefully Jimmy (JGMO) will jump in on this problem.
 
Thanks again, CHawk.

I started calling around to see if I could get some advice on how to tackle this from a machine shop. The first guy I called mentioned the helicoil kit, which I had never heard of, but it sounds like a good way to go.

If I had to get to guess, I would say the broken off extractor (left-hand threaded EZ-Out, hardened steel type) is broken off about flush, or a little under the mounting surface. The machine shop guy mentioned coming at it with a carbide drill bit and taking it slow to drill it out.

Once I get the extractor piece out, I still have to figure out how to get the old bolt out, and I'm not sure how.

I'm thinking I'll try the carbide bit (I can borrow a Dremel if necessary too), then increase my bit size until I can't go any bigger before hitting the original threading, and then use the bit that comes with the helicoil set to remove the rest of the original bolt bore a hole for the heli coil insert. Does that sound like a good idea.

Also, does anybody know the thread size on these bolts, so I can get the right kind of insert?
 
Once the extractor is out keep drilling to the bottom of the bolt. Remember their is one both longer than the other two so you need to figure out which one you are dealing with. Then use ever larger bits to drill out more of the bolt until you can get the bit for the helix coil.
 
I need to correct my last. On the port side of the engine, all three bolts are 6 X 35 mm. On the starboard side one of the bolts is 6 X 35 and two are 6 X 60. From the diagram in the Helm manual it looks like the 6 X 35 is the top most bolt, furthermost from the outlet.

I have a call in to a friend who is a retired AF aviation mechanic and I will see what he recommends to get that broken extractor out.
 
Friend called me back. He says the way he has done it in the past is to use a small punch on the top of the broken off piece and tap on it to back it out. Probably tedious, but should work. Use plenty of lube like WD-40.
 
Thank you, CHawk.

I was on a family vacation over the weekend, so I was unable to work on it. However, I will try the punch you mentioned, and I've grabbed some carbide drill bits, and ordered a 6mm helicoil set.

I will update the thread once I've given it another try.
 
It's hard to tell whether he is talking about # 8 or F-9. The items labeled F-9 appear to be the tubes that feed directly into the exhaust tubes that are attached to the oil pan - the ones Service Bulletin # 56 discusses changing out.

Item# 8 appears to be a water relief tube. I'm not exactly sure what it does or whether if it gets clogged, it would cause an overheat.

The water flow diagram is at the beginning of Chapter 8 in the Helm manual. It's very difficult to follow.
 
Thanks for the feedback, CHawk.

I hope I don't have a problem with either of those tubes. I'm a little nervous that when I replaced those internal anodes over the winter, something didn't go back together properly when re-installing the exhaust manifolds. I ran the boat several times in the Spring after doing this and it ran well. I think I'm going to get some time on Saturday to work on those broken bolts and hopefully get the new t-stats in, put it back together, and test it out. Hopefully those were my problem and I'll be good to go. I'll update the thread to let everyone know it goes. Thanks.
 
Update:

I got one of these

https://www.amazon.com/Broken-Extra...TF8&qid=1498477256&sr=8-1&keywords=rescue+bit

to screw out the broken extractor. It did a good job and I had that thing drilled out in about 5 minutes. After that, I moved in small increments in drill bit size to remove the old bolts. Finally, I used the 1/4' bit that came with this Helicoil set:

https://www.amazon.com/gp/product/B0092QUUY4/ref=oh_aui_detailpage_o00_s00?ie=UTF8&psc=1

It removed the last bit of original bolt and drilled out the original hole a little bigger. For anybody that's never used a helicoil set (I had never heard of them before going through this fiasco), you then tap the drilled out hole, and screw in an insert that has the same size threads as the original hole on the inside. It worked like a champ.

After that, I replace the t-stats and o-rings and put everything back together. I was able to run the boat for about 2.5 hours at various speeds, idling up to cruise rpm, with no problems. I feel pretty good about it, though there were a couple of times when the water coming out of the pee hole seemed pretty hot, like hot bath water. Most of the time, though, that water was barely warm.

Anyway, if anybody finds himself in a similar situation and is pretty much out of options, I do recommend that Rescue Bit and helicoil set. Thanks to everybody, especially CHawk, for all the advice!
 
GREAT TO HEAR THAT. Thanks for the link to the extractor drill bit. No wonder that can charge $50 for it. Happy boating.
 
Back
Top