Edchris177
Regular Contributor
I picked up this little 6hp for the cost of a couple 6packs of good beer.
Had no idea if it ran, but I could use some of the parts.Racerone advised to spend NO money on a 50 year old motor til I’d ascertained it’s bones, so with his mentoring I put my limited Outboard knowledge to work.
Compression was 85psi, both sides, I’ve been told 80 is fine for these motors
The starter slow to retract, but I found the plastic pinion gear on top was mashed up & binding the flywheel.
A few minutes with an Exacto knife made it workable, but I’ll change it.
Was getting intermittent spark in one cylinder. Changed out top plug wire, as it showed very high resistance.
Made a new one using some spare wire cored ignition cable from an ancient John Deere lawn tractor- (serial #87).
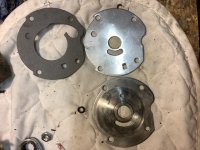
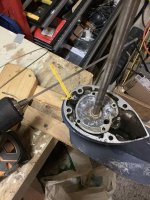
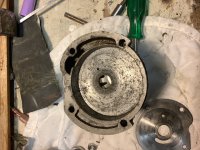
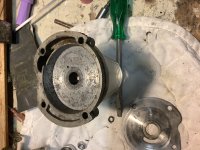
Pulled flywheel, coils were new, points looked good, cleaned them anyway.
Set points to .020 as a starting point, then timed it as per Racers instructions, (by using an ohmmeter, & just lifting off the flywheel to adjust points so they opened when the flywheel mark was centered between the two marks on the stator plate). No need to buy the timing tool.
Discovered one condenser was bad, borrowed one from an old motor, & now have good spark on both jugs.
Carb was full of grunge, suspect old fuel left in. Disassembled & cleaned everything, used the old gaskets for now, found a couple packing washes from a previous carb job that didn’t need them.
It didn’t start well, needed a shot down the carb throat, but ran intermittently once going.
Here I made a mistake. Thinking it was a bad fuel pump, (it would “usually” run if I pumped the primer), I pulled the line from the pump to the carb, then pulled the starter- it spit good pulses of fuel, leading me to believe the fuel pump was OK.
I changed the fuel lines as they were rock hard, & loose in the barbs.
Today, I pulled the fuel line off the carb, & gave it a suck/blow test. I can easily blow air in both directions through the pump, idiot, I should have done this earlier.
Swapped a pump I scavenged off a scrapped motor, Weather warmed up today, so I put it in a barrel- Buenos! It started, & seems to run OK.
I left it for half an hour & it just chugged away.
Using a mechanic stethoscope all around, I don’t hear any knocking, or other unhappy noise.
Seems my 50 year old timing light doesn’t work, not sure if it can be rebulbed, so I could check exact timing.
It runs cold as I pulled the thermostat- it was stuck closed.
So far I have $30 into it, I’m leaning to buying the required parts, & make it into a fishing motor.
https://youtu.be/x_vJL2NK1gA
Had no idea if it ran, but I could use some of the parts.Racerone advised to spend NO money on a 50 year old motor til I’d ascertained it’s bones, so with his mentoring I put my limited Outboard knowledge to work.
Compression was 85psi, both sides, I’ve been told 80 is fine for these motors
The starter slow to retract, but I found the plastic pinion gear on top was mashed up & binding the flywheel.
A few minutes with an Exacto knife made it workable, but I’ll change it.
Was getting intermittent spark in one cylinder. Changed out top plug wire, as it showed very high resistance.
Made a new one using some spare wire cored ignition cable from an ancient John Deere lawn tractor- (serial #87).
Pulled flywheel, coils were new, points looked good, cleaned them anyway.
Set points to .020 as a starting point, then timed it as per Racers instructions, (by using an ohmmeter, & just lifting off the flywheel to adjust points so they opened when the flywheel mark was centered between the two marks on the stator plate). No need to buy the timing tool.
Discovered one condenser was bad, borrowed one from an old motor, & now have good spark on both jugs.
Carb was full of grunge, suspect old fuel left in. Disassembled & cleaned everything, used the old gaskets for now, found a couple packing washes from a previous carb job that didn’t need them.
It didn’t start well, needed a shot down the carb throat, but ran intermittently once going.
Here I made a mistake. Thinking it was a bad fuel pump, (it would “usually” run if I pumped the primer), I pulled the line from the pump to the carb, then pulled the starter- it spit good pulses of fuel, leading me to believe the fuel pump was OK.
I changed the fuel lines as they were rock hard, & loose in the barbs.
Today, I pulled the fuel line off the carb, & gave it a suck/blow test. I can easily blow air in both directions through the pump, idiot, I should have done this earlier.
Swapped a pump I scavenged off a scrapped motor, Weather warmed up today, so I put it in a barrel- Buenos! It started, & seems to run OK.
I left it for half an hour & it just chugged away.
Using a mechanic stethoscope all around, I don’t hear any knocking, or other unhappy noise.
Seems my 50 year old timing light doesn’t work, not sure if it can be rebulbed, so I could check exact timing.
It runs cold as I pulled the thermostat- it was stuck closed.
So far I have $30 into it, I’m leaning to buying the required parts, & make it into a fishing motor.
https://youtu.be/x_vJL2NK1gA
Last edited: