Logo

BF20 (20hp) Choke Cable Install

alumarine

Regular Contributor
Hi there, I will be installing a new choke cable on a friend's 2006 BF20 (20hp) serial BAMJ-1302613.
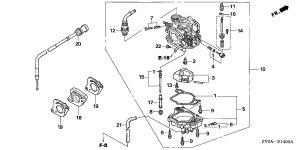
Part Number 17950-ZY1-003. It's ref number 20 in the attached diagram.
I believe it attaches somehow to ref number 12 in the diagram.

I don't have a service manual. Is it a straight forward install?
If not, I'll pick up a manual.

thanks

carb image.jpg
 
Hi,
Yes, the cable attaches to item 12.

Item 12 is the valve that opens and closes the start enrichment circuit.

Item 12 unscrews from the carburetor but I have found that it's best to remove the carb to do what you want to do or to replace the valve.

There's very little to no clearance to "swing" the cable around while trying to unscrew or screw in the valve. And, it is very difficult to try to remove or install the cable while the valve is mounted to the carb.

Also, it is pointless to try to install a new cable into a used valve that has a damaged "boot'. The boot helps keep the cable in place and working correctly.

When I was doing these on a regular basis I got very frustrated trying to insert a new cable into a used valve assembly and found it much easier and, ultimately, more cost effective to buy the valve and boot assembly already mated together. I believe that if you buy a new valve it comes preassembled with the cable and only costs a few dollars more. Although, the parts diagram doesn't make that clear so maybe they have changed the way package them these days. Not sure.

Another reason I liked doing that is because the plastic threads on those valves are fairly delicate and engine vibration, along with the pulling forces the cable exerts on the valve, can cause the valve to not be firmly anchored to the carb. That will adversely effect the operation of the "choke". As a matter of fact, I found that torn valve boots and bad valve threads to be the two top reasons for the enrichment system not to work and cause cold start complaints.

As a last "gotchya" it is fairly easy to overtorque the valve and ruin (strip) those threads right out of the box. So keep that in mind as you work on this thing.

Good luck.
 
Thanks for the detailed reply. That will certainly help.
I had my friend place an additional order for a couple of carb gaskets as well as item 12. No harm if it includes the cable.
I'll be careful to not over tighten the valve fittings.

So, inside the carb Item 12 is not attached to anything? It just comes straight out?
It sounds like it's not a choke per se? I notice that's it's not at the front of the carb.
 
Removing the recoil starter is "the book" method and you could do it that way if you so choose. But I think you will still find the intake housing will be in your way as you attempt to rotate the valve with the cable attached.

As to your question about what is attached to the valve or if there's a "suprise' waiting to jump out as you lift it out of the carb, the answer is no. Actually, the "valve", per se', is actually the end of the cable. The "valve" part is really nothing more than a guide for the cable. That's why the cable and "valve assembly" come mated together when you buy the valve. Because, without a cable, it isn't a valve at all.

You are correct, there is no "blade" in the carb throat to act as a choke. This system utilizes an "enrichment passage" that pulls additional fuel from the bowl to "fatten up" the mixture during cold start.

The little "barrel" at the end of the cable opens that passage when the cable is pulled and closes the passage when the cable is pushed in.

That's why the relationship between the housing, curved cable retainer boot and the carburetor housing is so critical. Any looseness will result in poor or no control of the enrichment system.

If the cable end isn't held firmly in the down or closed position, the mixture will always be rich and possibly too lean for cold start because there is looseness in the valve assembly.

If you choose to replace the cable only, I think you will find it frustrating and unsuccessful in the end. Believe me, I tried it a few times and used methods like trying shrink wrap to patch the boot and Loc-Tite to reinforce the threads. All with little to no success. I finally realized that replacing the whole assembly was the best way to go.

Your experience and deftness may get you a bettrr outcome but that's my opinion on this.

Good luck.


Great info, it makes sense now how it works.
I will take the intake housing off for sure. I think Honda calls that the muffler housing?
We won't have a new gasket that goes between the housing and the front of the carb but I'm thinking that should be good enough to reuse.

thanks again
 
Yes, the intake is called the muffler. You might want to smear some quality gasket maker on the old gasket to ensure a tight seal.

As to taking the muffler off, Honda did an unfortunate thing by encapsulating brass nuts into the plastic housing and then using stainless bolts with a threadlocker. This often can result in the housing cracking as you try to loosen the bolts.

I found that using a quick, snapping action to initially break the bolts free will result in less housing damage. I've even considered using an impact gun but have never tried that.

If you do crack the housing, I recommend that you NOT replace it but simply repair it using a good quality epoxy. Cracking the housing only results in the brass nuts becoming loose and making the housing more difficult to get tight. It doesn't effect the way the engine operates at all.

Also, when you open the muffler housing you may likely find the round flame arrester screen lying at the bottom. The engine vibrations tend to cause the screen to rub against the small retaining "nubs" molded in to hold it and, eventually, they wear down. You can also use epoxy to remedy this too. I like to drill a small hole or two in the plastic to provide an anchor point or two when repairing these plastic parts. The results, if done with care, will be a part that is WAY better than it left the factory.

Good luck.


More good info!
I had the owner remove the outer housing so not sure if the housing is cracked. Will take a look and epoxy if needed.
And, as you mentioned the flame arrestor screen had worked itself loose.
We'll follow your advice for repairing that as well!
 
Update, got the parts yesterday and got the choke cable installed.
Put it on muffs and it started on the first pull so I guess we did something right!

Once we got the choke cable assembly removed it made sense how it works.
Glad we bought the entire assembly as suggested.

Also, as suggested we undid the 2 carb bolts so we could move the carb over to give us room to access the fitting that goes into the carb.

We epoxied the flame arrestor screen in place.

The hardest part was assembling the new choke cable to get it ready for the install.

Thanks for all the help!
 
Back
Top