Logo

Remove Steel bolt from aluminum crankcase.

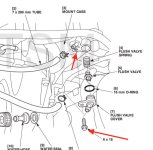
The flushing system on the 2004 Honda 150 I have was never used by the previous owner and the flush valve must be frozen, water will not go through.

My docking situation will not allow me to flush with muffs, which I would much prefer, so I have to get the flush system working.

I cannot remove the 6x16 steel bolt holding the flush valve cover in place, after 16 years it must be frozen to the aluminum crankcase.

I've tried heating it as much as I am comfortable, soaked it with Kroil every day for a week, hitting it with a hammer and steel rod, and still it will not budge with a 6pt socket.

Any suggestions to remove the bolt, or another flushing option it it can't be?

thanks,

Rob


attachment.php
 

Attachments

  • Screen Shot 2022-05-05 at 12.51.17 AM.jpg
    Screen Shot 2022-05-05 at 12.51.17 AM.jpg
    87.3 KB · Views: 65
What makes it worse is that housing is plastic.

What makes you believe that the valve is stuck? Have you tried to get it to release with air pressure? Have you disconnected the short piece of rubber line that leads from it to see if the blockage might be downstream from the check valve?

I'm not REAL sure, but I think that whole arrangement could be eliminated? It's just a check valve at the end of the line, so internal water pressure isn't pumped overboard. If that is the case, you could disconnect that rubber line that that leads back to the elbow in the block. Then install a hose with an on/off valve and whatever fitting you require on that elbow that goes into the block. Not QUITE as neat as the Honda arrangement, but just as functional. Best of luck!
 
Last edited:
I have not checked downstream, a Honda mechanic says the check valves always get jammed up when not used regularly. I know that when I coonect a the fresh water hose to the fitting it blows off from back pressure.
 
Well, if the housing is actually plastic, (I don't know one way or the other) it's amazing that the bolt is stuck like that.

If it's aluminum then you've already tried what I would have tried except...
....my experience with Aero Kroil is that it can take a loooong time to "creep" into a joint. I have waited 2 months for it to work in the past but it really is "the oil that creeps"....very slowly.

You might just want to put some inside the flush valve passage and see if the valve loosens up while you're waiting and trying the air pressure thing. That might also get the Kroil more access to the bolt threads.

Just DON'T get impatient and bust that $800 case!

I know....
.....I know....
....I didn't have to tell you that;>)

Good luck.
 
The housing is plastic, not the crank case.
I sprayed a good deal of Kroil into the valve at the end of the season but the motor was down so gravity wasn't on my side.
Last week I raised the motor and flooded the valve with Salt-Away to see if that helps. If not I'll flood it with Kroil for a few days.
Any chance compressed air can blow a tube or fitting down line?
 
There are 2 rubber lines involved. The first (the inlet side) leads to you garden hose. If I've understood properly, you already know that one can/will blow off. The other is a short section leading to an elbow 8" or so to the rear of what you are working on, and it's fastened to the engine block. That's on the outlet side of this valve.

I would suggest you remove that "outlet" section of hose prior to messing with the valve, whether using water or air.

That will eliminate any chance of hurting anything downstream, AND it will verify if it's the check valve causing your problem, or if the problem isn't actually further downstream....
 
Hmmm, I don't know about how much pressure to use since I don't know the larger outboards.

I think Alan might have your solution though. If you can get in there with a cut off wheel on a Dremel you could slice the head off of the bolt. I wouldn't risk snapping it off with force because of the risk of damaging the case. You also need to cut slowly and let the heat dissipate so as not to damage the plastic cover.

Once the cover is out of the way a judiciously placed center punch to start and then drill and tap. Start with a very small pilot hole and then step up the drill size in increments if possible.

This is where I would be using my left hand cobalt twist drills because, sometimes, they will "catch" the bolt and, together with all the heating and banging and Kroil you've applied so far, it might just give up and back out of there.

Hope you get it.
 
Back
Top