Logo

Mercruiser 3.0 Spark at coil but not at spark plugs

Boatguy97

New member
Hello Boater’s, I recently bought a 1999 Stingray/mercruiser 3.0 in good running conditions but needed a floor replacement. I decided to pull the engine and replace every single gasket, oil pan gasket, head gasket, oil seal, carb kit, etc.. Inspect every single wire, connection, etc.. Long story short, I have the engine ready to put back in the boat, but want to bench tested to make sure there no leaks, here is my problem. I have 12.5 volt everywhere, on the starter, on the solenoid when switch is on the on position, on the purple wire at the coil, on the plug going to the distributor, also have spark on the coil wire but not spark at all to the spark plugs. in a nutshell, I have spark going into the distributor but is not coming out to the spark plugs, I took the cap and rotor out, test for 12v on the ignition module and it has 12v when switch is on (not sure if that mean is good) also had triple check the timing, every single time #1 piston TDC on the compression stroke, rotor facing #1 wire, etc.. also 210psi in each cylinder. Not sure what to do next. Need help
 
Ayuh,.... The path of the spark is from the coil, into the distributor center tower, through the rotor button, out to each plug wire to the spark plug, to ground,.....
So,..... it could be the dist. cap, or the rotor, or the plug wires, or the plugs, or no block ground,....
 
How did you test for spark at plug wires?

The spark going to plug will not jump a conventional spark checker where the gap is ~ 1/2"

Insert plug into spark plug wire wire, ground threads and recheck
 
Ayuh,.... The path of the spark is from the coil, into the distributor center tower, through the rotor button, out to each plug wire to the spark plug, to ground,.....
So,..... it could be the dist. cap, or the rotor, or the plug wires, or the plugs, or no block ground,....
Everything is new, cap, rotor, coil and starter solenoid. All quicksilver brand. (I’m aware some stuff just bad out of the box) And ground is good.
 
How did you test for spark at plug wires?

The spark going to plug will not jump a conventional spark checker where the gap is ~ 1/2"

Insert plug into spark plug wire wire, ground threads and recheck
I use one of those spark tester with light in the middle. Im
Not sure what to do next. How exactly is that about “ground threads” to recheck?
 
I have to ask, If you do not understand how to ground something, do you really understand what you are doing?

Anyway,

Spark plug 101

The spark plug is a device/component that takes a HIGH voltage of ~ 20.000 Volts from the spark plug wire and transfers it to the insulated tip in the center and then a spark jumps to the electrode (electrode being the ground or battery - ).

Now that we understand the basic principle of the function lets do

Electrical 101

When you want DC (Direct current) electricity to flow from the source Battery + to the end location (load) you need a couple of things to do that effectively.

Resistance (Load) and a ground path.

As with the Battery which is the source of the electrical power/current you have Battery + (Power) and Battery - (Ground)

The ground of the battery is also connected directly to the engine BLOCK by BLACK wires so the engine block is considered a ground (Battery - )

Back to the spark plug,

If you noted earlier, the ELECTRODE is the ground path so the high voltage jumps from the insulated tip to the electrode.
The electrode if you look, is part of the threads of the spark plug thus the threads are also part of the ground, thus when one screws a spark plug into the head and the head being part of the block thus it is part of the ground path (Battery - ) then the threaded part of the spark plug once screwed into the head creates the ground path allowing the spark to jump.

OK so we now have the basics explained,

Take one of you spark plugs, Insert the spark plug wire side tip into the spark plug wire,
Get a 16 gauge wire maybe 4-6 ft long, strip about 1-2 inches of the insulation away on each end, Attache one end of wire to a ground, Battery - or some other good location you are sure is well grounded.
Now wrap the other end of the wire around the spark plug threads, Wrap it with some electrical tape to keep it from unwrapping.

If you have alligator clips you can use those instead of just stripping the wire ends. Basically making a Jumper wire.

Now that you have grounded the spark plug.

Find a safe location for the spark plug to rest away from fuel but in a way you can watch for spark at the electrode. You can hold the spark plug with a large pair of pliers but remember there is ~ 20,000 volts running thru the plug so be sure the pliers are well insulated.

Once you are ready to check for spark, Crank engine over with the key switch and watch spark plug end and see if there is spark.

If you see a blue spark jumping from the center point of plug to electrode, you have spark
Well, this might sound contradictory, but my english is not perfect and sometimes I dont get the meaning of things right away. I do know what ground is, matter of fact when all connections are done, to test for good ground, you connect one end of a wire to battery negative, and the other end to any metal in the engine, and if you dont have a good ground it will spark, and mine doesnt spark which mean ground is good. I have strong feeling the ignition module is my problem.
 
Lets start with more information.
Do you know what ignition system you have?

My manual says EST (Electronic spark Timing)

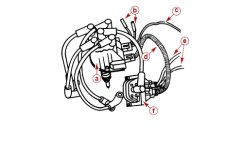
Does it look like this?

111.jpg

What is the ignition module you refer to?

Pictures will help a lot
 
Hello Boater’s, I recently bought a 1999 Stingray/mercruiser 3.0 in good running conditions but needed a floor replacement. I decided to pull the engine and replace every single gasket, oil pan gasket, head gasket, oil seal, carb kit, etc.. Inspect every single wire, connection, etc.. Long story short, I have the engine ready to put back in the boat, but want to bench tested to make sure there no leaks, here is my problem. I have 12.5 volt everywhere, on the starter, on the solenoid when switch is on the on position, on the purple wire at the coil, on the plug going to the distributor, also have spark on the coil wire but not spark at all to the spark plugs. in a nutshell, I have spark going into the distributor but is not coming out to the spark plugs, I took the cap and rotor out, test for 12v on the ignition module and it has 12v when switch is on (not sure if that mean is good) also had triple check the timing, every single time #1 piston TDC on the compression stroke, rotor facing #1 wire, etc.. also 210psi in each cylinder. Not sure what to do next. Need help

When you check the spark from the coil use a spark plug at the end of the coil wire. If the spark is snappy and blue and fast while cranking the engine, then there is nothing wrong with the module. The problem is the cap and or rotor. I don't care if it is new, there is a leak.
 
Hi

Just to add to what Chris mentioned.

Many years back while working for a Mazda dealer, I replaced a cap and rotor on a car as part of a tune up.

The car wound’ t start.

It had spark at the coil but not at the plugs.

Turned out the brand new rotor I installed had pinhole in the plastic beneath where the brass arm sat above the distributor shaft.

As a result the spark was traveling thru the rotor and grounding to the shaft.

No chance for the spark to make it to the plugs.

Jon Allen
 
Got it running! It was the ignition module. Ordered, got it today, installed, checked spark and bingo. 5 min later engine was running on the bench. I do have another question/issue not sure if here or new thread but thank you to every single one of you that posted on this thread… Here is my new question, when I installed the riser, I used the old gasket, remember this is a bench test, after it cooled down I went to install the new gasket and notice that the exhaust manifold has 4 water passages and the riser has 3, is this normal? Remember what I state in the original post, I bought this boat in good running condition, took it to the lake for about 25 min and ran good, no overheat. But this manifold/riser thing is a concern. Look like someone on the past replaced the riser, but is this ok? Wanted to post pictures but dont know how.
 
Back
Top