Logo

1965 9.5 HP Johnson MQ-11C - Rough Idle Help

Got all fuel lines replaced. Tank tested and engine ran much better than it has previously. However, at very slow idle, still coughs. If I pump the bulb (which feels pretty stiff), coughing smoothes out. It's gotta be the delivery of fuel from the tank to the motor. The motor is definitely running well enough now to use, so I think I'll do a "load test" with a different hose/tank in the coming weeks. Thanks to all who have contributed....I really appreciate it.
 
Here is a quote from an earlier post, what do you think?

"When you idle it down and lean the low speed needle, does it "sneeze" on you? What's your mixing ratio? I have a dozen of these 9.5's around. Love 'em. I mix 64:1 on Amsoil Saber, or 100:1 Pre Mix Amsoil, but mixed at 64:1. Make sure crankshaft seals are good. If the seal will suck air, it will cause the motor to "sneeze" as well. Usually the result of ethanol fuel use. This motor uses rubber composition crank seals both top and bottom. Upper seal is most often the first failure. As Racer has mentioned in other posts, the seal will also spit out oil/fuel mix, and you will have signs of oil under the flywheel and often spilling on the block".

Quote from Brupp:
"I just went through the same thing this last summer with one of those motors. I did all of the same things, carburetor kit, new spark plugs, tune-up kit, impeller, lower unit seals. The whole 9 yards. I also had to do a fuel pump overhaul as the diaphragms were rock hard and the check valves were shot as they wouldn't seal properly. After I did all of that it would start up and run 100% better than when I first got it. But I had issues at idle it wouldn't idle smooth and would cough and sneeze and then die out. If I richened it up it would no longer cough and sneeze but I couldn't get it to idle down low. So then I pulled the power head off to check the crankshaft seals. There was no oil residue around the top crankshaft seal and both of them felt nice and soft and look like they were making a good seal around the crankshaft. But I changed them anyways being I was that far into it and put the whole works back together. Then I took it back out on the lake and tried it out. That is one of the nicest idling motors I have ever used! It idles down just as nice as my dad's 1959 Evinrude 3 horsepower. It will idle down so low and so smooth the boat doesn't hardly move in the water. You can barely hear it running. Not says the seals are shot, but they will be eventually.. just my $0.02...."
 
Last edited:
Update......after replacing all fuel lines, I got the motor to run pretty well in my tank. I also tested that it would go into F/R gears and back to neutral. My father in law took it on a test run to the lake and reported back to me that it started on the 3rd pull, ran pretty well, so he went about 50 yards and it jumped out of gear (as he throttled it up). He then wore himself out attempting to restart it, but couldn't (I'm thinking he flooded it). So, I've pulled off the lower gearbox and found the pinion gear has some teeth broken as well as forward gear. Reverse looks OK. Unless someone has other ideas, I guess I'm now looking for OEM part nos. 307752 (pinion) & 378179. Anyone have a parts motor they'd like to rob from? I can go to ebay, but that's always sketchy. Thanks!
 
There is more to it.-----Pull the driveshaft.-----Inspect shaft bearing area above pinion gear.----Inspect bushing above pinion gear.----Inspect forward gear bushing.-----You may need a seal kit.-----Any water in this lower unit ?-------I have parts motors.-----Have a brand new ( in factory primer ) gearcase too ---No shaft in it but I have those as well.----Your location ?
 
Driveshaft is removed....some grooves and inconsistencies (any ideas on how to get smooth?). I didn't see a bushing above the pinion gear....it was just attached to the end of the shaft (shaft looks tapered to hold it?) and no key....Definitely will need a seal kit (this comes with bushings, right?), but not going to order until I know more what I'm into with these gears. There are also some grooves on the propeller shaft where gears were attached....again, suggestions for smoothing? When I got this motor, I noticed right away no gear oil....when drained, some water came out....some rust is present inside the housing as a result. My location is Clinton, Tennessee 37716. Thanks!
 
There is a bronze bushing cast into the housing.----Not replaceable.-----Sounds like someone was into it before.----From many years of experience I say that you need a complete gearcase.-----A parts motor from 1964 to 1973 model 9.5.-----Or even a 62 or 63 model 10 HP can be used by changing driveshaft and shift rod.----Since motor does not start now you might check for spark.----Perhaps flywheel key sheared during the " jumping out of gear " event.
 
Last edited:
I think if you check it closer, you will find the bushing above the pinion gear is worn. That is why the gears stripped. The bushing is cast into the gearcase, not replaceable.
 
ugh...sounds like I'm F'ed.....Racer, how much for you to turn loose of that gear case you spoke of? Can I "smooth" my driveshaft, or do I need that too?
 
Sorry----I am across the border ( north ) shipping would be the issue.-----I believe you can find a good parts motor locally to you.----Find ----aomci----website.-----Find a local member .----Find a local swap meet.-----Often you can find good parts 9.5 HP for less than 100 beer tokens.----I picked up a low hour 1963 10 HP for $60 US a few weeks ago.
 
I understand the shipping issue....thanks for trying. Can you provide any comment on the driveshaft and prop shaft issue I raised?
 
I am familiar with the scoring of the shafts.------I myself would not use them.-----But oil and the way it WORKS in those bearings is much miss-understood.-----Every one works to different standards.-----Do what is best in your opinion.
 
Ebowles, give this place a shop before you check "Feebay". Not sure what shipping would be, but I have gotten parts from them, they are great! Nice folks and very helpful. They may have a complete bottom end for ya.

TIM'S OUTBOARD518 County 5 NW, Hackensack MN 56452
phone:*218-682-2331*fax: 218-682-3526
email:*[email protected]
 
The broken teeth / scored shaft is quite common.----So I suggest you get any lower unit you are interested in to be taken apart for inspection.-----Only buy good parts and say you will put it together again..----They are easy to put back together !
 
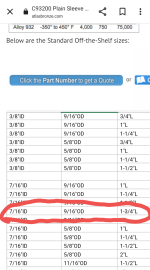
Here's what I do if I like the housing. I ream the bushing bore to 9/16-in and install an alloy 932 bushing. Just have to make sure your centered, set it up on the drill press. This is a very good alloy, bushing cost: 10 bucks. Saves alot of trouble. This will outlast OEM. Don't forget to drill lube opening 1/8".
 

Attachments

  • Screenshot_20220411-125058.png
    Screenshot_20220411-125058.png
    244.3 KB · Views: 9
Was at a----" wannabee an outboard repair shop / place " ---one time.----Owner asked me to diagnose a problem with a 9.5 HP.-----Tough to turn the flywheel.-----Quickly removed lower unit and flywheel turned easily.-----Then he told me he had a new bushing installed above the pinion.-----Local shop had no idea that the bushing must be in the right place !!
 
Thanks guys....timguy, by the time your suggestion arrived, I had already contacted Tim's Outboards and they have a shaft and housing they're shipping me. Given the low cost solution you posed, I intend to attempt drilling out the bushing and replacing as per your suggestion......if nothing else, I'll learn something or, even better, end up with a spare housing for 10 bucks! Looks like you use Atlas Bronze as the supplier of the bushing?
 
Also, I'm sure this is a dumb question, but once I get the housing reamed for the new 9/16 in. OD bushing, do I use some kind of adhesive to keep it in the hole? And (I know this is a dumb question) what do you mean by drilling 1/8 in. lube opening? Sorry in advance.
 
Not sure on my size here, I'm doing a 6 hp now and this is the size for that. Atlas is good, just give them your Federal tax number if you have one. Might not even need one.
The hole is for oil movement through the bushing, you can see it from the bottom. Something like JB weld can ensure the bushing will stay in place. 32 years ago I "glued" a pinion bearing race in my 59 Chevy truck, which had started to spin in the casting. That rear end has made 6 trips since then through the Rockies and Cascade mountains, while hauling giant loads in that 'ol 1 1/2 ton. Still great never had a problem. You loose a gear going down the back side of the Rockies with an old truck and drum brakes, your gonna be a sorry fella. Trust my life to JB, when applied properly.
 
Hello Gents.....so, I received my new (used) lower unit housing & skegg from Tim's Outboards. I also bought a new (used) set of LU gears from another source. I have the new seal kit and am now ready to reassemble. Here's what I've discovered.......one of the housing pins is basically flush with the housing, so the indent on the forward gear won't index....on the propeller end, I can't see that a pin ever existed at this location. So the question becomes, how critical are these housing pins in allowing the gear box to work properly? Seems to me as though the worse case is the forward gear bushing may want to "spin", although I don't see how it can much given the friction of the fit alone. Thoughts and suggestions appreciated as always.
 
The pin for the forward bushing is there to orient the bushing for proper lubrication / oil flow.----So drill another hole for a new pin.-----Problem solved.
 
As always Racer, thank you for your response....and, as usual I have a couple of questions/clarifications......first, after reading closer in the old manual, it appears that the bushing closest to the prop never had a pin...it has the "protrusion" as per the manual, so we're good there. On the other end (forward gear), it definitely has a pin (it's just flush to the housing). When you refer to the "forward bushing", are you referencing the bushing closest to the prop or the opposite end? Also, if I have to drill out and reinstall the pin closest to the forward gear, where can I get a proper replacement pin and, do I install it using a drop of JB weld after drilling out?
 
???---Some " club fisted " mechanic did not line the bushing up and the pin was pushed in too far.-----You can use any pin you want.----The pin is there simply to put to bushing in the right orientation for proper oil flow and lubrication.----It appears to that some of these simple matters are hard to explain to a novice.
 
Right, I see that pin pushed flush quite often. Just drill a shallow hole and put in any kind of steel, even a short slice off a nail. Tap it in place so it sticks up just enough to orient the bushing for that forward drive gear. Make sure that it engages the slot in the bushing. We don't want that bushing to spin. It bares all the thrust when moving your boat forward. Don't forget to pre lube parts as you assemble. Fill lower unit while it is vertical and from the bottom, just until the oil shows itself coming out the upper plug. There you will have the right amount of airspace inside.
 
Hello Friends......this has been an adventure, to say the least! Here is the latest......I tracked down a parts motor and, between the one I had and it, managed to get one motor fully equipped with no known parts issues. Lots of hours of work swapping out bad stuff. With this "new" motor, all the essentials are basically brand new...carb kit, magneto system, lower unit, spark plug wiring, motor mounts, etc. After all this work, back to the test tank and I'm right back where I started.....persistent cough at low idle......spark is good, fuel is new, plugs are clean.....Here's my question: is this the best I can expect from this old turtle? She runs great on anything other than low idle. Any advice is always appreciated.
 
Does this motor have the anti-vibration kit installed, yes , no or no idea ?-----Have you made sure that throttle plate is opening at the correct time?
 
In looking back through this entire thread, the only thing I haven't done is replaced the upper and lower crankcase seals. I really don't want to try to tackle that project unless I absolutely have to, and I'm not sure I know the correct procedure or have the right tools to replace them. Does anyone have any other suggestions? I really appreciate the insight of the veteran mechanics on this website. Thanks again.
 
Update....I sprayed soapy water on the top crank seal and rotated crankshaft with spark plugs removed......saw absolutely no evidence of a leak whatsoever. In the videos I've seen, you can easily tell when a seal is bad by all the bubbles created while rotating shaft. Comments? Any other ideas?
 
Back
Top