Logo

2015 9.9D Not completely broken in

Interesting to note Item 15 is back ordered. Must be a popular part. The oring will be here in a couple of days so in the meantime I’m going to give it another dose of Seafoam and run it.
 
Yes, when I was cleaning these carbs on pretty much a daily basis, I found so many of those jet tubes cracked or virtually impossible to get reliably clean, I got in the habit of just replacing them. I kept a stock of them for the varying horsepower outboards I worked on because it was more cost effective for my customers to pay for the part than to pay for my time to "massage" on that little dude. I keep a new one on hand today in my spares kit for the BF20D I currrently own.

Those things being on backorder for the 9.9 doesn't surprise me because that outboard is probably the most sold outboard in Honda history. The D models are the best twin you can buy in my opinion. I have always called them "lifetime" models because that's how long they will last if well maintained.

The Keihin carbs on these though are a bit of a pain. Hard to clean and the so called "accelerator pump" is pretty much a joke. It doesn't work well when brand new, wears out VERY rapidly and most people can't even tell when the piston freezes in it's bore. I've removed the piston completely on several of them when parts weren't readily available and I never heard one complaint about performance.

BUT BOY! If that circuit gets plugged, it causes all kinds of problems! It's as if the carb can't "breathe" when the accelerator pump circuit gets dirty.

It's an area you need to pay particular attention to as you work on your carb. I can walk you through that as well as cover other "points of interest" so that you have the best chance of a one time and done job.

These carburetors are famous for guys taking them off 3,4,5,6, or more times to get them clean. They drove me nuts too when I first got "introduced" and I had been rebuilding automobile carburetors for years!

So, if you're "game" I'm willing to help you.
 
I’m “game”! I have the gasket set, Item 1 you referred to coming tomorrow, failing that Honda will ship it. I have a service manual so I’ll be able to follow that for the big picture.
 
Sadly the service manual is very vague on the carb but with it and the parts pages you will at least have some references.

The carbs are pretty simple... the main body and float chamber (bowl) are the only two major components. Simple but just a pain to clean.

I think, from what you've said, that yours isn't very plugged. A badly plugged one can be a real bear to clean up but, hopefully, yours should be relatively easy.

You should know that the screws that hold the float chamber to the main body look like phillips head but are NOT...they are JIS...Japanese Industrial Standard. As a result they are easy to booger up because the fit of a phillips isn't quite right and they are TIGHT!

If you have an impact driver it's best to use that but I have taken them out with a screwdriver by tapping with a hammer and turning simultaneously. Just be careful there. Let me know when you're ready to open her up.
 
The easy stuff to remove is removed, flange bolts that hold the carburetor on are finger tight. My issue is removing the throttle cable holder, the bolt is removed but the slot above the two small jam nuts are smaller than the threaded part of the cable. The manual goes on to say to disconnect the throttle cable pivot from the throttle lever, well I can’t seem to get that far. It looks like there is a black plastic holder that might flip up and away from the throttle cable holder. Nervous of breaking anything since parts are along ways away. Is the black plastic part the key to separating the throttle cable from the throttle lever?
 
The easy stuff to remove is removed, flange bolts that hold the carburetor on are finger tight. My issue is removing the throttle cable holder, the bolt is removed but the slot above the two small jam nuts are smaller than the threaded part of the cable. The manual goes on to say to disconnect the throttle cable pivot from the throttle lever, well I can’t seem to get that far. It looks like there is a black plastic holder that might flip up and away from the throttle cable holder. Nervous of breaking anything since parts are along ways away. Is the black plastic part the key to separating the throttle cable from the throttle lever?

https://peparts.honda.com/marine#/browse/oe/bf/bf9/BF9.9DK3-SHA

Item 1 is the black plastic part I’m referring to
 
No worries about double posting. It happens.

Yoir imstincts are excellent! Yes, the plasic linkage "pops" off and back on to the metal carb arm ball end. I use a screwdriver between the carb body and plastic end but I'm sure there are other, better ways. And, you are 100% correct about breaking ANY plastic parts because it either means a new throttle cable or a new carb depending on what gets damaged.

To make sure I’m doing this correctly I will be prying the black plastic linkage pivot off the throttle lever. When I get the throttle cable disconnected the black plastic linkage pivot will still be connected to the throttle cable? I will be prying the linkage pivot to the left if standing behind the engine, in other words prying the black plastic socket towards the engine and away from the ball(throttle lever) It’s currently 5C here so I have a hairdryer blowing warm air on the plastic to ensure the plastic is warm.
 
You have described the process exactly. Yes, the plastic swivel end remains on the end of the throttle cable. Those ends are pretty tough and I've never broken one but I live in SoCal so never had to deal with the cold. You're heating up technique is likely a really smart move.

Just make sure that you don't "soften" the plastic!

You want to try catching the very edge of the ball socket with the tip of your screwdriver and use a firm, swift motion to pop it off the carb's throttle lever.

Good luck.
 
Many thanks, I just needed to be more aggressive. Carburetor is disassembled as per service manual. The throttle lever and all components associated with throttle are still on the carburetor including the rubber bellows on the opposite side of the throttle level. I don’t have the fancy Float Level Gauge as shown in the service manual but did measure 13.5 mm with a steel ruler having the carburetor sitting in the same position as the manual shows. No issues with any screws, all came out with no slippage. No blockages noticed in any holes in the jets, no cracks, under magnification, in the jet nozzle. Some discolouration on the jet nozzle between the two small holes. A bit of discolouration in the float bowl but that could be from the manufacture or possibly varnish. Remember I have untrained eyes.
 
Untrained eyes but great instincts!

No fancy float level gauge needed.

You should not try to disassemble the throttle linkage. Not necessary. Leave the accelerator pump bellows and pin on the body if you want. Just make sure the bellows is in good shape and stays that way.

You may even choose to leave the accelerator pump piston in place if you don't have an appropriate snap ring plier to remove the snap ring. As I have already said, that "pump" is fairly useless and you don't seem inclined to spend money on parts. But if you can remove it easily then do so as that will ensure a thorough cleaning. If you do remove the snap ring, the piston might not come out. It has a spring under it but if the piston is worn it will cock in the bore and stick. You can get it out by laying a towel on a solid surface and judiciously knocking the bowl flange to shock it loose. You just need to be careful not to damage the flange in any way. When the piston is out you may find a steel ball comes out with it. It is the check ball and is supposed to be staked in place. If it comes loose, no need to try puttimg it back. I have tried and it won't stay even if you think it might. Don't worry about it.

The main thing about the float chamber is the accelerator pump feed tunnel and carb drain tunnel at the bottom. Those are where dirt and minerals will settle. I usually try to run a small wire through both and give them a squirt of cleaner to flush them out.

More later...typing on my phone and taking a break.
 
Rest your fingers this project is not time sensitive. I have snap ring pliers just not small enough to fit into the hole, I’ll go looking around the lake and see if I can find a suitable pair. I don’t mind spending money on parts, I have a oring coming for the jet nozzle and a new fuel filter, will be here this evening. My location and the dealerships reluctance to stock parts is a pain in the… “We don’t stock that part but can order it and have it in a couple of days” Then they want your first born to cover shipping. Can’t blame the dealerships they have to make money it’s just the times we live in. Thanks for your time and sore fingers to this point.
 
Ok, back.

Lets start looking at the main body. You need to find a way to reliably prop the throttle in the wide open position. I use a pocket screwdriver wedged in the lever but anything skinny and stiff enough will do.

While most cleaning processes will just need a squirt or two of pressurized carb cleaner, cleaning the upper orifice circuits and accelerator pump delivery tube can take some quantity and will probably get a bit messy on you. Hopefully you don't have sensitive skin and you can find a suitable area (preferrably outdoors) to do some or most of this. I recommend at least two cans of spray but three might save you a trip to the auto parts store. I have used more than 6 cans on very dirty carbs before.

I'm assuming that you have removed the service enrichment valve (SE) otherwise known as the choke. If not, take it off and set it aside.

Slide out the float pivot pin and remove the.float and needle valve. I have not seen many issues with these floats or needle valves. I have replaced a few valves because they looked to be a bit distorted but I think they were actually still sealing ok.

With the float off you need to remove the brass "plug" at the bottom of the fuel emulsion tubes. Use a wrench or, preferrably, a socket that fits well. A six point socket or box end wrench is the safest way to go so as not to risk damaging the plug hex. I can't recall exactly but I believe it's 12 millimeter.

When the plug comes off, the large emulsion tube will come off and the jet-set tube will be left hanging by that little oring I had you get.
That jet set extends up through the carb throat and it, along with that little oring, inserts into the main fuel passage at the top of the Venturi section of the throat.

To remove the jet-set you need another small tipped screwdriver or something similar to reach in through the front of the throat and work the tip between the carb throat and the little ledge that the tiny oring sets on. Once you have the tip inserted that way, simply twist the tool enough to overcome the friction of the oring that holds the tube in place. You want to be a bit gentle here to avoid damage to the tube or the carb throat.

At this point, it's time to inspect and clean.
 
Last edited:
All parts you mentioned above are out. My brass plug is a slotted for a flat screwdriver. Couldn’t find suitable snap ring pliers so the accelerator pump piston will have to stay in place. As I was pulling the parts off it looked real clean, certainly no obvious build up of dirt. Incidentally the bottom of the fuel tank has no dirt sitting on the bottom, perfectly clean. I’m thinking my issue is more of gas sitting in the carburetor overtime and varnish forming maybe? I’ll start cleaning chasing every passage way and see what happens.
 
When I stuff the cleaner straw in the orifice where the jet nozzle came out of I get a good stream of cleaner coming out of the 5 or 6 holes in the throat, the steam is hitting the throttle plate and splashing everywhere. The lone single hole about 1/2” away has cleaner coming out but nowhere near the velocity that the ring of 5 or 6 has. I would describe it as a dribble. I’m GUESSING that the single hole should have cleaner coming out like the others? My issue is that my baby finger is too fat to block the 5 holes to force the cleaner out the single hole. Will keep playing with the single hole…
 
Yes, sorry about getting the plug mixed up. It's been awhile.

Instead of spraying away willy nilly it would be better if you did a little studying first. You should look at some things and develop that "experienced eye".

Lets start with where the gas comes out of the carb and goes right into the engine.

With the throttle plate fully closed, if you look at the engine end of the carb you will see one tiny hole at the top of the throat bore. That is the idle speed orifice.

If you prop the throttle open you can then see a couple of similar holes very near that idle orifice further from the engine. Those are the transition
orifices. They provide additional fuel as the engine is coming off idle and transitioning to higher rpm.

Further forward you see a collection of more orifices. There are two groups....intermediate and high speed orifices. It.doesn't take a brain surgeon to see that the high speed circuit has the most orifices.

If you focus further forward, near the inlet end of the carb, you see a brass tube jutting out into the carb throat. If you look closely at the very tip of that tube, I hope that you will see a.very tiny orifice aimed directly toward the outlet end of the carb. That is the accelerator pump nozzle. It is intended to spray a fairly large volume of fuel into the engine if the throttle is rapidly advanced.

Every one of those orifices must be cleaned and flowing fuel to have this engine operate correctly.

Also each of those orifices are dependent on the flow of two separate but associated circuits to provide 1. fuel and 2. air to "push" the fuel and mix wth it.

Those "feeder" circuits must also be cleaned for everything to flow properly.

At this point, after you've seen some of the detail, I will ask you if you're interested in hearing the rest or would you rather I simply tell you where to point and spray?
 
Let me find the rest of the orifices you are talking about first and I’ll see if I can get cleaner through them on my own. I’m cooking supper and watching hockey tonight GO OILERS! so won’t be working on her tonight. As far as explaining the rest of the story I’d be interested. I’ve read lots of your other post re this carburetor so If you wanted to post some links you think that would be beneficial for me to read that would save you time and fingers. Thanks again, much appreciated.
 
Well, I'm not sure from your description but I think that you might be talking about the idle orifice. It stands alone and is the only one of the bunch that you can see from the engine side when the throttle plate is closed.

If it is the idle orifice then what you are seeing is likely normal. Remember, you didn't remove the idle mixture screw. The screw is designed to limit the amount of fuel that can reach that orifice. And, since it has a limiter cap on it you can't back it out to see if the flow increases or not.
 
Idle speed orifice found at the 1:00 o’clock position.

Transition orifice found, only found one. With the throttle plate closed this orifice is almost covered by the edge of the throttle plate 12:00 o’clock position

Intermediate and high speed orifices found, 4 in total, 2 sets of 2 staggered pattern barely offset from 12:00 o’clock.

Accelerator pump nozzle found with orifice pointing towards engine

Re your post #49, yes that orifice appears to coming from the idle mixture screw so a reduced volume of cleaner makes sense
 
Ok, good work.
Lets move on.
Hold the body so that you're looking into the fuel feed hole (where the jet tube goes).
The throttle lever should be on the right and the accelerator pump pushrod on the left.
Look for the two atmospheric vent openings near the fuel feed passage.
One at about 10 o'clock and one at about 5 o'clock.
Give them a squirt and note where the fluid exits out the top of the body.
Make sure those openings are clear. Critters like to take up residence in those openings.

Next locate the accelerator pump delivery passage. Holding the body in the same position as before, the opening will be in the upper left corner of the mating flange. You should be able to see how it is associated with the brass tube in the throat of the carb.

I cannot EMPHASIZE enough how important this passage and the nozzle are to the performance of this carburetor. While the pump doesn't seem to make a big difference, that tube, nozzle and feed passage MUST be kept clear or you will have performance problems with your engine.

Once you've located the feed passage, go outside with a spray can. With the throttle propped wide open, point the outlet side of the carb away from you and insert the can's straw in the passage and give it a blast.
A clean tube and orifice should result in a stream of cleaner out of the carb throat about 8 feet or so. Very important.

Be careful. If the orifice or tube is blocked it will shoot fluid back toward you. It's a good idea to wear safety glasses while doing this.

If you get a stream but it's weak (i consider less than 6 ft. stream weak),
You need to insert the straw through the carb throat and carefully place it over the tube nozzle opening and blast it.

You need to keep at it until you have that 8 ft. stream.

Let me know how that goes.
 
After you verify the accel pump tube and nozzle are clear there is another hole near the delivery passage. That is the primary fuel bowl vent. Squirt it and verify fluid comes out in the fuel chamber.

The next thing is to hold the carb looking into the inlet end. There are two bolt holes on the mount flange and three other holes in the flange. Those are the air jet feed passages and SE valve vent.

The one that has a machined grove going to it vents the the SE fuel feed.

The lower of the two other holes is the slow speed air jet feed.

The upper is the high speed air jet passage.

Give them all a squirt and watch for fluid from the associated circuits.

Plugging the holes in the center of the carb throat helps concentrate the cleaner pressure going to the speed circuits. You can also insert the spray straw into the middle of circuit by inserting it where the jet tube goes. This provides a backflushing action. If you can cover the delivery orifices with your fingers while spraying it helps with the backflushing action.
I even use a straw tip that I bend close to 90° and hit each delivery orifice to backflush as much as possible.

If you do all of that and concentrate on getting the jet-set tube as clean as possible you have probably slayed the dragon. I caution you though to look once, twice, three times at the jet tube WITH A MAGNIFYING GLASS! Make dang sure that it is clean and is not cracked down the side.
Pay particular attention to the hole in the center of the tube. It is hard to see in there and getting it clean can be frustrating because of where it is.

Use Vasaline or WD-40 to lube the tiny oring before VERY CAREFULLY reinserting the tube into the passage. Also take particular care not to overtighten the plug that holds the tubes. Overtightening the plug can crack the jet-set tube.

Crossed fingers and Hope I haven't forgotten anything important.

I hope she runs like...
....H-E-DOUBLE HOCKY STICKS when you're finished!
 
Last edited:
The 10:00 and 2:00 o’clock atmospheric found deep inside the float chamber, cleaning solution makes it’s way out the carb quickly, I fill the little chambers(looking into the float chamber from the bottom so I’m really looking at the top of the float chamber as carb sits on engine) and it drains out quickly. I back flushed from the two passages that cleaner came out

Accelerator pump feed yields a stream about 8.5 feet.
 
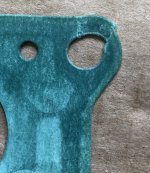
Ran into a snag. Accidentally tore one of the carburetor gaskets. The tear goes from the long flange bolt hole to the outer edge.

I’m guessing this gasket is NFG?

IMG_0632(1).jpg
 
Well, I probably shouldn't suggest that you reuse the gasket but I have reused gaskets that were damaged like that. You might want to use a small amount of gasket maker to patch it a bit if you decide to try. Too bad that happened but it's always a risk. Heck, I've boogered up new gaskets before!

How does your jet tube look? Did it clean up ok? Good news about the accel nozzle being clean.

How did it go spraying the air jet circuits? Plenty of fluid movement through them?
 
Stuff happens, got new gaskets coming next week. I thought of reusing the gasket but during the cleaning process nothing jumped out at me that would explain why the engine was/is running like it currently is. No obvious blockage or any dirt visible so by reusing the slightly compromised gasket I’d be the situation, if the engine still isn’t running properly was it due to the gasket. Figured I’d also order the carburetor insulation gasket, service manual says replace as it does with the carburetor gaskets, backordered till sometime in July.

Jet tube looked good under magnification, no split and could see light through the tube likewise with the air jet circuits. In all honesty my untrained eyes couldn’t find anything that would indicate a plugged/dirty carburetor.

The jet tube oring kit came with a float bowl and drain screw orings so I replaced them, kept the old ones “just in case”

One thing that did catch me off guard was a bit of engine oil inside the silencer case. When I purchased the engine I transported it laying on its side as per Honda’s recommendation, about 200 km distance, when I transported the engine to the lake I drained the engine oil since it was a 1000 km trip. The oil in the silencer case would have had to come from the crankcase via the carburetor? The previous owner had the engine on a stand and also knew about which way was up during transport. In any case the oily film is cleaned up and the few drops that accumulated in the silencer case is cleaned up.

Many Thanks for your assistance.
 
Good call on the gasket situatiin IMO.

Also a good call on draining the oil prior to transport. Sometimes oil leaks out even if the outboard is lain down properly and not even moved.

The fact that the outboard has so few hours might explain the oil in the muffler housing. It might just be from blow by vapors due to the not yet fully seated in piston rings.

In addition to that, consider the fact that there will often be a bit of "accelerated" wear on many engine components as they seat in. One such area is often the rocker arm to valve stem end contact area. It's a good practice to check/adjust the valve lash a couple of times early on in an engine's life. My experience with Hondas is that the wear is typically very minimal and, usually, lash doesn't change. But, if you still have issues after installing the carb, valve lash is what I would check next.

Your not having anything jump out at you during the carb cleaning doesn't necessarily mean nothing was in there causing problems. A small piece of debris is all it would take. That's why I'm big on backflushing the circuits. The debris comes in one direction and gets stuck. Backflushing is the means of dislodging it and forcing it back out.

At least you know now that it's pretty dang clean and shoudn't be the cause of any "runability" issues. You also know how to get it clean if the need ever arises in the future.

Once it's sorted out and running the way it should, feed it clean fresh fuel and get in the habit of draining the bowl anytime it will be sitting for more than a month. If you do those things you shouldn't need to clean the carb for a long, long time.

Looking forward to seeing how things go after you fire her up.

Good luck.
 
Back
Top