Logo

Yamaha 9.9 hp metal Screw from Hades in plastic part - won't come out.

Land_Owner

New member
2006 9.9 MSH 682K S 1041179

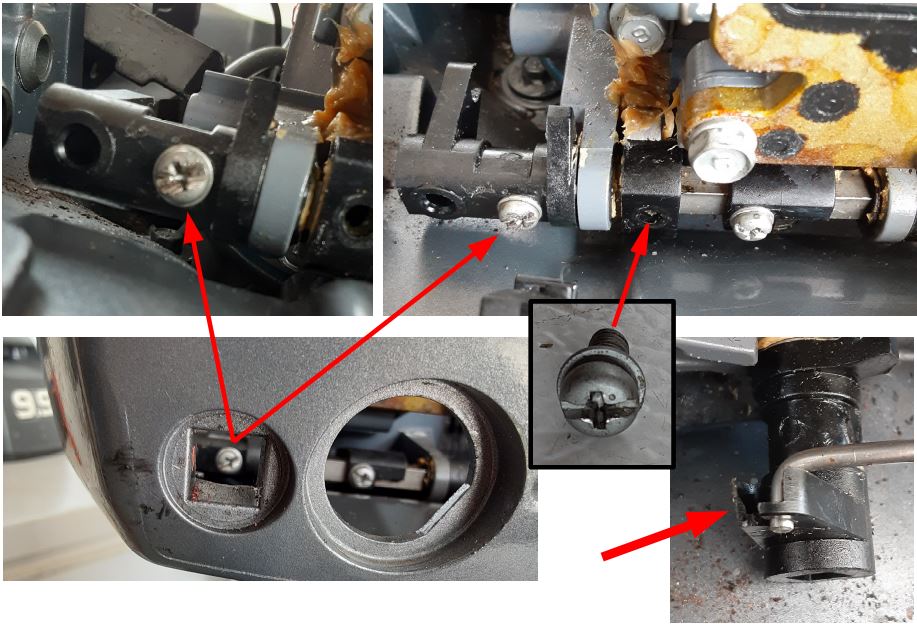
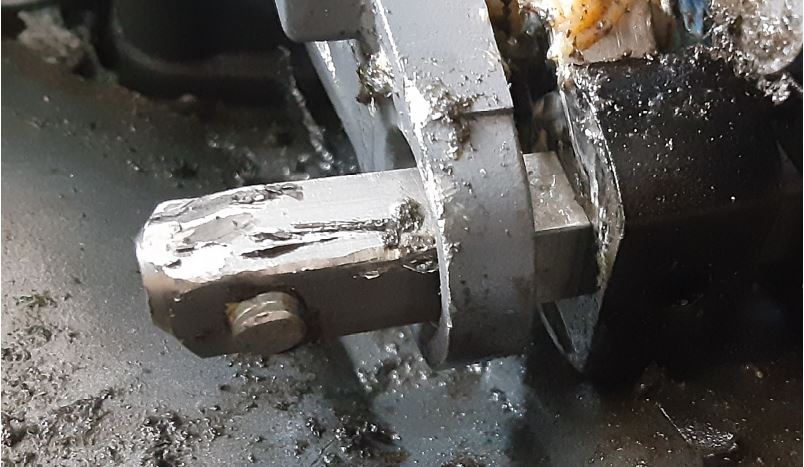
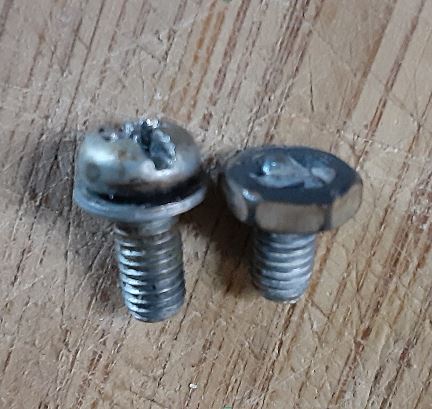
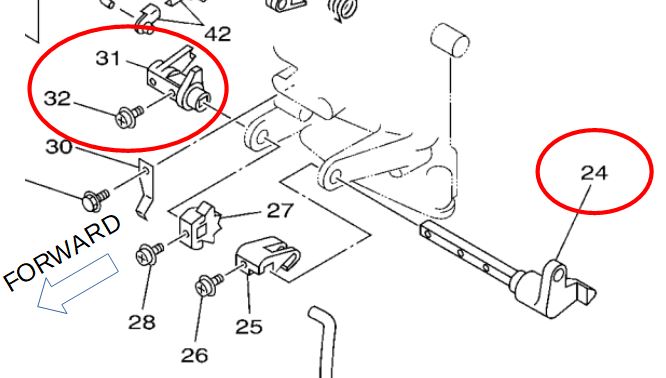
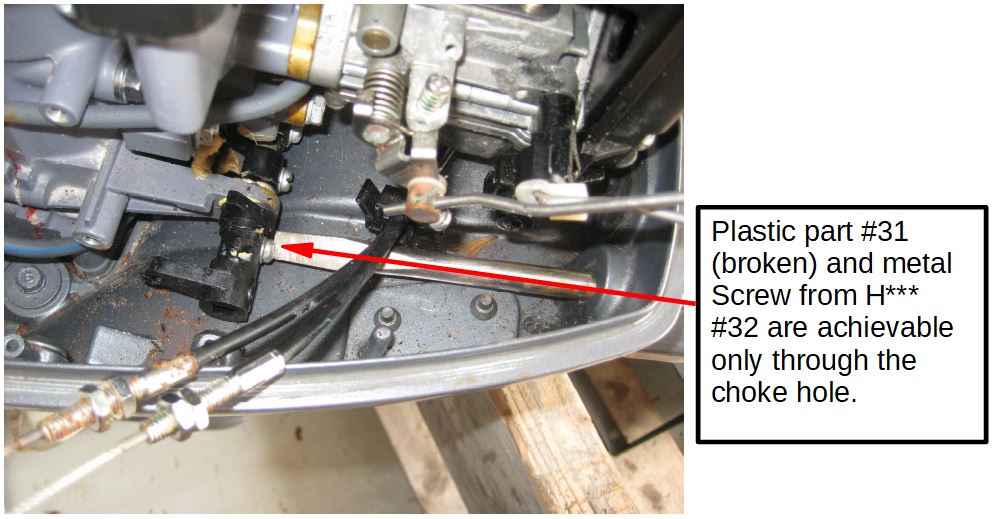
A metal screw (#32 in picture below), keeps a broken plastic piece (#31) on its plastic shaft (#24), for control of forward, neutral, and reverse. The screw WILL NOT back out - and I HAVE TRIED. A huge screwdriver, well fitted to the slot in the screw head, cannot turn this screw more than a few hundredths of an inch. I held #24 in location while my son torqued on #32 - nothing. He held its location and I TORQUED on #32 - twice. I got 0.02" (+/-) of total rotation.


I can't grab it with any wrench. None of my Phillips screwdrivers are long enough, and if I had one it would not engage the screw any better than the huge Standard screwdriver already used.


I have tried counter rotation (tightening) and nothing. I have Kroil oil that I have not tried. I am at a loss for what to try next...the "assembly" is held in place through holes in the casting. There is no removal to work this out at the vice on the bench.


9-9-HP-Yamaha-1.jpg


9-9-HP-Yamaha-2.jpg
 
Vise grips maybe? Looks like you might have room for them. Together with the screwdriver possibly.

Ever heard of red Lock tite? Stuff from hell.
 
Another suggested a 1/4" impact driver and Phillips bit, which sounds pretty good. I'll have to borrow one from a friend. I am dousing it in Kroil, though I am skeptical that the fastener will be affected as I have noted through-bolts and their keeper-nuts seem to take to Kroil's penetration better than fasteners. Are these parts assembled at the factory with Red Locktite? Oh boy! I'll let you know how this goes. It ain't over till the Fat Lady sings...
 
Trouble with an impact driver is that the part to which the screw is attached could be damaged. The shaft could very well be bent from the force of the driver. Plus, I don't think that the shaft is solid enough for the driver to work.

Red lock tite is just my guess.
 
Yesterday was heating with the soldering iron and cooling with Kroil - four cycles. Not budging yet. I am swiftly reaching a loss as to how to proceed without messing something up using the impact driver. I have never had a bolt that would not "turn loose" after this much torque. The bolt face and screwdriver slot remains pretty much intact. I have not boogered it up, so there is that to work with.
 
On another Board a member said it might be a JIS screw, and I think it is, as the machine was Made in Japan.

Looking at the illustration AND the engine (see OP pic), it dawns on me that in order to remove #31, part #24 MUST first slide to the right, as there is insufficient space to the left of #31 to remove it. THAT consideration creates the problem of removing TWO MORE 5mm screws from #24 (see OP pic). These additional screws are beneath the working, and heretofore never removed carburetor, which I had no though of removing for this plastic part R&R...I'm screwed.

In this DIY instance, there is NO WONDER that MECHANIC'S LABOR in Dealer or Shop time is 50%, or more, of the repair cost. Perhaps though, for my own sanity, I should take this to a Dealer or shop and let them find the way home...
 
Last edited:
If one were paying a shop for labour, at times it is more cost effective for a mechanic to cut the parts apart. Then replace with new. The savings in labour will offset the cost of the parts.
 
I removed the carburetor. Gave myself some breathing room and work space.

The middle screw came out with no problem. It is definitely a JIS screw, evidenced by the small indent in the screw head (see pic).

I made a montage of the parts in pictures below. #24 is a METAL shaft with a plastic tip on the right hand end.

I tried every tool bit I have. None are JIS. Retooling or other solution is at hand. Offending screw is boogered up some.

The broken part #31 is shown (lower rt. pic). What is the chance, if it was REAL clean, that JB Weld and a dab of petroleum jelly on the metal pin (inserted) would hold the thrust of this linkage? Thinking out loud, maybe drill through #31 and with a very small/long stainless bolt and nut, fashion a stainless strap around the broken area after the JB Weld dries. Sort of a red neck solution. Maybe asking for problems in the future in that...


Offending-Screw-2.jpg
 
Last edited:
Have you not tried a big honkin flat bladed screw driver? With a square shank to which a wrench can be used to help it turn?

They work better for me if and when I can use them. I hate a Philips.
 
The picture in the OP shows the largest (BIG) standard screwdriver I have that we already tried. Two men turning the handle could not get the screw to budge more than 0.02" (+/-). No wrench was used at the time as the carburetor was still in and there wasn't room. The slot in the screw head got boogered up by the big screwdriver through applied hand torque so further Turn of the Nut with a standard screwdriver is useless.

With the carburetor removed, there is room to work. I spent a portion of the evening with a cigar lighter (thin blue-line torch) heating to red hot (melting some plastic) and Kroil cooling the two bolts. This morning I will try to remove them with more heat and a pointed nose mini-vice grip or with the one screw that is already out, fashion a Phillips bit to suit the JIS slots. Gentle persuasion rather than a bigger hammer and fixed correctly is the way forward. I appreciate your thinking with regard to this removal and I will periodically update this Forum.
 
Heat got the other and the Dremel did the job to a point. I am left with a few scratches, a removed broken part #31, and ALL but the last remnant of the offending screw(s) off of #24, which is good to reuse. The replacement parts are ordered.


Now...how to get the remnant screw out? There isn't sufficient room to get a mini-vide grip on it. I don't weld. Maybe my friend could.


I could, with care, Dremel a slot in the remnant, but that isn't assured to get it out with the big standard screw driver.


Offending-Screw-4.jpg
 
It has been a GOOD day. The offending screw is OUT of the outboard and new parts are ordered for this control linkage repair.

Side by side (pictured below) is part #32 and #32 MODIFIED. I put a 3/8" machine threaded nut on the stub. My friend zip-welded the nut to the stub and the high heat and 1/4" ratchet "walked it out" smartly.

Offending-Screw-6.jpg
 
Back
Top