Logo

Bf9.9 will not idle

camsides

New member
First of all, thank you to everyone who’s posts I have learned from the last few weeks! I have scoured these forums while trying to get my little Honda bf9.9A to run. I bought it 2 years ago, the owner said it was a great motor but hadn’t started it for at least a year prior. So it had sat for maybe 3 years.

I bought a new tank, line, and bulb, got fresh gas, tried it and had no real luck. Recently have had reason to try again, and did get it running, after cleaning the carb and pulling until my arm was numb. As of now, I’be had the carb off to clean at least 5 times. The “idle adjust screw” -if I am even using the right term- has a “stop” on it for lack of a better word, and I don’t believe I can remove without breaking something. I have a new carb on order but it’s looking to be a wait.

It will start on the first pull, and if I kind of force the throttle handle to rev higher (doesn’t go all the way out of gear) it will stay running as long as I do that, or manually open the throttle on the carb with my finger. It does not like to be chocked at all, will not start that way. It seems to be a bit smoky as well.

Any tips are greatly appreciated, and hopefully some of the guys whose posts I have been reading will chime in!

Here is a link if a short video of it running:

[url]https://youtu.be/ipFuQtJKKbI [/URL]
 
Last edited:
Hi,
Do you know what year the outboard is? If you don't, see if you can locate the frame number on or about the stern bracket.

What struck me as I watched your video is how much the outboard was shaking. It is possible that the engine is only running on one cylinder. I suggest that you do a cylinder contribution test to see if both cylinders are providing equal power.

It's pretty easy to do. First take both spark wire boots off of the plugs and smear a small amount of dielectric (tune-up) grease inside both boots. This will make pulling off and replacing them during the test go smoothly.

Wear a thick DRY glove or use a thick cloth to do this so you don't get shocked. You can use
insulated pliers if you prefer but be careful not to damage the plug wires.

Start her up and pull one of the plug boots off and see what happens. If it dies, that's ok. If it doesn't, that's ok too. Either way, replace that boot and pull the other while she's running and note any difference in response. If it dies when one boot is pulled but not the other then the engine is either only firing one cylinder or the cylinder that makes the least difference is much weaker. If they both are contributing approximately the same then that at least gives you some basic info to go on.

Reasons for unbalanced power are:
Missing spark...this could be due to a bad plug or plug wire.
Valves out of adjustment.... Adjustment is pretty easy
Valve timing is off....a timing belt and timing mark inspection will tell the tale
Lower compression in the weak cylinder....compression test is always good to do on an engine youve just obtained.

You may have more than one problem. Two minor problems will often seem more like one big problem but might be easier to straighten out than you think.

The little carburetors on these are VERY difficult to get properly cleaned and many attempts by a novice might not get one "right". This can be completely frustrating because there's more to it than meets the eye.

But you've had some success....it's running! That's a good start!

Do the contribution test and get back with the results and we'll go from there.
 
Thank you for the quick response! I will try the contribution test this afternoon and report the results. I did install new spark plugs, and visually checked spark before. I used the ngk dr5hs.

I believe it’s a 2000 model. Frame # is: BABS-1601741
 
Hi,

Yes, I looked it up and it's a 2000. Goodonya fer usin' the correct (DR5HS) plugs. NGK just seem to work the best on the Hondas for some reason.

Can you describe how the old plugs looked to you?

Very interested to know what the contrib test reveals so standing by.

Be safe.
 
Well we now know that the upper cylinder has an issue.

Was there any difference at all in the way it ran when you pulled the boot or did it run pretty much the same?

At any rate, you will want to recheck that there is spark to the upper cylinder and that it is as strong as the spark to the lower cylinder. A simple spark tester is a good tool to use for checking this. They sell them at Harbor Freight and auto parts stores for a few bucks if you don't own one. I prefer using those over trying to ground the plug and watching the gap because it's just less awkward to do.

If it has good spark, you'll want to then pull the rocker cover and check the valve adjustment.

If the valves are adjusted properly then it will require a compression test and possibly a leak down test to determine why that cylinder isn't firing properly.

Do you have the shop manual for your outboard?
 
I will pickup a spark tester today- should I pick up a compression tester at the same time?

I do have the shop manual for it, I bought a PDF version online.

Thanks again for the help! I will report back with results of the spark test. I am on pacific time, so it may be later this evening.
 
Well....I hate to start telling you how to spend your money but a spark tester, a compression tester and a leak down tester are basic tools for working on these outboards. Along with a set of feeler gauges and a shop manual you can diagnose one pretty thoroughly.

One thing about the "screw into the spark plug hole" tools is that not all of the sets come with an appropriate adapter for the Honda spark plug holes. The REAL problem is that the ones that do might be more expensive and harder to find. I don't know anymore. When I put my kit together they were expensive and rare so I just made my own adapter out of an old hollowed out spark plug. I still have those tools and haven't bought any in quite a while. I'm old.
But I THINK that has changed and they are easier to find and less expensive these days. Harbor Freight is the first stop I would make looking for one.

I'm near Los Angeles so I'm on the PST clock too.
 
The spark tester I grabbed did not fit, I will get another. The compression tester did, and I got 42psi on the top cylinder and 68 on the bottom.

Also noticed the plugs (new) looked pretty dirty.

Another thought- when it was delivered to me a couple years ago, it was laying on it’s side in the back of the truck and had leaked oil. Level is fine on the stick, would that affect anything else?
 
Well...
Those compression numbers are not encouraging. But it may have to do with how you performed the test.

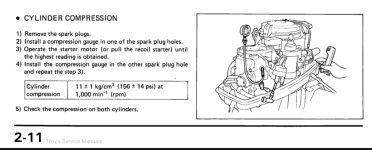
A compression test on this engine must be done with the fuel line disconnected, carburetor float chamber drained or empty and the ignition kill switch activated.

Both spark plugs removed and the throttle held wide open. You then install the gauge and pull the engine over until the gauge stops moving upward. At least five pulls per cylinder.

Did you do all that? That is the way to perform a "dry" compression test. There is also a "wet" compression test for checking the sealing of the piston rings. We can go over that once I know that you did the dry test correctly.

Look in your service manual specifications section and find what the compression is supposed to be when the engine is new.

While no well used engine will match new compression specifications, ideally you don't want to see over a 20% (or thereabouts) loss for easy starting and good performance.

Engines will start and run with lower compression but things get "problematic" after they lose pressure because that's a big component in vaporizing and firing the gasoline. Especially during cold start.

The spark tester didn't fit? How so? Please explain how the one you bought hooks up or post a picture.
 
Ok, I did not do all of those things. I watched a short YouTube video and went for it. I did have the gas disconnected and both plugs out.

re-did the test per your instructions and got 84 on the bottom and 60 on the top. Had someone hold the throttle open on the carb, since you can’t open it up all the way out of gear. Is that correct?

I have this from the manual. Does that mean
 

Attachments

  • IMG_0058.jpg
    IMG_0058.jpg
    188.3 KB · Views: 34
Last edited:
Sorry, forgot to answer your question about the oil leaking during transport.

These outboards aren't supposed to leak if laid down correctly but I know that some do. I doubt that the leak is causing your current problem but if you look at items 5,6,7,8,9 and 20 in the link below, that oil probably contaminated the crankcase breather assembly. It should be cleaned.

https://www.boats.net/catalog/honda/outboard-by-hp-serial-range/9-9hp/bf9-9ay-la-2000

Also, when one of these is stored that breather assembly attracts bugs and spiders as a convenient nesting place. If they clog it up with webs or debris, that will cause excessive crankcase pressure and that will result in excessive oil consumption and smoking.

See the arrow next to part 5 and the "F8" note it points to? That indicates that part is listed again for reference in illustration page F8. Which, in this case, is the oil case and engine cover page.

Look in the lower right corner of the cylinder page illustration and you wil see
ZV48-E0300C
In the weird Honda page code used to direct you from illustration to illustration, that translates to "page E3" .

Now open the link to the oil case and engine cover parts page and you will see an arrow pointing at E3 next to a "ghost" image of the oil breather assembly.

Look in the lower right corner of the oil case and engine cover and you will see
ZV48F0800F

Translation???
You are on page F8!

https://www.boats.net/catalog/honda...e/9-9hp/bf9-9ay-la-2000/oil-case-engine-cover

I know it doesn't make much sense but in the real Honda parts manual it is very understandable. It's just that boats.net doesn't utilize the system correctly. But they are all we mere mortals have to look up and order our own Honda parts at a reduced price. And, these parts illustrations are invaluable for reference if you know what to look for.
 
I guess I was typing while you were posting. If you sent a spark tester pic it didn't come through.

But no matter...you can figure out what you need there.

The real problem, which I hope looking at the compression readings tells you, is that the engine has lost about 50% of it's compression. And that's on the cylinder that still fires! More than half on the upper!

Loss of compression simply means that there is pressure leakage inside the combustion chamber. The leakage is caused by either the valves not seating correctly or the piston rings aren't sealing against the cylinder walls. Or both.

The valves not seating can be caused by bent valves, seat wear, weak return springs, carbon build-up or tight rocker arm adjustment.

The good news is that you can cure tight rockers by doing an adjustment. A valve adjustment. The procedure should be in your service manual. It requires some specific knowledge about how to position the valves and a little bit of finesse for getting them adjusted "just right" but it's not difficult at all.

I suggest your next diagnostic step to simply be checking the valve to rocker arm clearances. A too tight clearance will hold the valve away from it's seat and cause low compression.
 
Last edited:
You did good on the compression test. I may direct you to do a wet test but you should really inspect that valve train first.

I don't remember if you said that you changed the oil.

Anyway, read up on the valve adjustment and pull the rocker cover. With the spark plugs removed you can easily turn the engine over slowly.

At first, rotate the engine several times very slowly and observe the rockers pushing the valves down and then releasing. You should use a bright light and look for the mechanism to operate smoothly and that each valve stem returns up and to the same height as the others.

Look for any broken coils on the return springs.

If all that checks out proceed with checking the clearances.
 
Well....stupid me....
...I forget to take my own advice sometimes.

I went back to read what all has been said so far and realized I had completely neglected to talk to you about valve timing.

While valve timing is certainly something that you will read about and need to understand for checking and adjusting the valves, it can also cause low compression in an engine if it is off a small amount. If it's off more than a little it can make the engine impossible to start and can cause major damage in an "interference" engine which yours probably is. I don't know but most Hondas are.


The fact that it wasn't used for a long while might not have anything to do with the problem but it is possible that the timing belt deteriorated in some fashion and it should at least be checked along with timing mark alignment.

You can address this while doing the valve lash check which is really a necessity every few seasons anyway. If you can solve the low compression issue and decide to commit to keeping this outboard you will be well served to replace the timing belt because of it's age. Going over engine timing and valve adjustment now will be good practice for doing that later.

Also because it likely IS an interference engine (meaning the valves and pistons will contact each other if the timing is off too far) you must not rotate the engine backwards. Always rotate the engine in the same direction that the pull starter rotates it no matter what procedure you are doing.

Sorry I glossed over this point but I do get ahead of myself more than I'd like.

Good luck.
 
Last edited:
Back
Top