Logo

How much does a warped head affect compression?

Edchris177

Regular Contributor
It seems all these smaller kickers have warped heads. IIRC, the factory service manual states .002” is the limit.
Can anyone quantify the effect of greater warpage on compression?
Is it possible to say that a warpage of .005” will result in xx loss of compression, or .01” is double that of .005”?
Out of curiosity, are these heads all warped, even with normal running, or does it only occur in an overheat incident?
 
To my understanding, warping occurs mostly during a bad overheat. That’s why I like to run a water temperature guage so I can always see how hot the engine is.
But wear and tear comes into play even without an overheat. I think they come with 120-130psi per cyl. The more you use the engine those numbers will drop. If you are running it when it has a problem those numbers will drop a lot quicker.
 
I answered my question today. Turned out my compression gauge was reading correctly, at 60 psi both jugs, for this motor.,(J8REIA, a ‘91 rope start 8hp).
I tried it on several other motors, it gave expected readings.
Removed the head, it showed .005” warpage at the Center, between the pistons.
Dug out a sheet of plate glass, some sandpaper, & within 10 minutes had the head decked to within .001”.
put it back on, using the old gasket & some Permatex #3 gasket maker.
Compression is now a needle width over 110 psi both jugs.
That is exactly what my ‘94 Evinrude 8hp shows, so I’m going to purchase new gaskets, clean the carb, do the impeller & get it running.
 
To elaborate, I know re-using the head gasket, along with some Miracle Shyte gasket maker is not the way to go. I did this
only to see if decking the head fixed the low compression values, which it did.
I intend to clean things up, & obtain new OEM gaskets.
I had removed the exhaust cover, to look at pistons & rings, & will obtain new gaskets there also.
 

Attachments

  • E6C0BF6D-3663-4339-8865-3EC7F89E273E.jpeg
    E6C0BF6D-3663-4339-8865-3EC7F89E273E.jpeg
    267.7 KB · Views: 42
  • B551820F-BD7B-4360-94E7-A4A5A91398A4.jpeg
    B551820F-BD7B-4360-94E7-A4A5A91398A4.jpeg
    437.9 KB · Views: 45
  • 83851178-A8F7-4701-923F-816C2C9CE12B.jpeg
    83851178-A8F7-4701-923F-816C2C9CE12B.jpeg
    366.5 KB · Views: 40
Last edited:
Excellent photos and information, Ed. The rings and pistons look beautiful. What grit paper did you use for that work?
 
I only had regular 100 grit handy, plus a single sheet of 400 wet/dry automotive paper. I’m not sure if the 400 was necessary, it really only polished the marks left by the 100. I’ve never seen a brand new factory head, so I cannot say how well they finish them, or if a polished surface is in fact necessary.
I used a “figure 8” movement while sanding, to prevent all sanding lines being orientated on the same axis, again, I don’t know if that was required.
 
UPDATE: Posted to encourage others who may have overheated their kicker. Just because your motor is now D.O.A., it might not be a death sentence. Resurrection can happen!
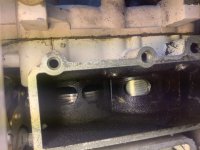
This motor got hot, really hot, but decking the head brought back compression, & you can see from the previous photos, the rings, bores, & pistons looked OK.
This motor appears to have had little use, the factory sticker was still on the carb, along with the pinstripes on the lower unit. I asked Racerone’s opinion, he thought it was worth saving, so I spent a few $.
I got the impeller, entire thermostat assembly, & the kill switch replaced.
Full Disclosure- I didn’t personally do any of that. I dropped it off at Racerone’s place, he has all the parts on hand, & knows how to do it.
Picked the motor up last week, tested it in a barrel, then put it in my 14’ Jon boat. There was black crap leaking out of the exhaust, I think the previous owner had used it a lot for trolling. I ran it full throttle for 1/2 hr, cleaned that mess out.
The one thing I did discover, & hadn’t noticed earlier was the twist throttle was wonky, 1st third of travel was fine, but then it seemed to bind.
I undid the throttle cable, & it was smooth, so that wasn’t the issue. Hooked it back up, then started looking closely at all the moving parts as it went to full throttle.
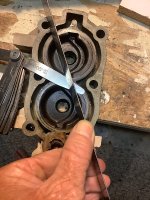
A-Ha. When the previous owner overheated it, it got hot enough to melt the pivot point of the THROTTLE ADVANCE LEVER,(#40 in the parts diagram).
BCE33DE4-D608-47C5-B8C4-1AFE836DD6BD.jpeg43A026CF-4265-4B84-9095-200636C2E55B.jpeg
Instead of rotating as you twist the throttle, because the boss was melted, the lever “rolled” sideways, causing the twist grip to bind, & the throttle not to fully advance. I considered JB welding & trying to fix it because
this critical part is no longer in existence, not here, or Evinrude Canada. I scrounged one, installed, (this is where the factory manual was critical), EUREKA, full smooth throttle.
The other issue was the kill switch. The original was broken off at the little tabs that hold the lanyard.
Racer had one, but I was overseas, & he wasn’t sure I wanted to pay for it, so didn’t install it.
I took it, (cause his price was way less then what they list a new one for).
He explained about tying a line to the old one before you pulled the wires out, so you had a means to pull the new wires back through the sheath.
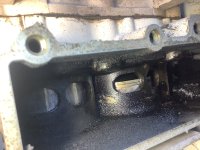
However, upon close observation of the replacement switch, (and being one who leans to the easiest way), these switches bear close resemblance to many automotive switches. There are a couple of small “tits” that actually hold the switch together.
Its actually two pieces that snap together. One part contains the little red buttons, but that’s all it does. The other part is the sealed unit, with a push button that actually makes the connection to ground out the ignition. Using a small flat head screwdriver, in the orientation shown, you can easily split the two pieces.
The RED “button” can then simply be pushed out, inserted into the original fitting, & the two parts snapped back together.
No fishing wires, or splicing if your working pull had the wires cut.
Obviously, this won’t work if the actual sealed switch is bad, but that’s easy to test with a multimeter. If it’s only the “red button”, this makes the job about 10 minutes. You only have to undo the 3 Phillips screws underneath the tiller handle, remove the cover plate, then 2 screws that hold the switch.
Ill make a separate post, with appropriate title, so it shows up when others search for Kill Switch Replace.
It starts 1 pull, pushed my 14’ Jon boat at full plane. I paid $100 for the motor, to use as parts for my other 8hp, but upon inspection/consultation, it seemed to good to part out.

7B2DE452-5928-455A-93C5-51351B2BFDEC.jpegF823AB69-FCDA-47F5-BDD1-B406F65A7446.jpeg7B868CA8-12DA-4D97-954E-0EBCC11510E7.jpeg
 
Last edited:
Once again, great information. Thanks for the update. Over the years I have seen some factory surfacing on heads quite unfinished looking. If the head is badly warped I will start with around 100 grit too and then finish with something in the high 200's while using soapy water or something similar.
 
I answered my question today. Turned out my compression gauge was reading correctly, at 60 psi both jugs, for this motor.,(J8REIA, a ‘91 rope start 8hp).
I tried it on several other motors, it gave expected readings.
Removed the head, it showed .005” warpage at the Center, between the pistons.
Dug out a sheet of plate glass, some sandpaper, & within 10 minutes had the head decked to within .001”.
put it back on, using the old gasket & some Permatex #3 gasket maker.
Compression is now a needle width over 110 psi both jugs.
That is exactly what my ‘94 Evinrude 8hp shows, so I’m going to purchase new gaskets, clean the carb, do the impeller & get it running.

Wow, great results. Thanks for sharing.
 
Back
Top