Logo

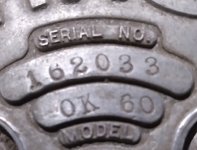
My new project, sometime. 1932 Johnson OK-60

BRUPP79

Regular Contributor
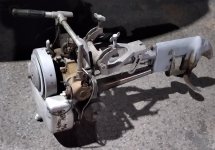
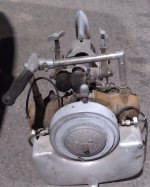
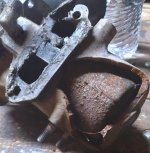
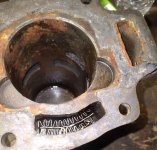
Okay here's a new project for me to do, in my spare time. It is a 1932 Johnson OK-60 7 horsepower. I picked it up early this morning from a guy at work he said he was going to scrap it. He gave it to me just basically get it out of his yard. Everything looks to be complete, the motor is seized up I'm guessing from rust. However the water jacket is broken off on one side but I don't think the combustion chamber was damaged so I can always fix the hole with brass. Fun fun!
20210330_081901.jpg
20210330_081641.jpg
20210330_081613.jpg
 
Should not be hard to find a replacement used cylinder.-------aomci------Is the place to find that item and other parts cheap.
 
They were a real powerhouse. Be great if you could get it running. Tim's Outboard might direct you too. Start soakin' er down with atf/acetone.....fresh mix. I'll drive up to Virginia, buy you lunch, just to see it running. My friend Walt, who built a camp on our lake near Quibell Ont. back in the early 30's, had one an a frieghting canoe he used on the 16 mile portage......he said it was an "animal".......not sure if that meant good or bad! Same motor, Brian.....I've seen pictures.
 
I am going to start soaking it tonight. I have a bit of tinker time tonight, been digging around AOMCI already. Lots of great info on that old stuff. I hope it is just rust stuck not blown up. I want to see it run up on Jackfish bay in BWCA! Chart says 7hp, but it has a huge prop for a 7hp. Maybe 7hp, but lots of torque.
 
Exactly.....old "Walter", my resort/log building mentor said about that 7
horse: ..........................."She got some SHOULDERS on 'er"......."Pulls like a good team a horses".
 
Last edited:
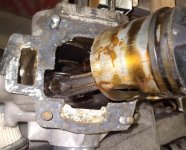
Ok, so a little update with this project. It had sat outside in many snowbanks over the years and was minorly seized. Light rust mixed with varnish/fuel/oil mix. I am glad they ran them so very rich years ago as that is what has saved this engine. From what I can gather, it is 99% complete, I even have one of the Bakelite plastic spark plug caps that came with it. Typical things: light abuse on the propeller, small dents on the fuel tank, the cast exhaust manifolds have some bolts tabs broken, but nothing that can't be made or welded. These motors have a interesting induction setup on them, piston porting, but yet some sort of spring loaded valve with what looks like a diffuser under it? Almost like the finning off of a industrial bulldozer radiator. I hope the pictures show it. I hope to get the parts soaking in a tub of ATF/acetone 50/50 mix to unstick them, rings are stuck hard but not broken, yet that is..... I have this project posted over on AOMCI as well. I have a feeling parts will be hard to find. Anywho, I will post when I can, when life allows. In the meantime, here is a few pictures.
1932 johnson 04.jpg
1932 johnson 055.jpg
1932 johnson 066.jpg
1932 johnson 07.jpg
 
At one time ALUMINUM was very expensive compared to today.------They kept things simple and reed valves were still in the future.----Ports in the pistons work and can not fail.
 
Looks like that motor was in pretty good shape when some idiot threw it out in the snow. That busted cylinder jacket is obviously from water pooled inside, then frozen. Did you know that the "Wright Flier" was fuel injected? No carb. Part of it now has been transported to Mars. Man can accomplish anything. Brian, this will be a fun project.
 
Would have been nice if the cyl was Aluminum, that is a eazy fix with a peice of 10ga sheet and a TIG. But I have a method in my head to repair the cast iron if it comes to that. I hope the bore isn't cracked. I will de-rust it then pressure check it. If it is a pass then some careful grinding, patch cutting, then brazing or silver soldering is in order. I used to nickel weld cast, but sometimes the base metal will not blend. Or even with a preheat you hear "tink!" another crack! Brass is forgiving, and easy to reshape when done.
 
Well had a few seconds in the garage to play. I pulled the piston/rod assembly out of the crankcase. Things at first glance look great for the age! Rods have shims so you can pull a shim when the rod gets sloppy. Interesting idea. The main crank bushings look in great shape! Both the rod and main journals on the crank look very nice. I will spin them on a lathe to polish with some 800 wet/dry and mineral spirits. I have to get some acetone and ATF tomorrow to let the piston/rods soak and the cylinders. This is going to be a fun project! Rest of my 9.9 parts came today, so let the juggling begin!
 
With nice journals....that's half the battle, eh? If no water was trapped in the cylinder, it's unlikely the bore is cracked. Somebody MUST have a "jug", however, save a lot of work for sure.....even if you gotta sleeve it. If cracks are not running all over your busted jug, you could certainly repair it with a patch and pure nickel, reverse polarity. Trick would be to find a scrap piece with a reasonably close shape. I love working with cast...I enjoy the challenge. Ha! My first attempt, however, 45 years ago....destroyed a set of 327 fuelie heads......stupid.
 
Just a little update. I have both cylinders soaking in ATF/Acetone mix. Lots of crude coming out of them. I will probably rinse them out this weekend and maybe boil them in hot water and dawn dish soap and see where that takes me. All of the frost/casting plugs have pushed out which is good, that saved one cylinder. I am going to silicone a plate on the exhaust and main flange and pressure test the damaged one to see if it is good or not. Pitting didn't look to bad, good enough to make it a light duty runner anyways.
Pistons and rods are soaking in the same mix. The lower rings on each unstuck rather easy. The top are being stubborn. But slowly I am getting them. Each day after work I lightly compress them into the groove, then heat the piston with a hand torch and "work" the rings a bit and let the "mix" get in there. Then heat them again and dunk back into the mix and let it wick in there. Kind of weird, I used Valvoline Dextron/Mercon 3 and store brand Acetone, but they don't stay mixed for more than a hour. I keep sloshing them around, seems to work. Anywho, thats it for now, till I get the cylinders cleaned and rings unstuck and unbroken........
 
Looks like a great project for you to do. I have been trying to insert images on another thread but I cannot work out how to do it. Any tips on what to do?
 
Looks like a great project for you to do. I have been trying to insert images on another thread but I cannot work out how to do it. Any tips on what to do?

Pictures have to be under 1000K file size. If they are too big, open in windows, upper right side there will be three dots. Click that and select resize. Slide the bar to a lower percentage and hit save. That should do it. I'm guessing there might be a few different ways, but that's just the way I do it. After that you should be all set.
 
I have an editing/file app called litphoto. I always use my phone...so it's right there, I can check the forum anytime. Once I take my picture, I open litphoto and resize, crop, .....whatever, then it puts the 1000k photo into the file. I can then go back and the "forum photos" are ready to go out for the readers.
 

Attachments

  • Screenshot_20210305-200618.jpg
    Screenshot_20210305-200618.jpg
    63.9 KB · Views: 33
Last edited:
Well i forgot to take some pictures of in progress. But lets see if this one posts. It is coming along nice. Alot of monkey work. Had to silver solder to build up the worn connecting rods, bore then ream to size. Cast red brass. Found a used cylinder at Penns outboard. Rings from Otto's small engine. Have been hitting up the guys on AOMCI for indepth stuff. But most is straight forward. Fuel system is next..
20211119_155653.jpg
 
Last edited:
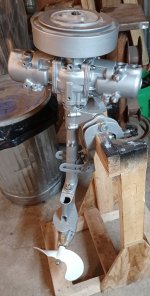
Well I figured that I would type up a quick overview of what took place on this restoration. I had a few pictures, but didn't take any step by step, so I will try to explain the best I can.
Step one was the tear down of this old motor. It was rust seized and ice seized. But after warming it in the garage and some WD-40 the cylinders came off. One jug was in good shape, and a sandblast, honing and fresh paint it was like new. I think the motor let loose because part of the bore was brazed back in place. They did a nice job whomever it was. They other jug had gotten water in it a freeze cracked. Made a call to Penns outboard salvage and they had a good used one.:cool: The old pistons were nice once cleaned up. I found piston rings from a collector salvage guy named Otto, 5/32" x 2 3/8".
 
On to the rods and crank. The rods are a red bronze cast. but are offset. By that I mean the cylinders are inline, but the crank is offset. This I imagine was to keep the motor shorter in height and easier for casting parts, who knows. The issue is that over time the small end of the rod will crack, as one of mine was. Back to Penns, got a crank case with rods for $25.00. One rod good, one cracked. Now to resize the big end. They used shims from factory, so when the rod got sloppy, pull a thin shim and, Vola! back in business. I pulled the shims and reamed the journal. But, was tired and didn't notice that I did not re-bevel the rod for the radius on the crank. Idiot! Well I had some good really old (probly super toxic) silver solder and built them up and got them to about's .005" - .006" slip. Perfect, as this motor runs at 16:1 - 20:1. The crank cleaned up good with some 600 grit and a lathe. The main shaft was rusted in, so a torch and slide hammer freed it up.
Crankcase has bronze bushings in it, they are sorta loose, but within guesstimate reason tolerance. To help the old thing out I modified the case to accept modern seals. To do that I turned down a bar in the lathe that was .0005" larger than the ID of the bushing. Then tapped it on with a rubber hammer and that ensured it was true and centered to bore it out for the seals. Worked like a jiffy! I sand blasted the top end parts and to prime coats and two top coats with Rust-Oleum silver wrinkle paint. Fasteners were all 5/16, 3/8 & 1/2 fine thread, so I made a few orders to McMaster-Carr for stainless acorn nuts to dress it up. Looks sharp now!
 
Mid section was simple and straight forward. Strip down, blast and paint. Until I got to the bent aluminum transom clamp bolts. They were 5/8 thread alright. But not 11-NC or 18-NF. They were 5/8-14 UNS "United National Special" pitch. Hahahahaha, good grief! Well I was able to bend them straight and use a tread file to clean them up. A small Dremel wire brush cleaned the inside threads up.
 
Lower unit now. Fairly easy strip, blast and paint. The water pump is a brass wobbler style, it was worn down so I soldered some brass and turned it on the lathe so it was tight again. On to the cases. I had just enough meat there on the output to bore it for a seal same as the crankcase. The input side had a two piece brass bushing/steel slinger. So this took a bit of work. I had to finagle a nut to the inside of the case, then thread a rod to the nut and used a slide hammer to pull the bushing out. Next I soldered on a chunk of brass to bore out and accept a seal. Bingo! Done! Easy? No. Required? No. But a fun challenge. And now no more water in the gears and same oil all year (if I run it that much).
Propeller was in nice shape, a quick smooth and blasting and was ready for paint. I used white Rust-Oleum appliance epoxy, as the last prop I used normal paint it all came off.
 
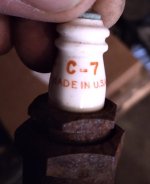
Lightning time. All the parts there were in great shape since 1932! Wires were rotted, but that was easy. Points cleaned up great. It gives a strong 1/2" - 5/8" snap now. It had old two piece Champion plugs which I did get apart and restored. Blasted and Birchwood Casey blued them. Oiled them up and will used them for show as new plugs are cheap to run in it.
Carb is next. I soaked it in acetone and cleaned it spotless. But it needs a new cork in it. I bought a cork. Now just need to cut to size and seal it, then that is done.
Fuel tank was pretty beat up. Steam cleaned it out. Tried to air it up and apply some heat to get the dents out. No Bueno. Used masking tape to guide me with a jig saw. Cut it in half and tapped the dents out. TIG'd it back together. I will give it a RED COAT treatment to the inside to be safe, as the aluminum tank was OXY-Acetylene welded in 1932, and was a porous weld.
Forgot to mention, after each part was blasted clean, I have access to a welding rod oven that stays at 350-400 degrees so I cooked the parts to boil out the gunk. Then they were soaked in acetone for a week.
This motor has a exposed exhaust, kinda cool. Aluminum manifolds and a big stainless collector can to bring it below the water. I will get pictures of that.
That's it for now. Should have it buttoned up in a month or two. Just in time for ice out! It is and interesting way to run it. The carb has one mixture circuit as you tune it per your engine speed. Throttle has 3 positions: "SLOW" "FULL" and "CHOKE". You set your throttle position, adjust your spark timing required then tune your mixture. Alot to do on a windy day! Well should be fun! I will post pictures and video when I can. Thanks for reading.
 
Nice motor, what's your mixture with non oxy? Sounds pretty quiet too. Not too many would take on a project like that and then get positive results. How big is your boat?
 
Nice motor, what's your mixture with non oxy? Sounds pretty quiet too. Not too many would take on a project like that and then get positive results. How big is your boat?

Hey Tim. I am running right now 20:1 Klotz outboard oil (smells good and was whats on hand) with 91 non oxy non ethanol. Once I get the few bugs out of it and it is broke in will switch to Amsoil. This will be the only 2 stroke own. Yes it was a fun project. Having carb float issues. Needle doesn't shut the flow off completely so it will overflow at low speed and engine off. Floods out easy trying to start. Will have to lap the needle and seat. Maybe find a slightly bigger yet more boyant float.
 
Back
Top