Hello to all.
I have a 1979 VP 280 in a 21 ft Glasply which is powered by 350 Chevy Vortec which I built. The boat originally had a 305 Chevy. I have owned the boat for 25 years. The PDS bearings have been done twice by a Tech and about every 3 years I pull the transmission off and have a Tech replace the bearing crosses "universal joint assembly" along with checking everything in the bearing and gearbox (transmission). 4 years ago I did the duo-prop and suggest those thinking about it to do it.
This year I decided to "try" and do it on my own. Through this site I was able to get a copy of the OEM manual for the 280 to 290 (A) drives.
I have read every post I can find in regards to the double bearing box and how to set up for pre-stressing new bearings but I am still unsure about that procedure and a few others.
Hopefully my questions will help others who also need clarification.
I will make an attempt to include pictures.
I will try to describe the order in how I think it all goes together.(so to speak). This will no doubt get long winded.
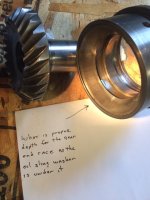
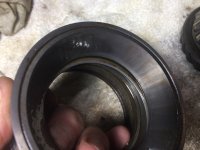
After pressing the 31307 bearing/race onto the main drive gear (input gear) shaft until it bottoms out, Insert oil slinger washer into double bearing box and then press the race for that bearing into the double bearing box until it is flush (or is it suppose to be recessed a certain depth?). I ask as my old race is recessed .017".


For bearing 31307 I ordered a Koyo but they were out and substituted it for a Nachi, any thoughts on that brand?
Press bearing 30207 race in until it bottoms out. Install main drive gear (input gear) into double bearing box and now press 30207 bearing onto shaft end of main drive gear (input gear) while protecting input gear teeth until the bearing makes contact with the race.
With all that, is it the amount of pressure applied to the 30207 bearing that gives us the pre-stress string pull force?
If that is the proper procedure, in order to increase or decrease rolling force it would be necessary to either press the bearing harder or “unpress” it a fraction. Is it correct to say, in order to loosen the tension, the double bearing box will need to be held in place and tap on the shaft end of the input gear to get slack.
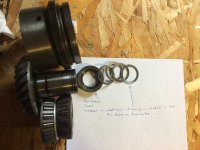
When it comes to the surface seal washer and the correct amount of shims required, (1) are we only trying to fill the space in “B” on page 36 so when the surface seal washer is tightened down we are not adding force (pre tension) or have a gap on the input gear shaft end?
Or (2) are the shims in the surface seal washer the only procedure to get pre-stress?
(3) Install "universal joint assembly", torque Allen-head screw, install bearing seal and then check rolling force with the spring scale.

For new bearing pre-stress on the 280, the OEM manual states on page 35 to use 3.69 to 7.38 lb.ft. Is that correct? I am asking because on page 36 the manual states using 3.69 to 8.11 lb.ft.
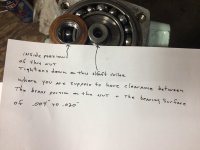
On another question or clarification for the axial shaft left handed nut. In order the get the proper clearance (0.004” to 0.020”) between the copper washer on the nut and the bearing surface, is it the inner portion of the nut that has different lengths that will be mated to the axial shaft (lip) collar that gives us the required clearance?

Here is a helpful thought when trying to remove the race from the input gear shaft. I did not think of this, it was on someone’s Youtube channel which I do not recall.
Using an angle grinder with a cut off wheel, I cut a recessed area large enough on both sides the race ( 180 degrees apart) for the jaws on my “little” 4 inch puller to get a good holding surface. I cut a circle from a piece of steel that covered the end of the input gear shaft so the puller had something to push against. Using a propane torch with a small tip I heated the race a bit and proceeded to pull it up. I tried to only heat the race for it to expand some without getting the input gear shaft warmer than needed. I took my time and it took about 3 heating attempts for it to come off. After the race is lifted some it is possible to reposition the puller so the jaws are under the race.

While I had the bearing box open (transmission) I de-glazed the sliding sleeve.
When it comes to the needle bearings and spacer ring in the driven gear bearings, does it matter what direction they go back in as long as the matched set stay together? As in turning them 180 degrees.
I am replacing the split ring washer as mine was not flat anymore, the bottom gear gets all the use as I have left hand rotation.
A new surface seal washer, axial shaft nut, seals, o-rings and shims for most areas are on the list.
When attempting to replace the seal for the excentric piston shift mechanism the roll pin or spring pin needed to be driven in all the way, remove the excentric piston place pin and then turn the excentric piston upside down and shake the roll pin out. Well whoever did it last did not remove the rol lpin so when I drove mine in it got stuck. Very hard time drilling it out and in the process I will be getting a new position pin and roll pin.
Thanks for any and all help.
I have a 1979 VP 280 in a 21 ft Glasply which is powered by 350 Chevy Vortec which I built. The boat originally had a 305 Chevy. I have owned the boat for 25 years. The PDS bearings have been done twice by a Tech and about every 3 years I pull the transmission off and have a Tech replace the bearing crosses "universal joint assembly" along with checking everything in the bearing and gearbox (transmission). 4 years ago I did the duo-prop and suggest those thinking about it to do it.
This year I decided to "try" and do it on my own. Through this site I was able to get a copy of the OEM manual for the 280 to 290 (A) drives.
I have read every post I can find in regards to the double bearing box and how to set up for pre-stressing new bearings but I am still unsure about that procedure and a few others.
Hopefully my questions will help others who also need clarification.
I will make an attempt to include pictures.
I will try to describe the order in how I think it all goes together.(so to speak). This will no doubt get long winded.
After pressing the 31307 bearing/race onto the main drive gear (input gear) shaft until it bottoms out, Insert oil slinger washer into double bearing box and then press the race for that bearing into the double bearing box until it is flush (or is it suppose to be recessed a certain depth?). I ask as my old race is recessed .017".


For bearing 31307 I ordered a Koyo but they were out and substituted it for a Nachi, any thoughts on that brand?
Press bearing 30207 race in until it bottoms out. Install main drive gear (input gear) into double bearing box and now press 30207 bearing onto shaft end of main drive gear (input gear) while protecting input gear teeth until the bearing makes contact with the race.
With all that, is it the amount of pressure applied to the 30207 bearing that gives us the pre-stress string pull force?
If that is the proper procedure, in order to increase or decrease rolling force it would be necessary to either press the bearing harder or “unpress” it a fraction. Is it correct to say, in order to loosen the tension, the double bearing box will need to be held in place and tap on the shaft end of the input gear to get slack.
When it comes to the surface seal washer and the correct amount of shims required, (1) are we only trying to fill the space in “B” on page 36 so when the surface seal washer is tightened down we are not adding force (pre tension) or have a gap on the input gear shaft end?
Or (2) are the shims in the surface seal washer the only procedure to get pre-stress?
(3) Install "universal joint assembly", torque Allen-head screw, install bearing seal and then check rolling force with the spring scale.

For new bearing pre-stress on the 280, the OEM manual states on page 35 to use 3.69 to 7.38 lb.ft. Is that correct? I am asking because on page 36 the manual states using 3.69 to 8.11 lb.ft.
On another question or clarification for the axial shaft left handed nut. In order the get the proper clearance (0.004” to 0.020”) between the copper washer on the nut and the bearing surface, is it the inner portion of the nut that has different lengths that will be mated to the axial shaft (lip) collar that gives us the required clearance?

Here is a helpful thought when trying to remove the race from the input gear shaft. I did not think of this, it was on someone’s Youtube channel which I do not recall.
Using an angle grinder with a cut off wheel, I cut a recessed area large enough on both sides the race ( 180 degrees apart) for the jaws on my “little” 4 inch puller to get a good holding surface. I cut a circle from a piece of steel that covered the end of the input gear shaft so the puller had something to push against. Using a propane torch with a small tip I heated the race a bit and proceeded to pull it up. I tried to only heat the race for it to expand some without getting the input gear shaft warmer than needed. I took my time and it took about 3 heating attempts for it to come off. After the race is lifted some it is possible to reposition the puller so the jaws are under the race.

While I had the bearing box open (transmission) I de-glazed the sliding sleeve.
When it comes to the needle bearings and spacer ring in the driven gear bearings, does it matter what direction they go back in as long as the matched set stay together? As in turning them 180 degrees.
I am replacing the split ring washer as mine was not flat anymore, the bottom gear gets all the use as I have left hand rotation.
A new surface seal washer, axial shaft nut, seals, o-rings and shims for most areas are on the list.
When attempting to replace the seal for the excentric piston shift mechanism the roll pin or spring pin needed to be driven in all the way, remove the excentric piston place pin and then turn the excentric piston upside down and shake the roll pin out. Well whoever did it last did not remove the rol lpin so when I drove mine in it got stuck. Very hard time drilling it out and in the process I will be getting a new position pin and roll pin.
Thanks for any and all help.

