Logo

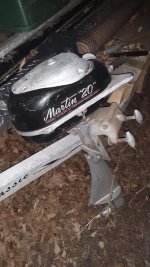
1948 Martin "20" any issues I should know of?

Colezay

Regular Contributor
Hi everyone! I just picked up this Martin "20" along with 4 other outboards for $25!! Is there any common issues with this motor that I should know of before diving in?141668775_466449087848933_1263355598027482821_n.jpg
 
Have one of those Martin motors and larger ones myself.---One of the best built motors at the time.------Cam operated intake valves on Martin motors.
 
No sadly. I just took a dive into the 9.9, complete loss. Multiple wires cut. 90% of the wiring is rigged. Wires for electric start are gone. Main issue being he overheated it since a bag covered the water intake. The head gasket blew and when he went to fix it he snapped a head bolt. When he went to drill out the snapped head bolt he drilled too far in and whatever he hit caused him to lose all compression. Lots more issues, would cost too much to repair and it’s not worth it for me at least.
 
Good for parts, anyway. As for the Martin, they have some good followers. I sell them on eBay. They are, like Racer knows, a good motor. I might have one left here. Let me know if you need any parts. I'm also loaded with Champions and Hiawathas. Sir Racer, what you think about Champions?
 
I had a lot of people trying to buy it from me so I assumed it was pretty good lol. I’d love to paint it but I don’t have the luxuries of a paint booth and the most I could give it is a rattlecan treatment. I don’t mind how it looks anyway!
 
With epoxies you can spray right outside it dries so fast. you can use a rattle can for the base and then use your epoxy base/clear right over it without sanding. This will also protect your decals. I like to use a Nason brand available at most Auto body supply stores. Activate only as much as you need and use it within six to ten hours once mixed in your spray cup. Mix 4 parts clear with 1 part activator. Not sure what you have for an air compressor but spray at regulated pressure of about 30 PSI. Your gun can be cleaned with a gun and equipment cleaner product or just simply use lacquer thinner. I have an old DeVilbiss JGA 502 but newer cheaper guns work pretty darn good as well.
When you get ready to mix your clear, have some other item ready to spray with the clear like a gas can or something that you want to protect. This will use up the last of your activated product. This costs about $100 a gallon, but goes a long long way and lasts for years and years unactivated. Once activated, you can store it in the freezer for maybe 24 hours.....if you need time to prepare another small painting project.
 
Last edited:
The guy who bought all the Martin parts years ago likely has the matching paint / decals.-----Turn it into a $799 motor in no time.
 
The issue is I don't have an air compressor, or anything that you need for a paint sprayer. Also I haven't painted anything in a long time. But from what I understand you're saying I could use a rattle can for the primer and the black and silver paint. But better off using a paint sprayer for the protective coating for the paint? I don't think I trust myself painting this motor. I'm good at getting outboards running, not at painting them.
 
Last edited:
If I were to paint it I wouldn't paint the lower unit since it is already in very good shape. Also, would it be possible just to fill in the marks in the tank and shroud instead if completely painting over it?
 
Yes, one should have some experience and equipment to bring the Martin to reasonable presentation. They are a very good looking motor. I started with rattle cans back when I was about nine years old. Bought factory paint for the old Johnson seahorses back in those days ready to spray from a can. Didn't know about the clear coats then so I just put my decals over that seahorse green and called it finished. Activated epoxy paints were non-existent at that time.....at least for the general public. The beauty of the epoxy clear, that I speak of, is that it will not lift other paints...... it flashes, etches, and dries in minutes. It can be applied over alkyd, acrylic, lawyers, latex, epoxies, ......anything. If there is any blemishes in that clear finish, such as a sag, bug, or dust you can wet sand it after 24 hours and buff it to a mirror finish. Therefore, paint work may be done outdoors in almost any temperature and that is good news for your health. Honestly, I have seen automotive finishes, in particular some Toyota trucks, that have so much Orange Peel I would have sanded down and started over. My neighbor has a black one, he paid 50,000 bucks for it...I gotta laugh to myself when I see it.
 
Last edited:
Yes, you could simply touch up the scratches, being careful not to damage the decals, and then the clear would smooth everything over. This type of touch up takes some experience so it might be hard for you to do. I do it quite often with Mercury's because they are a straight black color. So I am only feathering the scratches by hand with wet or dry paper, then priming only the feathered spots, then touching up with the black rattle can, while saving the decals. Then I lightly buff the entire motor with a medium grit Scotch-Brite and using water. Then cover spray with the epoxy clear. You get dramatic results, without completely covering the original finish with black. The clear also restores luster to the decals. I think that 20 is straight gloss black, right?
 
Last edited:
I got another issue with it. It’s seized but I don’t think it’s the piston that’s seized, 99% sure it’s the lower end. When I put a bit of pressure on the flywheel the piston moves but not the prop. Also when putting pressure on the flywheel it slowly gets harder to turn till it won’t unless you used a lot of force which is what I’m not about to do lol. One issue though, I don’t see how someone would take the lower unit off? Also the lower unit had no oil in it whatsoever, appears to have slowly leaked out overtime since those old seals weren’t always the best. How should I go about taking the lower unit off?
 
Or could I just put some ATF/Acetone mix to let it eat away at whatever is not letting it turn over. When I move the propeller the prop shaft does the same thing, moves a little but I don’t think the piston moves
 
Yes, you could simply touch up the scratches, being careful not to damage the decals, and then the clear would smooth everything over. This type of touch up takes some experience so it might be hard for you to do. I do it quite often with Mercury's because they are a straight black color. So I am only feathering the scratches by hand with wet or dry paper, then priming only the feathered spots, then touching up with the black rattle can, while saving the decals. Then I lightly buff the entire motor with a medium grit Scotch-Brite and using water. Then cover spray with the epoxy clear. You get dramatic results, without completely covering the original finish with black. The clear also restores luster to the decals. I think that 20 is straight gloss black, right?
yes it is straight gloss black. Also, they recommend spraying the 2 part clear coat within 2 hours of applying the last coat, how would I buff it with scotch brite then? Or should the paint be dry enough before 2 hours that I could buff it with the scotch brite pad? What I might just do is rough up all the paint with some sand paper, black gloss automotive paint,primer, 2 part clear coat. Then either keep decals or buy new ones.
 
Last edited:
In applications where the base coat is to be covered with the consideration of self-etching, then the clear coat should be applied within 2 hours of an activated base coat. In the case where you're using a different type of base finish you can let that dry thoroughly and then because of the Scotch-Brite and buffing the paint after it is dried, that allows the activated clear to etch and grab to the finish. The idea is to just let your base cure a bit and then scuff it up allowing the activated clear coat to etch and bond. You can do that at any time then there is no rush. So in other words, the instructions for 2 hours max is when applying to a base clear system. In automotive repair there is no attention given to the activated base coat we just apply the activated clear directly over without touching anything.
If for instance I'm repairing a lower unit on a black Mercury, after the welding is finished and primed then I apply a rattle can alkyd enamel like say Rust-Oleum, then as soon as that's tacked up I apply the base clear Nason.....or similar product. It etches and bonds into the finish making an extremely durable and brilliant result.
 
I"ll probably end up painting it then, defiantly seems more intimidating than it actually is. Before I can paint it though I have to get this engine unseized! Currently the piston moves a little and the prop shaft moves a little but then they both stop moving leading me to believe it's something with the driveshaft. I don't believe these engines even have bearings so I'm thinking the drive shaft rusted to something, not 100% sure though.
 
Honestly, I never tore into a Martin. I think they are well made, Racer or some older techs would know. If you get some acetone and auto trany fluid, mix it 50/50 and put into the cylinder. Try not to get it on the paint.
 
Last edited:
All shafts have bearings of some sort !!---Some shaft have rubber bearings and are lubricated by water.---Just a simple matter of designing for the conditions that exist.
 
When I said bearings I meant like the ball bearings. I know these engines have bushings. I think a part of the drive shaft just corroded and welded itself to a bushing or something.
 
All shafts have bearings of some sort !!---Some shaft have rubber bearings and are lubricated by water.---Just a simple matter of designing for the conditions that exist.
I just popped the lower unit off the Martin, completely seized. Power head is fine though, where should I go from here? Start taking apart the lower unit or just find a replacement?
 
Just set it aside and start on the next motor.----Then perhaps a Martin 20 lower unit will become available next week.
 
Probably too rusty to work with inside. Soak it down inside the case with 50/50 acetone and auto tranny fluid....then set it aside for awhile....couple days. I'll look around my shop for parts too.
 
Last edited:
I didn’t see much rust on the drive shaft in the lower unit. Took a little persuasion to get it off but that’s it. Would it be worth it to just put a wrench on the prop shaft and try getting it to turn over. Can’t break something that’s already broken
 
I don’t have any pictures currently, I’ll have to take them tomorrow as it’s 10° in my unheated garage right now lol. What I’ll probably do is temporarily clog the water drain for the lower unit so I can fill it up with fluid without it draining out everywhere.
 
Putting a wrench & twisting right now is the wrong approach. That is a guaranteed SNAFU.
While you’re looking for a used lower end, soak it like Tim said. BE PATIENT. After a day or two, try turning back/fwd, just a little. If it moves, let it soak some more, repeat.
Sometimes you get lucky, patience is a virtue here, & you’ve got plenty of time while looking for a used part.
Where should I put some pb blaster? I have some in the lower end and I'm thinking about temporarily plugging the water drain for the LU to fill that area up. It does move a little but that could just be some play in between the gears.
 
Back
Top