Logo

Skeg replacement

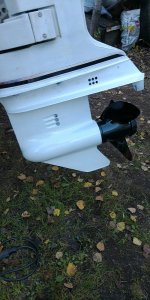
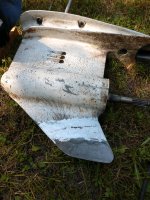
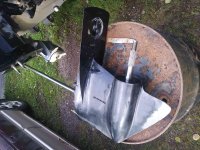
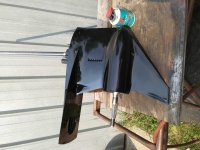
I'm looking for experienced advice regarding the replacement of a broken skeg on a 2020 Yamaha 150 HP outboard. I have seen the clamp over repair skegs but believe this one is broken too close and I prefer to maintain somewhat original appearance.

I have seen weld on skegs where the lower unit is machined and aluminum replacement skeg is welded on. If anyone has experience with these your thoughts will be appreciated. The welding would be performed by a professional, I don't trust my aluminum welding skills. One issue, how far is it recommended to break down the lower unit. I would expect that prop shaft seals and water pump must be removed to protect from welding heat. How far beyond that? Due to the tolerances I am reluctant to break down beyond necessity.

Again, all advice by those who may have done this procedure will be appreciated.
Gerry
 
Never done a Yamaha but a few Mercury lowers. We always stripped them down, usually because they were inspected to ensure the gears/bearings/shafts were serviceable (typically after the impact the shortened the skegs)...so only the housings went to the welder...

when they came back in, they were ground flush, and fared out then painted...then reassembled.
 
Thanks...nothing better than to learn from the experienced. My project is a 2020 Yamaha 150 with I believe only 37 hours total time. Skeg damage was with engine off and no substantial physical damage to prop so at present I'm assuming no internal shaft or bearing issues.Even with low hours, will install new impeller set and prop shaft seals. Beyond that, because I am not comfortable with gear lash adjustments, I would hope not to dis-assemble the entire lower unit. My main worries concern degree of heat within.

Also, being a 2020, does anyone suggest a paint match number for the Yamaha lower unit. Would use automotive probably to repaint after grind/sand/finish?
Gerry


Never done a Yamaha but a few Mercury lowers. We always stripped them down, usually because they were inspected to ensure the gears/bearings/shafts were serviceable (typically after the impact the shortened the skegs)...so only the housings went to the welder...

when they came back in, they were ground flush, and fared out then painted...then reassembled.
 
understand...i would suspect the Yamaha lowers aren't much different than the Mercury ones...the lash shouldn't change is you keep the shims i there original locations and reuse the same bearing assemblies. An exploded parts diagram should tell you where all of the seals are. at a minimum, I'd pull the carrier and invert the unit...i think you are better off doing the disassembly....

on the paint, as long as it is a decent (brand name) paint and your prime it correctly, shouldn't be a problem...
 
Thanks for suggestions...Gerry


understand...i would suspect the Yamaha lowers aren't much different than the Mercury ones...the lash shouldn't change is you keep the shims i there original locations and reuse the same bearing assemblies. An exploded parts diagram should tell you where all of the seals are. at a minimum, I'd pull the carrier and invert the unit...i think you are better off doing the disassembly....

on the paint, as long as it is a decent (brand name) paint and your prime it correctly, shouldn't be a problem...
 
Thanks to all. We don't have the unit in house yet...on it's way but a few days before we physically have it. I've noticed that most of those offering weld on skegs have three models. Short of locating a good unit, then measuring or tracing, any experience on which of the three is best for the Yamaha F150. If necessary we can use the Bridgeport to machine as necessary, planned to do that also to the lower unit to clean the broken remains.
 
I've done a few. Depending on how close the skeg is broken from the gearcase and even the shaft condition....the prop also tells a story. Replacement skegs are often available used and many years will fit and can be ground exact duplicate of original. Method of welding is critical and certainly mig is the way to go. This minimizes heat transfer into the gear area. Mig builds heat fast and with pure argon and proper filling material a tremendous and durable result is obtainable. I use an older Miller 200 with .035 5356, or preferably 4043 filler. Gun is a spoolmatic 30A and I run my pressure around 20 to 25 psi. I use an appropriate primer in a base clear finish, and I get a paint match at the auto parts store using their digital scanner. I finish with a Nason clear coat and the results are often quite better than original finish.....not only in durability, but appearance.
Photo of damage here would be nice....but if skeg is busted close, I might suspect a bent prop shaft......anything over .006 is not good. They can be straightened, however, as you might know. Good luck and hope this helps.
 

Attachments

  • 5798_compress76.jpg
    5798_compress76.jpg
    296.2 KB · Views: 25
  • 5252_compress65.jpg
    5252_compress65.jpg
    680.8 KB · Views: 22
Last edited:
Here is a big Optimax. Shaft was bent to .055....The guy backed into a rock pile. Skeg was bent beyond my repair standards....so I welded on a new one....didn't take apart case, and straightened shaft in place with a trade secret proceedure. This is $1000 repair.

Am I showcasing my work? ......maybe.....but if some hillbilly from nordern Minnesota can produce this kind of work on the top of a 55 gallon drum in front of his pole barn......then a "real" shop should have no excuse.
 

Attachments

  • 0921181618_compress97.jpg
    0921181618_compress97.jpg
    583.2 KB · Views: 35
  • 0924181407_compress38.jpg
    0924181407_compress38.jpg
    403.9 KB · Views: 28
  • Screenshot_20210123-122414_compress72.jpg
    Screenshot_20210123-122414_compress72.jpg
    324.2 KB · Views: 29
Timguy,
Thanks for taking time to reply. All good suggestions. It's pretty much broken entirely off, no more than an inch from prop shaft housing. I haven't done a runout of the prop shaft but it wasn't running when broken. The prop has wear but no broken blades. Hoping shaft will gauge OK but anything out of round would probably induce serious vibrations although I've seem some with missing chunks of prop that surprisingly didn't vibrate to badly. This is a 2019 or possibly 2020 Yamaha F150LB....short of taking a part of motor to paint shop for matching, does anyone have the correct code?

I haven't ordered the weld on replacement skeg but may just order the largest and then cut/machine to original. May trace a neighbor's . Welding, I'm going to hire a pro to weld. I have a 225 MIG and 210 TIG but not great with the TIG yet. Had assumed TIG would be best but you are right regarding minimizing heat. I have used MIG for aluminum, .035 but run through the cable, no gun in inventory. Still...professionals seem best on this. Thanks Gerry
 
Excellent. So skeg busted when trailering? Remember....welding specialty stuff like this is 50 percent welding and 50 percent "artwork". Remember also that the difference between a professional and an amateur......is "knowing what you can safely and virtuously get away with". Repairs are only as good as who's backing them.
 
Thanks....steel with either MIG or TIG I'm OK with. That said, for me there is beauty in aluminum welded with TIG....actually true with TIG and steel I suppose. The friend is a professional welder and something like this is a challenge for me and everyday work for him. I'll just order the replacement skeg, mate it and then leave the welding o him. No trailer accident, it's a 150 HP Yamaha on a 2020 Barletta pontoon that apparently got loose in a slip during a windstorm. I bought it and it only has 12.4 hours total time. A few trim pieces to replace and we are good. Checked the prop shaft run out....not even .001" with dial indicator. My movement when rotating was worse. Now all I need to find is the industry standard color so I can purchase paint. When in business, "pantone"was a standard color reference, apparently there is something similar for automotive finishes. I understand Yamaha is reluctant to provide the number and was hoping someone on this site had it. Gerry
 
The auto paint store can mix an exact match. They will gun your housing and determine the formula. You will need only 1/4 pint to do the entire lower unit. Acceptable primers are available in rattle cans. The base coat needs to be activated with the proper reducer based on temperature. Then activate an epoxy clear. Normally 4 parts clear to 1 part activator. This can be applied after allowing about 15 to 20 minutes set time for base coat. Your finish will be superior to OEM. Don't mix up more than you need...pot life is only about 24 hours in the freezer. When I mix clear coat, I get a couple small items ready to clear with the extra, like a fuel tank, powerhead, or cowling.
 

Attachments

  • IMG_20200805_225720224_compress14.jpg
    IMG_20200805_225720224_compress14.jpg
    255.3 KB · Views: 21
Last edited:
Back
Top