Logo

Hydrolocked in the parkinglot

OK in your image I can see that.

I have done hundreds and rarely replaced the nut or washer. If nut looked or felt bad then yes I would replace it, I dont think I have ever replaced the washer.
It's a good "Practice" but not always needed.

Also there is no real mention of red loctite. Any nut that holds bearings being driven by a heavy load should have loctite........That is also good practice!

also i think he is using descriptions from lower housing referring to label on nut or washer but its been a while since i looked at them. The lower unit has that specific language about the nut (and the washer used should be replaced as it is paper thin and gets mangled).

The nut only goes one way and I think the washer doesn't care

PS: You should be using a Merc Manual and not solely someones write up.

We had one of those guys here.......................he gone now............He didnt have Merc manuals either!
 
Last edited:
Thanks for that I love good practice and things that make sense, common sense. I always get manuals first and read up on things unless not obtainable. For this particular boat I have 3 different ones. But your input on Mercruiser 14 was awesome. That has it derailed the best. It was also weird for me to think the washer had any other usage but to be tightened by the nut, but they also stamp it with NUT and it is supposed to face upwards. That is also weird for a regular washer. But since you have done that many jobs not replacing any of them it's safe to say that should be the norm, no questions asked, especially if you add Loctite to the job. Thanks again for the input. Really great.
I have to tighten the nut a bit more and get to the 8Lb-in.
 
Last edited:
So I did the preload at 8Lb-in
https://www.dropbox.com/sh/mh73k2eofdqyasr/AABhtoJZ2MjM3kUSizdsfXB_a?dl=0
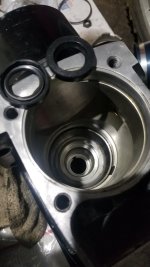
Next it's the seals and I took a picture of how I understand they go(spring side facing outward on either side)
20210325_175109.jpg
The one on the right faces down first and the other opposite direction. Do I need gasket sealant on the edge of the seal or Loctite 680?
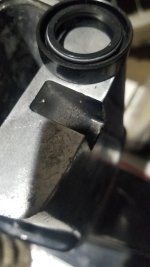
There is another seal in the pack that has a spring on both sides and it's thicker than the 2 above but exact same circumference . Is this for another model or a substitute for the other 2 above?
20210325_175141.jpg
 
Last edited:
MerCruiser Alpha One (Gen. II) 1991-1995 Drive Shaft Housing & Drive Gears Parts (marineengine.com)
At number#13 the O-rings that go on the shaft are all the same(3) in the diagram.
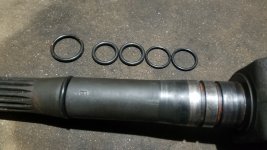
The kit I bought has pairs of different ones different widths and sizes. the large ones and the 2 thicker ones are the same width, 0.139
20210325_190822.jpg
My kit is from the Sierra seal kit 18-2644

The Sierra 18-7420 O-Rings from my kit that measure as per reference number 13 (more info) are the 2 thicker ones with smaller diameter(picture below) and measure ID 0.796 and width 0.139 pack of 5. These are the thicker pair from the picture. The other 2 are the thinner and close to the ID .862 width .103 from Mercury #13 reference(more info) There is another O-ring in the picture that is larger in circumference.

I messaged them and will see but from the info on their site I think the thick one goes up higher on the shaft and the thinner
What the heck is that all about?
 
Last edited:
When I do the rolling torque I use my fingers to lightly support wench and spin slowly all the way around in a constant moving circle. But you have it set so that part is done.

seals, They go back to back, Bottom one which faces lower unit, seal lips face down. Other seal lips face up towards cap. Manual says to use light coating of gear oil in bore before install for both.

As far as which ones to use, Match to what you pulled out. Not sure why you have three

O-rings, Use skinny ones for the two grooves next to U-joints. They support shaft in Gimbal bearing. If you use the fatter ones it will be a BITCH to get thru bearing! (grease the crap out of splines and o-rings) just prior to reinstall of drive.
 
Last edited:
The one seal that is thicker has double lip so spring on both sides. I noticed some of the books show one seal only. Sierra 18-3289 double lip seal
[FONT=&quot]replacement to Mercury part number 18-3289 it's for outboard motors. Why the heck it's in my kit have no clue.[/FONT]
After bottoming the first does the second get pushed all the way into the first or there's a gap?
So I understand that the O-rings next to the U-joints are the 2 thinner ones. As far as the 3rd I assume the thicker is ok as per marineengine.com? It is a bit thicker but I think so is the groove.
As far as the grease I have Quicksilver marine grease 2-4-C w/PTFE, Mercury 2-4-C w/Teflon, Quicksilver High Performance SAE 90 gear lube. And I also have some other marine grease that I got with the 2 stroke jetskis and it's green in color, comes in a grease pump for trailer and other uses. I have some AMSOil Severe Gear SAE 75W-90 Pressure Lubricant. Used to have some other blue marine grease but cannot find it.
I don't have the special lubricant 101, or the Quicksilver engine Coupler Spline Grease.
In the book they mention the 2-4-c w/teflon and quicksilver high performance gearlube
 
Last edited:
When installing seals Mercruiser has SEAL DRIVERS specifically for this task and automatically sets depth.

If you do not have these tools I cannot help you.

This is the problem when one tries to do such work. Why would you purchase the thousands of dollars of special tools REQUIRED to properly rebuild/service an outdrive?

I and many others here spent the money in order to properly service Mercruiser products.

It is not a good idea to suggest WORK AROUND'S unless it is a method to make a job easier. Not a work around for installing parts in a specific location and doing it correctly.

If you had the Merc manuals it would list the special tools needed
 
So I understand that the O-rings next to the U-joints are the 2 thinner ones. As far as the 3rd I assume the thicker is ok as per marineengine.com? It is a bit thicker but I think so is the groove.
As far as the grease I have Quicksilver marine grease 2-4-C w/PTFE, Mercury 2-4-C w/Teflon, Quicksilver High Performance SAE 90 gear lube. And I also have some other marine grease that I got with the 2 stroke jetskis and it's green in color, comes in a grease pump for trailer and other uses. I have some AMSOil Severe Gear SAE 75W-90 Pressure Lubricant. Used to have some other blue marine grease but cannot find it.
I don't have the special lubricant 101, or the Quicksilver engine Coupler Spline Grease.
In the book they mention the 2-4-c w/teflon and quicksilver high performance gearlube

The third O-ring keeps grease in the coupler so the thicker one is correct.

Mercruiser recommends MERCURY HIGH PERFORMANCE GEAR LUBE, Based on my understanding it is one of the best gear lubes available on the market.

Grease is Grease for the most part. I use Marine grade grease as it is far less water soluble so to speak

2-4-C is great stuff Great for splines surfaces.

When it first was released Merc sent out a service bulletin that it was NOT to be used on high speed bearing or U-joints. But now it seams to say it is good for all purposes.

I personally dont use it for U-joints or bearings requiring grease. I use a high grade synthetic marine grease.

But you can use what ever you choose.
 
Book says
2. Assemble the first seal to the long end of the driver tool with the lip (spring) side facingaway from the driver shoulder and press the seal into the bore.
4. Assemble the second seal to the short end of the driver tool with the lip (spring) sidefacing toward the driver shoulder and press the seal into the bore.
6. Completely fill the space between the two seals with 2-4-C Marine Lubricant with Teflonand install the upper driven gear assembly. Do not install the top cover at this time.
That doesn't specify if the seals touch.
Got a response from marineengine and this is the right page for my drive
http://www.marineengine.com/parts/mercury_marine_parts/sn/0K234754/6010000KS/1942_100
 
Last edited:
Mercruiser SEAL DRIVERS automatically sets depth. I for one has never checked "gap".

The seal driver is two sided if I remember, so one side seats the bottom seal and the other side seats the upper seal. Without the tool it is all guess work unless someone has measured the gap for reference
 
I see what you're saying there is a beveled area where I think the driver stops itself. S H I T it means the second seal does not connect to the first and there is a gap so I need the tool MERCURY 91-817570 UPPER DRIVE SHAFT HOUSING SEAL DRIVER
 
Last edited:
So I bought the seal driver tool 817570 do I need the driver rod 91-37323 or I can use some other home made rod to hammer the seal driver?
 
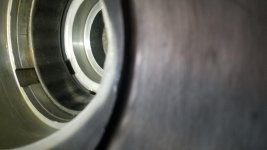
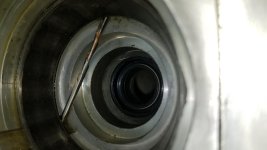
I finally got the tool for the seals, 91-817570 plus rod and something is weird so I have to ask. As far as driving the seals in do I have to remove the bearing cup that is in there? With it in The seals won't go that deep in the shaft. See pics below 16173195869034518081016368146562.jpg
16173196368795612428682120987577.jpg
 
I finally got the tool for the seals, 91-817570 plus rod and something is weird so I have to ask. As far as driving the seals in do I have to remove the bearing cup that is in there? With it in The seals won't go that deep in the shaft. See pics below View attachment 26449
View attachment 26450

The cap is 5/8 width. The measurement of each side of the tool plus 5/8 would be 2 and 3/8 for the long and 2 inches for the short side to the bottom of seal. The total distance to the bottom of the shaft from the top of the cup is 2 and 1/2. The distance between the 2 seals is 1/8.
So I do think the tool has to be used with the cup off to be accurate. By knowing these measutements you can do it without the tool.
If you use the tool with bearing cup installed only one seal will go in. S h i t !!!
All you need is the measurements of the tool plus cup.
Would that be a good assessment?
 
Last edited:
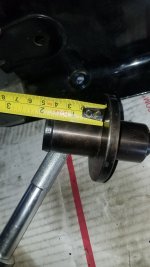
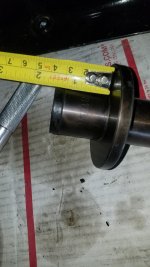
Ok my previous measurements were a little off. You have to measure from bellow the bearing race on the lowest wide lip 1 and 3/4 inch for the first seal and 1 and 3/8 plus 1/16 for the second seal.
That is the measurement of the tool on both sides.
I did not want to take off the bearing race or cup.
In the picture the drill bit is on the lip that you measure from.
16174960193496482777215548356763.jpg
The pictures show the measurements of the tool taken from both ends
20210403_171917.jpg
20210403_171953.jpg
The outer seal goes all the way down and the other is flush with the opening. This is for people that don't want to(or have to) buy the damn tool for nothing.
 
Last edited:
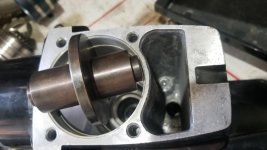
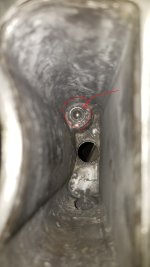
So I wanted to ask if anyone know what that silver ball down in the shaft see picture below?
20210403_184244.jpg
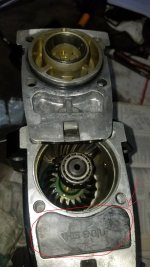
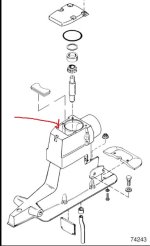
The ball inside there, underneath the Stuffer Plug, doesn't move so before I put the top cover back want to make sure this is not a problem. It's right next to the Upper Driven Gear Assembly compartment.
20210403_184526.jpg
Upper Drive.jpeg
 
Last edited:
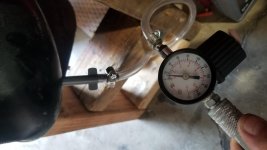
Doing the pressure test for the drive. I set it at 10-12psi and waiting.
View attachment 26496
1 hour no leak

Question,
Do you have that hooked up directly to a compressor or hand pump?

Do you have a shut off valve in line to separate the supplied air from compressor from air in drive if using a compressor?

The objective is to pump drive to ~ 15 psi and shut off air supply if using a compressor a hand pump works like a shut off valve due to a check valve/diaphragm.

Then monitor leak down for 2 minutes or so.

A Alpha drive produces ~ 7-9 psi when running.

Mercruiser as far as I know does not have a spec for pressure testing.

OMC however did. There's was 17-18 psi

I use 15 psi.
 
The air control valve I was using has forward on reverse release and in between completely off. SO I can control the air flow from there.
I installed the drive already yesterday. [FONT=&quot]Today I got the trim switches adjusted. Took me a bit to understand the trim limit one, the sender was easy. I am almost done with the shift cable. Watched 2 videos on it and got the 6 inch and also the part where you check excess slop. And then the adjustment of remote cable is brilliant. The other video didn't show all this.[/FONT]
Mercruiser Alpha Shift cable adjustment - YouTube
[FONT=&quot]I also wanted to ask, I have a fin stabilizer installed. I have read about the flat anode vs anode fin. So it is said that even though boat has power steering it can still benefit from a fin. But I also read about these fins sometimes not having enough clearance with the prop. My prop is stock nothin big. So any advice on this fin anode? Thanks in advance.[/FONT]
Amazon.com : Quicksilver 822777Q1 Aluminum Trim Tab Anode - Mercury or Mariner Outboards and MerCruiser Stern Drives Using High Rake Propellers : Boat Propellers : Sports & Outdoors
 
The Anode you refer to is commonly called a TRIM TAB

The Fin o2batsea is referring to is a "whale Tale" and is mounted on the cavitation plate on outdrive to "aid" in boat planing. It is big and plastic and black in color.

If you are referring to the Anode/trim tab style Flat or extended..........................Based on the year of your boat, I would suggest the extended one.

It does influence steering.
1. Start with the tab facing straight.
2. Lake test boat and when on plane at mid speed cruise loosen grip on steering wheel and see if boat wants to pull right or left.
3. if boat pulls left, loosen tab and turn to left about 15 or so degrees. (the tab bottom end furthest AFT, turn to the left). Retest. If boat stays straight you are done.
4. If boat pulls right loosen tab and turn to right about 15 or so degrees. (the tab bottom end furthest AFT, turn to the right). Retest. If boat stays straight you are done.

Older boats do not always steer straight under load The tab assists but has limitations as to how it works vs speed of boat so you need to decide what speed you want the boat to steer straight with little to no effort on steering wheel.

For example, My boat I have my tab set so at 35-45 mph I literally almost do not have to hold the steering wheel as my boat stays straight. At lower speeds and at full speed I have to control the steering


Newer Alpha Gen II's have a better/improved power steering assist assembly and almost all come with a FLAT anode on drive as the drive does not wander like the Gen I
 
The "wale tail" is not a good thing to use.
It is used on underpowered boats typically.

All boats with outdrives at slow/low speed wander.

If you have a Gen II drive and a properly functioning power steering assist assembly you should only need the FLAT anode.

Mercruiser has released bullitens speaking to the use of "whale tales" as they can cause a boat at higher speeds to become difficult to control. When you turn at higher speeds the boat can actually be much more difficult get back to straight.
 
I have used it for awhile and haven't noticed it at all, it really stabilized the boat remember the first time I used it, a friend recommended it and it was great.
As for the flat anode vs fin, at slow no wake speeds I am all over the place have a hard time keeping straight, always have to go slow, right and center to adjust.
 
Last edited:
At slow speed a extended anode will have no affect. It only would work when at higher speeds.

The higher the drive is trimmed up the worse the wandering will be at slow/idle speeds
 
I have used it for awhile and haven't noticed it at all, it really stabilized the boat remember the first time I used it, a friend recommended it and it was great.
As for the flat anode vs fin, at slow no wake speeds I am all over the place have a hard time keeping straight, always have to go slow, right and center to adjust.

Of course it works great for you.............I assume you have a barge with a tiny engine?

Like a 20 ft boat with a 4 cylinder?


A whales tail overcomes boat power design issues and hull design issues (extra heavy with under powered engine)

My 21 ft 3600lbs dry weight does just fine without a wales tale.
I have driven many boats with them installed. If it has "no" affect on your boat then you do not have much experience with boats that dont need them.........

The difference in steering is night and day
 
Back
Top