Logo

Aq280PT and 290A V8 PDS bearings/u joints.

Welp, I screwed up.

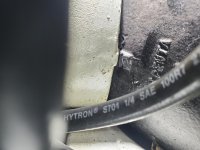
Bellows were replaced last year. U joints done by previous owner maybe 2 years ago. I ran the engine with the outdrive too high. There's a two inch gash in the u joint bellows at the 12 o clock position. I'm guessing from contact with the spinning assembly.

I was on the water today getting everything tuned up and I could hear an odd whirring sound, like water inside of a tube. I had very small amounts of water coming through the flywheel cover as well into the bilge.

Took the boat back home and pushed the upper bellows back, sure enough there's water. UJoints have a lot of surface rust.

I'm guessing I've compromised the PDS bearings, I know I have a 2 PDS style where the engine will probably have to be moved. No PDS replacement history that I'm aware of.

I have two options. Grease the PDS bearings and pray, or replace em.

I would guess the UJoints need to be replaced as well.

Ricardo, I have a few of your PDS write ups book marked, but I might have some other questions.

A couple questions, can I pull the PDS aft just enough to uncouple it from the engine and spin to check for bearing noise and end play? If not, then full replacement I'm assuming.

UJoints replacement...just remove the 4 top bolts and pull the top of the drive, UJoints and all or pull the entire drive?

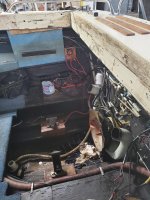
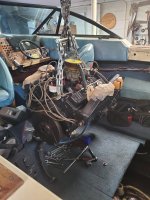
I'll send some pics of the engine compartment, my hope is I can just lift the engine up enough to clear the mounting studs and pull it forward, but I'm not sure how much space I'll need to access the forward seal, clip and bearing.
 
............
Welp, I screwed up.

Bellows were replaced last year. U joints done by previous owner maybe 2 years ago. I ran the engine with the outdrive too high. There's a two inch gash in the u joint bellows at the 12 o clock position. I'm guessing from contact with the spinning assembly.
Where are the grease fittings in the bearing crosses?
They should be in the apex of the cross like shown below.

shopping


If they are in the bearing caps, they will contact and damage the bellows.

I was on the water today getting everything tuned up and I could hear an odd whirring sound, like water inside of a tube. I had very small amounts of water coming through the flywheel cover as well into the bilge.

Took the boat back home and pushed the upper bellows back, sure enough there's water. UJoints have a lot of surface rust.

I'm guessing I've compromised the PDS bearings, I know I have a 2 PDS style where the engine will probably have to be moved. No PDS replacement history that I'm aware of.
If no history, you'd best replace them ASAP.

I have two options. Grease the PDS bearings and pray, or replace em.
No amount of new grease or prayers will resurrect worn bearings.

I would guess the UJoints need to be replaced as well.
Bearing Crosses..... (U-joint [aka universal joint] is the sum of all components).

Ricardo, I have a few of your PDS write ups book marked, but I might have some other questions.

A couple questions, can I pull the PDS aft just enough to uncouple it from the engine and spin to check for bearing noise and end play?
NO!

If not, then full replacement I'm assuming.
Yes!

UJoints replacement...just remove the 4 top bolts and pull the top of the drive, UJoints and all or pull the entire drive?

We seldom remove an entire AQ series drive.
It is much easier to remove the transmission and lower unit separately, and then the Intermediate housing if need be.
Re-assemble in reverse order.


I'll send some pics of the engine compartment, my hope is I can just lift the engine up enough to clear the mounting studs and pull it forward,
I would pull the lag bolts so that the side engine mounts remain attached to the engine.

but I'm not sure how much space I'll need to access the forward seal, clip and bearing.
 
Spicer has apparently discontinued the 5-1306X with the grease fitting in the apex.
However, they still offer the same bearing cross without the grease fitting.

The marine universal joint (considering that it spends most of it's time while steering straight ahead) does not articulate as much as if in a car/truck drive line.
Because of this, it spends most of it's time while undergoing point loading, of which no amount of new grease can save them from.
In other words, they have a finite life span, and I'm not convinced that a grease fitting is absolutely necessary.
By the time you pull it down to grease them, you may as well replace them.


Re; the seals:
Some of these seals have what appears to be a double lip.
Look closely and you will see that one lip is large and one is rather small.
I have always used a Timken or a TCM brand.


Got it!

For the forward seal, rubber cement or any recommended glue to hold it in?

I know to make sure both bearings and the space between them needs to be completely filled before installing the seals. i plan on using the Lucas red n tacky for the bearings.

Looking at your write-ups, it looks like the two bearing PDS pulls out AFT, it's just the forward seal that requires access? I have a weekend set up with an engine hoist.
 
..........
Got it!

For the forward seal, rubber cement or any recommended glue to hold it in?


I know to make sure both bearings and the space between them needs to be completely filled before installing the seals.
Install the PDS with the AFT bearing and small snag ring in place.
Install the FWD bearing and the FWD seal.
Glue or stake the FWD seal so that is cannot become dislodged.

Pump the cavity full of grease while you spin the PDS.
Install the AFT seal ONLY after you see grease exit the ball cage.

i plan on using the Lucas red n tacky for the bearings.

Looking at your write-ups, it looks like the two bearing PDS pulls out AFT, it's just the forward seal that requires access? I have a weekend set up with an engine hoist.
 
Update!

Found a friend of a friend with a rolling hoist in a shop. Got the engine out, PDS replaced per instructions, and got everything back in. Greased before placing the forward seal, and I glued that seal in. The previous seal had blown out and was hanging over the PDS, the aft PDS bearing was not receiving grease, and before I disassembled everything, the bearings sounded awful. I'm very pleased with the results and tackling this job. I suspect this will eliminate much of the droning I was feeling through the hull.

I will be reviewing the triangulation procedure once I have more time, I'll have to loosen up the tap bolts a bit I think. I was unable to remove the lag bolts from the stringers, I suspect they are corroded or might have been glued in for some reason. We sheared off the head of one of them, and stopped. There was enough room in the engine mount bases to predrill the stringer block, and run a new lag bolt. Stringers are dry as a bone, which was great to see for a 40 year old boat.

I didn't move the mounts to the stringers because of our frozen lag bolts, and marked them with a paint pen for position, but I suspect since we had to remove the bolts that held the engine mounts to the block, the alignment is going to be off a bit. The locating pins on the flywheel cover made placing the engine back into position a 10 minute ordeal.

Here are a couple pics!
20200509-164721.jpg

20200509-164719.jpg
 
....................
Update!

Found a friend of a friend with a rolling hoist in a shop. Got the engine out, PDS replaced per instructions, and got everything back in.
Greased before placing the forward seal, and I glued that seal in.
The FWD seal installs first, and yes, it will be either glued or staked in place..... or both.

You want to add the grease while spinning the PDS, before installing the AFT seal.
Please note that the AFT seal installs in the non-conventional direction (lip and tension spring visible).

The previous seal had blown out and was hanging over the PDS,
Yep.... I've seen that many times.

the aft PDS bearing was not receiving grease, and before I disassembled everything, the bearings sounded awful. I'm very pleased with the results and tackling this job. I suspect this will eliminate much of the droning I was feeling through the hull.
Yes, and you will have prevented eventual and catastrophic and expensive damage.

I will be reviewing the triangulation procedure once I have more time, I'll have to loosen up the tap bolts a bit I think. I was unable to remove the lag bolts from the stringers, I suspect they are corroded or might have been glued in for some reason. We sheared off the head of one of them, and stopped. There was enough room in the engine mount bases to predrill the stringer block, and run a new lag bolt. Stringers are dry as a bone, which was great to see for a 40 year old boat.
Yes, good to hear that!

I didn't move the mounts to the stringers because of our frozen lag bolts, and marked them with a paint pen for position, but I suspect since we had to remove the bolts that held the engine mounts to the block, the alignment is going to be off a bit. The locating pins on the flywheel cover made placing the engine back into position a 10 minute ordeal.
If the front elevation of the engine has not changed, you might be OK as is.
You can still check the alignment by taking the triangulation measurements. The main objective is making sure that the rubber cushions are able to do their jobs.


Here are a couple pics!
View attachment 23466

View attachment 23465
 
So I'm back at it today, checking engine alignment after we bolted everything up. I did not touch the six clamping bolts yet. On each alignment tab, they are equally distant, or pretty close, but the engine is rotated to port just slightly, probably less than 1/4" . Loosen the clamping bolts and rotate it or leave it?

20200514-135224.jpg

20200514-135139.jpg


20200514-135123.jpg
 
..........
So I'm back at it today, checking engine alignment after we bolted everything up. I did not touch the six clamping bolts yet.
Those would be the six clamping ring Tap Bolts.
Be very careful loosening them. Often the hex heads are rusted and even a six point socket will slip on them.
I've occasionally had to use a Metric socket driven on to them.


On each alignment tab, they are equally distant, or pretty close, but the engine is rotated to port just slightly, probably less than 1/4" . Loosen the clamping bolts and rotate it or leave it?
You will want the exhaust elbows to align with the Y-pipe inlets. So yes....... I would loosen the Tap Bolts and rotate the engine as needed.

You may also want to pull the six tap bolts and apply a thread sealant to them in order to prevent corrosion.
DO NOT use Automotive Never-Seez.

If the hex heads are compromised, a good Fastener Company can bring in Tap Bolts for you.
These are nothing more than grade #5 3/8" NC galvanized Tap Bolts.
 
RicardoMarine..........[/QUOTE said:
They all broke loose without too much effort. I'm going to replace all six for insurance.

Hopefully last question...

The hex center bolt that holds the bearing cross assembly together feels much tighter than 55 ft lbs. I assume it's a standard rotation? turn left to loosen? I have a 15 inch bar on it and it won't budge. I can throw a 24 on it but I don't want to round it out. I've tried heat as well. I'm guessing there's some threadlocker on it.....Thoughts?
 
Update

I was able to successfully remove the center bolt holding the yoke to the clamping ring. There is some threadlocker from the factory, required a bit of heat to the yoke. I'll clean up the shims and replace the UJoints, o rings and seal. Project is almost done!
 
..................
Update

I was able to successfully remove the center bolt holding the yoke to the clamping ring.
I'm thinking that you meant the bolt the secures the male yoke into the main drive gear.
(SEQ #33 below)

There is some threadlocker from the factory, required a bit of heat to the yoke.
Yes, they can be stubborn at times.

I'll clean up the shims and replace the UJoints, o rings and seal. Project is almost done!
Don't forget to replace the O-ring at the FWD side of the main drive gear sealing washer.
(SEQ #22 here)


Last edited:
Just an update

In some past threads, other users have listed some bearing crosses that are compatible with the Spicer 1306. At least the MOOG 315 G is NOT. The retaining clips for the caps fit, but the assembly is way too tight, even after tapping the tops of the yokes. From what I've found, the 1306 was replaced by the Spicer SPI-5- 789X. I will compare dimensions when they come in tomorrow, but the spec matches the cap diameter and clip spacing of the original 1306

Edit: I moved the 315G to a different part of the yoke assembly, on the engine side, and found that it works fine, but the actual cap height is different from the originals, and I'm going to still go with the Spicers to avoid clearance issues. I might have a slightly bent yoke on the transmission side. When I inspected the original bearing crosses, one of the caps was so rusted it was seized. This caused the yoke ears to rotate around the cap. I'll probably run it this season, and look at replacing the assembly this winter. Anyone with a good condition assembly, let me know!
 
If your universal drive shaft yokes require the internal bearing cross "cap clips", the Spicer 5-1306X will be correct.
This was originally for an early Chrysler automotive application.
Spicer has apparently discontinued this part.

However, some of these are still available.

https://www.google.com/search?bih=6...kgEDNi4xmAEAoAEBqgEHZ3dzLXdpeg&sclient=psy-ab


https://www.ebay.com/sch/i.html?_from=R40&_trksid=m570.l1313&_nkw=spicer+5-1306X&_sacat=0


If you find a bearing cross that does not want to relax once installed, check to see if the yoke has been twisted.
That is not common, but it does happen.


.
 
Last edited:
Thanks for the links. I'm impatient at times, and I found a bearing cross set locally with the right bearing cap height, dimensions identical to the Spicers, made by SKF.

Bearing crosses are in, and not bound up like the first set i purchased. To solve each cap spinning in the female yoke, I put two small spot welds between the cap and machined surface of the yoke on the strong side of the yoke, being careful not to distort the caps. This will be a fix until they come out again.

I kept all shims the same, and everything is back together.

The triangulation went fine, I got each point within .4 mm of each other which I think is within spec!

Thank you for all of the help!!
 
.............
Thanks for the links. I'm impatient at times, and I found a bearing cross set locally with the right bearing cap height, dimensions identical to the Spicers, made by SKF.

Bearing crosses are in, and not bound up like the first set i purchased. To solve each cap spinning in the female yoke, I put two small spot welds between the cap and machined surface of the yoke on the strong side of the yoke, being careful not to distort the caps. This will be a fix until they come out again.
This drive shaft spins engine RPM. I hope that you did not disturb the balancing.
If you ever encounter this again, take a fine point punch and make a circular series of punch marks around the interior of the bearing cap bore.
Better yet, replace any yoke that may have expanded.


I kept all shims the same, and everything is back together.

The triangulation went fine, I got each point within .4 mm of each other which I think is within spec!

Thank you for all of the help!!
You are very welcome!

Now go out and have some trouble-free operation! :)
 
Back
Top