Logo

AQ280-DP PT blockoff plate option?

Walleye4Days

Contributing Member
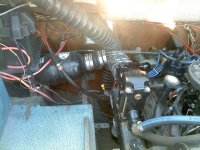
At the end of the season (thanks to Rick and the rest of the guys here!) I got my thru hull exhausts rigged in and going well. I temporarily left the exhaust y-pipe in place to not have to remove the engine a 3rd time and just plugged it with a 3" plumbing plug aft of the transom, and two fernco caps fore of the transom of cut ends the y-pipe themselves. Worked great for the rest of season and well into December.

Now, I'm pulling the engine and have the y-pipe out. But, I'm having trouble deciding how to deal off the stock exhaust hole because of the two exhaust relief holes are right up against curved parts of the transom shield... I have the power trim version AQ280, so it doesn't have just the exhaust port or the exhaust port and single relief. Both reliefs are extremely close the edges where it begins to curve, and the normal blockoff plates just aren't available for it.

Do I have to pay a Tig welder to get in there and weld the plate on, or should I just make my own plate for the aft side and 5200 inbetween, or what is the best approach and option to sealing this off very effectively and without future worry? (I go 15-20miles out on Lake Erie, so definitely don't want to risk any leaking or the corners seeping hear those relief holes because of how thin the sealing margin would be from around the edges first left and right on them). Any advice or suggestions?
 
A picture of the setup right before sealing and installing final screws.

RT4BsDu


Nvm... for some reason, my pictures won't post from mobile.
 
When I went thru huli with my exhaust I left the Y pipe attached to the transom shield but:
1) Cut the "Y"s to about 3" long ( just a handy dimension)
2) Sanded the IDs of the "Y" pipe stubs the last inch or so reasonalby smooth
3) Filled the "Y"s with flexible marine calk up to sanded surface
4) Smeared a thin coat of flexible marine calk over the sanded surface.
5) Bought 2 "Pool plugs" of the correct size and replaced Bolts/nuts with MARINE grade stainless
6) Installed said "Pool Plugs" into "Y" pipes
7) Sanded most of roughness off of the ID ( and O/D) of the exhaust port on the outside of the transom shield
8) Filled "relief ports" with said flexible marine calk
9) Found plug in H/W store that fit exhaust port and installed with coating of flexible calk
10) Found neoprene cap that fit over the plugged external exhaust port and SS band clamped it into place.

..... 12 seasons so far... No issues.... A "Belt and Suspenders" and double stick tape solution...
 
Last edited:
If you were to shorten the Y-pipe, and if that remaining portion corroded through, or if a rubber cap/plug failed below the water line, and if that became the cause of your boat sinking, your insurance company would have an "easy out"!
Many policies do not cover owner neglect, improper parts use or fabrication, improper procedures, etc.

You'll be hard pressed to find an OEM block-off plate for the early 280 PT application.

Suggestion:

Remove the OEM Y-pipe.
Use the Y-pipe mounting surface as a pattern for a properly made block-off plate.
Build this plate from a material of the correct thickness.
Use O-rings similar to like what the OEM used.
Use the 3M 5200 if so inclined.

Take several good pictures of your block-off plate and how it is mounted and sealed.
Hire a marine surveyor to examine your block-off method and to write up his assessment of it.
Send the info to your insurance company and ask for their blessings.

While some insurance policies will cover owner errors (aka "stupid"), I would still take these precautions.


,
 
Last edited:
In order for my boat to sink from Y pipe bock off failure...

1) External easily inspected and replaced neoprene cap would have to fail
AND
2) The sealed plug behind it would need to fail
AND
3) The calk sealing plug in the Y passage would need to fail
AND
4) The neoprene/stainless pool plug would need to fail
OR
The Y pipe stub that is dry in and out and is surface sealed internally with calk would have to corrode.

I'm not worried...

I think I'll have to make a blockoff plate, because my entire exhaust port was corroded as all hell from previous owner painting over anodes. (That's why I went to thru hull exhaust to begin with actually).

But, as of current, I have it kinda fixed up like you did. Used I.D. pipe plug on external exhaust area, and two flexible fernco o.d. pipe caps with SS bands. Did great for thre remainder of the season, but definitely would like a little more piece of mind Haha.
 
If you were to shorten the Y-pipe, and if that remaining portion corroded through, or if a rubber cap/plug failed below the water line, and if that became the cause of your boat sinking, your insurance company would have an "easy out"!
Many policies do not cover owner neglect, improper parts use or fabrication, improper procedures, etc.

You'll be hard pressed to find an OEM block-off plate for the early 280 PT application.

Suggestion:

Remove the OEM Y-pipe.
Use the Y-pipe mounting surface as a pattern for a properly made block-off plate.
Build this plate from a material of the correct thickness.
Use O-rings similar to like what the OEM used.
Use the 3M 5200 if so inclined.

Take several good pictures of your block-off plate and how it is mounted and sealed.
Hire a marine surveyor to examine your block-off method and to write up his assessment of it.
Send the info to your insurance company and ask for their blessings.

While some insurance policies will cover owner errors (aka "stupid"), I would still take these precautions.
,

I think I'm gonna take the blockoff route and make a plate similar to OEM or better. Should the blockoff plate be made to sit on the inside of the transom like three current y-pipe is, or does the blockoff plate need to be made for the outside?

- I'm assuming to use the exhaust surface to make the blockoff plate for the inside.
- 5200 it on the inside, along with 5200 the thru bolt holes and relief holes.
- tighten marine grade stainless bolts gently snug and let 5200 cure.
- then come back and tighten up stainless bolts a little more for a little extra sandwiching effect of the 5200.

Does that sound about right? Or, should I be looking for some type of o-ring and cut recess grooves into the blocking plate to hold them in place and use those for sealing?

I was trying to find some pictures of blockoff plates or installed blockoff plates, but I've done so to no avail unfortunately.
 
.............
I think I'm gonna take the blockoff route and make a plate similar to OEM or better. Should the blockoff plate be made to sit on the inside of the transom like three current y-pipe is, or does the blockoff plate need to be made for the outside?
I would make one for the inside area, and would use the OEM bolt pattern/holes to secure it.
But again.... run this by a surveyor and/or your insurance agent (if you insure this boat).


- I'm assuming to use the exhaust surface to make the blockoff plate for the inside.
- 5200 it on the inside, along with 5200 the thru bolt holes and relief holes.
- tighten marine grade stainless bolts gently snug and let 5200 cure.
- then come back and tighten up stainless bolts a little more for a little extra sandwiching effect of the 5200.

Does that sound about right? Or, should I be looking for some type of o-ring and cut recess grooves into the blocking plate to hold them in place and use those for sealing?
Most all O-rings come to rest within an O-ring grove/recessed area to ensure that they become properly compressed and that they do not slip out.

I was trying to find some pictures of blockoff plates or installed blockoff plates, but I've done so to no avail unfortunately.
I think that you'll be hard pressed to find anything for an older 280 PT drive.
 
.............

Eureka!!! I found a full OEM block off kit from a local boat shop for $100 for the 280 w/dual relief! It's old 'new stock' someone never came to pick up or whatever.

It has 2 rubber plugs/puck looking things for the reliefs, a thick O-ring for the main exhaust hole, and a wide backing plate with 4 bolts. So, looks like I got super lucky. Should I still have an appraiser/insurance check it out afterwards?

Before I found this, I already ordered two new rubber hooks (was going to use the base of those (installed normally) as the "sealers" for the reliefs, and find an o-ring for the exhaust port and just make a plate.

So, if anyone needs any AQ rubber hooks I've got a brand new pair on the way I won't be needing now.
 
Given stated corrosion issues with drive, make sure the "Seating" groove ( and opposite mating surface for the O-ring is in good shape. Normally O rings only need , at most some lube on installation, If there are any pits or voids, I'd consider partially filling the O-ring groove ( or mating surface if corroded) with a flexible when cured sealant. Good find on that blocking plate !!!
Don't forget "flaps" on the external exhaust ports!!!

My thru hull exhaust project was complicated by NJ rules on noise that ended up with having to use mufflers ( shorty fiberglass ones) inside the transom.

BTW... I got an extra 450 RPM at WOT when I went thru transom w/mufflers. The Exhaust passages thru the 200 series drives are woefully too small for 350 CID/ 5.7L engines... The Merc installation manual for the 5.7 MIE ( 260HP w/carb) specifies a MINIMUM of a single 4" dia hole for a single port exhaust, and even the 280s with the dual reliefs are TOO SMALL. I measured the back pressure with my stock 280 drive and thru drive exhaust and it was over 6.5psi....waaaaay above factory limits.
 
Last edited:
Yeah, I went with dual 4" thru hull slashed exhaust (no mufflers yet, because there's literally ZERO room from the elbows to the exhaust tips. But, I do have internal flappers and plan on adding internal baffles before this season.)

I gained SERIOUS top end difference vs before with all the restriction. I had to readjust my rockers to compensate, but definitely much better having the thru hull. The only con is the louder noise at high speeds, but I think the baffles will help a lot with that.
 
I had room for mufflers because Chriscraft used an extended housing that allowed the use of "bob tailed" , i.e.Chris manufactured, engines. For that matter any "Borg Warner" patterned engine, hence my crate 5.7MIE. That expended housing moved the engine several inches forward. My center rise 4" merc elbows go to a 4" to 3" elbow which allows room for a pair of fibergalss mufflers to be oriented parallel and down ward to 90 degree elbows out the transom at the extreme port/starboard ends of the transom, at the recommended distance above the waterline. I had to do some work to relocate the batteries as they used to be on the deck next to the engine.
 

Attachments

  • Port Muffler.jpg
    Port Muffler.jpg
    374.5 KB · Views: 35
  • Lancer_WinterCover_stern.jpg
    Lancer_WinterCover_stern.jpg
    346.6 KB · Views: 28
Last edited:
can try a Fernco rubber cap on the outside but I dont recommend that route, other option is use the existing Y pipe and cap it inside or if necessary have a blockoff plate made
 
Please explain!


.


After straight piping directly out of the engine, we realized the ticking noise we heard previously WASN'T from the exhaust. So, we just adjusted the valves/rockers to get rid of the ticking.

It was a pre-existing lifter tick that we attributed to the other exhaust. So, when the new exhaust was put on we realized it was a lifter this whole time. (Not necessarily anything to do with the exhaust itself as I may've mistakenly worded lol)
 
Yeah Sandkicker, I wish I would've had room to go 90-degrees off the elbow like you did, but unfortunately I had ZERO room for any other option than to just go straight out the back... Which, left me no room for internal muffler. So, I think im gonna just build baffles to slip into the aft side of the exhaust tips. I'd put them in before, but my tips have shutters in them and they're near the front 1/3 of the tips near the engine side.
 
Yeah Sandkicker, I wish I would've had room to go 90-degrees off the elbow like you did, but unfortunately I had ZERO room for any other option than to just go straight out the back... Which, left me no room for internal muffler. So, I think im gonna just build baffles to slip into the aft side of the exhaust tips. I'd put them in before, but my tips have shutters in them and they're near the front 1/3 of the tips near the engine side.

The FIRST time I did a thru hull exhaust on a Chriscraft, it was on the same series hull. I had installed a Chrysler LM318 engine with center rise exhaust manifolds. I reversed the manifolds/elbows ( right to left) and the elbows and had them pointing FORWARD. Then I put in a short stub hose and a 72 degree elbow, DOWN, then hose down to just above the waterline, then a 90 degree elbow aft and hose back. I installed the mufflers directly on the transom UNDER the exhaust manifolds. A pain to change spark plugs, but it worked. Was not able to do that with this particular MERC as there was waaay too much in the way ( remote oil filter mainly) for the forward/down/back route. Back then, I used Salisbury neoprene mufflers.
 
Back
Top